Move Close
Welcome to zx14ninjaform.com!

You are not logged in.
New Topic Reply
Next Page

Page: 1 2 3 4

Previous Page

Thread: Sprocket/Drive Chain Replacement

Created on: 03/24/11 10:03 PM

Replies: 98

Rook


Rook's Gravatar

Joined: 03/28/09

Posts: 20856

RE: Sprocket/Drive Chain Replacement
05/22/16 5:31 PM

I think you would have been fine with just torquing them/spec or ~20% less than spec. The LokTight and lock washer seems a bit overkill but you'll be sure they won't fall out now.

I was going to suggest a dremmel to start a hole for a drill bit but you'd probably need some kind of guide to slide the bit down. Dremmels love to skip all over the place.

I think I would have done the same if I wanted to go with the chain guard. Maybe next time you change the chain you will have another whack at that busted bolt.

Nice sprocket, too! Went with the SuperSprox? Nice choice. Can't wait to see pics of the chain with the whole bike.

Works done! go out and ride!


08 MIDNIGHT SAPPHIRE BLUE ZX-14 Now Deceased, will be resurected 2024 ZX-14R bran friggin NEW!

Link | Top | Bottom

viperkillertt


viperkillertt's Gravatar

Location: Spokane, WA USA

Joined: 04/08/11

Posts: 159

RE: Sprocket/Drive Chain Replacement
05/22/16 5:56 PM

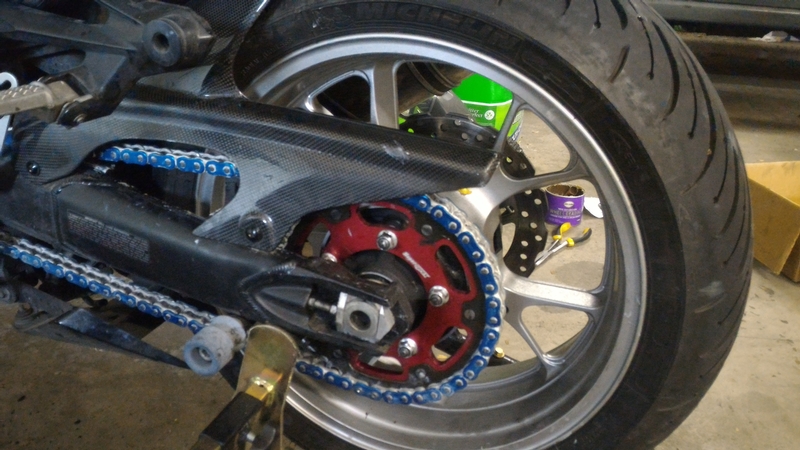
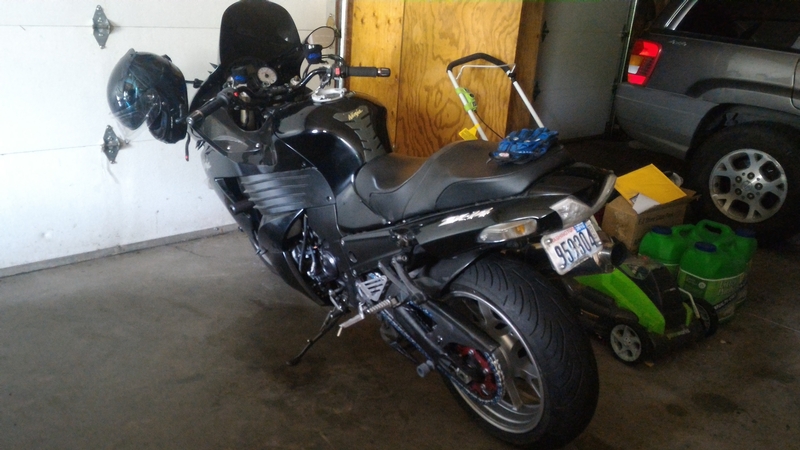
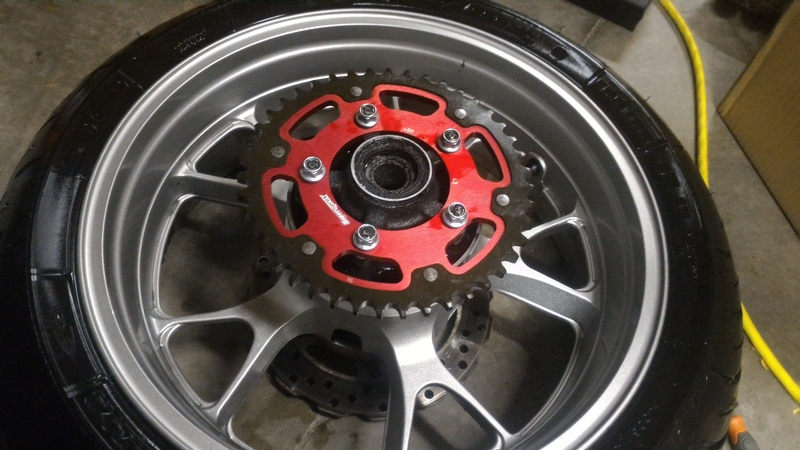
Not the best picture but here she is all buttoned up. So excited to ride. The former sprocket lost about 7 of the 41 teeth last October and I have just been putting the project off, so I have not ridden at all this season :( . My new sprocket is a 43.


I am really proud of the rear wheel. It took about 2 hours of cleaning to get it that shiny. It was just black before.


* Last updated by: viperkillertt on 5/22/2016 @ 6:03 PM *


2007 Black ZX-14, Flies out, Power Commander 3, Broc's 4 into 1 SS Exhaust with Titanium can, Pipercross Air Filter, SpeedoHealer v4, HID Low Beams, Stebel Air Horn, Muzzy Fan, LSL handlebar, Concours seat, front brake SS lines, Buell Ulysses pegs, Carbon Fiber Rear Fender, Throttlemeister Bar ends, and much more.

Link | Top | Bottom

lytnin


lytnin's Gravatar

Location: St. Louis MO

Joined: 02/08/09

Posts: 999

RE: Sprocket/Drive Chain Replacement
05/22/16 8:13 PM

Everybody has their own way of doing chains and sprockets so here is mine. I have a lift and air and I am old and do not enjoys working on the floor anymore. Bike goes on lift then adjust chain as tite as I dare then have some one else hold the rear brake pedal down then attack the countershaft sprocket with my 3/4 in electric impact. I use the electric because it backs out 1 ton lugnutz and if they are tuff it breaks the stud. Sucker has the power. I found out that making the chain tite and rear brake applied that there is no slack that kills impactizm. The nut get all the impact action. Next is pull rear wheel then cut off wheel to take the old chain apart. Cutoff wheels are fast. Countershaft sprocket does not always like to pop off so in that case I put the nut on the end of the countershaft threads then put a cotter key puller behind the sprocket to pry out them tap the nut with a hammer. Sometimes I have to rotate the sprocket and do the hammer tap again. Rear sprocket comes off with the impact but new one get tq'd down by tq wrench. I have a chain tool so pressing back together is not a problem. Rook had good pics of them in work.
Like I said we all have our own ways


2015 FJR1300A 2008 ZX14 2001 ZRX1200

Link | Top | Bottom

Rook


Rook's Gravatar

Joined: 03/28/09

Posts: 20856

RE: Sprocket/Drive Chain Replacement
05/22/16 9:36 PM

Those are great tips, lytnin. 'specially the one about tightening the chain to use the impact. You get older, you do things smarter.

Chain and sprocket looks beautiful, viper.


08 MIDNIGHT SAPPHIRE BLUE ZX-14 Now Deceased, will be resurected 2024 ZX-14R bran friggin NEW!

Link | Top | Bottom

GIXXERCON


GIXXERCON's Gravatar

Location: Nor'east

Joined: 08/20/12

Posts: 5

RE: Sprocket/Drive Chain Replacement
03/23/17 11:04 AM

So Rook, how about the update to this...
Mileage on the sprocket? When it reached the end of its serviceable life did you only replace the rear? Mileage on second sprocket if you did? Pros and cons? Worries?

I have watched this thread from its beginning and always tinkered with the idea of this gearing without ever truly considering it for a stock wheelbase. I had a 43t standard aluminum Vortex on for 21k miles (after 7k miles on the stock chain/front sprocket) and it never felt wrong or gave any questionable feedback... even after losing almost every other tooth I had to look at it to see the damage. When I pull the sprocket in the coming week or so, expect some photos.
As a curious individual and always a sucker for solid deals, I snagged a new EK ZVX3 120 link chain for $112 along with a 45 tooth Vortex in the F5 hardcoat for $24 USD (instead of $60+ for a 43t) both on Amazon.


09 Candy Lime Green - Two Bros full M2 Black edition CF - PCV - Flies out - 17/45 gearing - Dunlop Q3s - DDM HIDs

Link | Top | Bottom

Rook


Rook's Gravatar

Joined: 03/28/09

Posts: 20856

RE: Sprocket/Drive Chain Replacement
05/14/17 9:05 AM

updating


08 MIDNIGHT SAPPHIRE BLUE ZX-14 Now Deceased, will be resurected 2024 ZX-14R bran friggin NEW!

Link | Top | Bottom

Rook


Rook's Gravatar

Joined: 03/28/09

Posts: 20856

RE: Sprocket/Drive Chain Replacement
01/26/20 4:01 PM

Second sprocket and chain replacement 9 years later

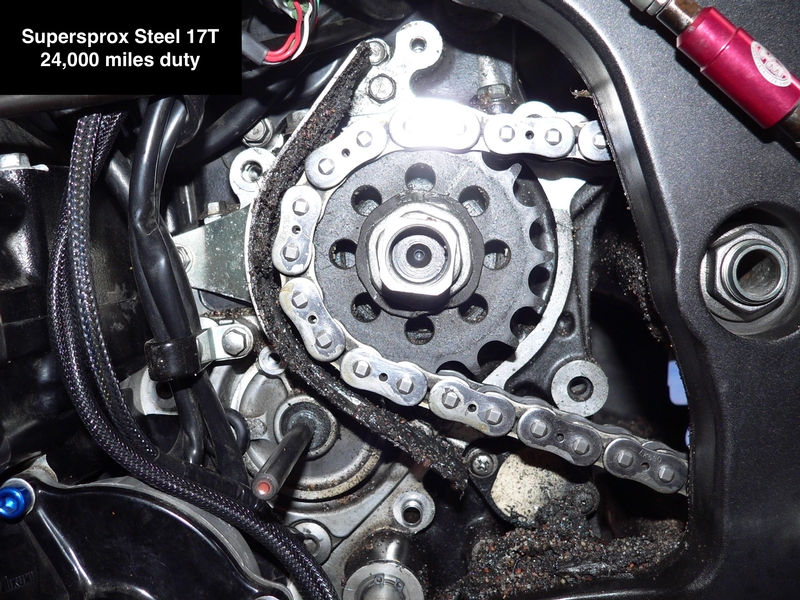
SO here we are three years after my last post on this thread and I'm finally getting around to getting it done. The steel front sprocket gave me 24,000 miles of service and it could go another couple thousand, maybe. I see no need to push it to the point that it might break a tooth though. I have gone through two 45T aluminum rear sprockets with the 17T steel front Supersprox. I have used the EK ZZZ chain for the whole 24,000 miles as well. According to the ZX-14 service manual, the ZZZ is now at the max of the standard range for chain stretch. Unfortunately, I didn't measure the 21 pins before putting it into service. Sure seems like I adjusted that chain hardly at all except for when I changed sprockets. That chain mighta lasted another 25,000, IDK. Or it might have stretched to the service limit in a short time with the new sprockets I'm putting on. I've wanted a gold chain for a long time anyway so I don't mind not having to live with the old chrome one for another 7 years.

The OEM engine sprocket gave me 25,000 miles but that was all with a 41T rear. I'd say the aftermarket steel sprockets last about as good as the OEM sprocket. The aluminum rear sprockets last about half the life of a steel front and the HD chain I got----well it measured out about the same across 21 pins as the OEM chain did after approximately the same number of miles (with just the 41T on there and that probably wears everything less than the 45T I like to use now). According to my math, appears the Z3D chain is a tiny bit heavier than the ZZZ which was about the same weight as the OEM chain. I will have to verify the exact weight of the Z3D after I cut it to size though.

Vortex is the lightest rear I've used. I hear Renthal is lighter yet. I got a Driven this time and it is a bit lighter than the AFAM I last had on there.

Vortex 17T steel front is lighter than the 17T steel Supersprox I will be removing.

Pics on all of this to come.

Looks like time to change.


* Last updated by: Rook on 2/8/2020 @ 4:03 PM *


08 MIDNIGHT SAPPHIRE BLUE ZX-14 Now Deceased, will be resurected 2024 ZX-14R bran friggin NEW!

Link | Top | Bottom

Rook


Rook's Gravatar

Joined: 03/28/09

Posts: 20856

RE: Sprocket/Drive Chain Replacement
02/08/20 4:11 PM

MAJOR ALERT!
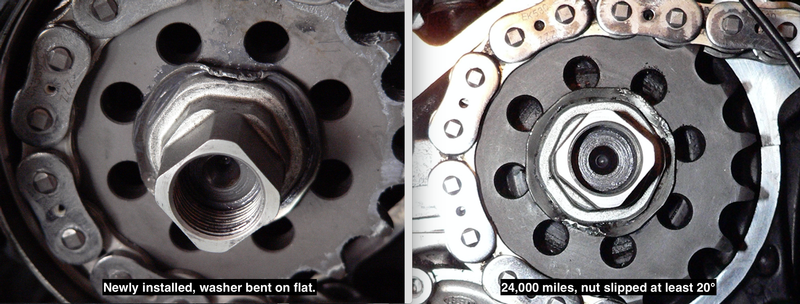
You know that safety retainer washer you bend up to lock the countershaft sprocket nut? Ever wonder if it is necessary? Well it is. I got the washer bent flat, barred the wheel and got the breaker bar on there. The nut spun right loose with no effort at all. I did try the socket fit on there by hand first so the nut wasn't totally loose but I doubt it was even hand tight. The safety washer was what held that thing on.

BS on the notion that the countershaft rotation tends to keep the nut tight. It didn't for me. I did reuse the nut rather than replace...could that have been it? Glad I decided not to skip that washer or I'da been toast at some point in the past 9 years. No damper or steel plate in the sprocket cover either.

USE THE WASHER!

BTW, the old EK chain came off without much trouble. The hollow tipped pins in the master link grind away a lot quicker than a solid rivet. It laughed at a cobalt drill bit though. The master link pin presses out with a chain breaker just like the other links do.

I'll show pics whenever the forum starts letting me upload pics again. No worky at the moment.


* Last updated by: Rook on 2/8/2020 @ 4:15 PM *


08 MIDNIGHT SAPPHIRE BLUE ZX-14 Now Deceased, will be resurected 2024 ZX-14R bran friggin NEW!

Link | Top | Bottom

Rook


Rook's Gravatar

Joined: 03/28/09

Posts: 20856

RE: Sprocket/Drive Chain Replacement
05/16/20 2:22 PM


You can see that the countershaft sprocket nut had the retainer washer bent over one flat when the nut was installed. Some time before it was inspected, the nut appears to have loosened and turned about 20 degrees in spite of the retainer washer. The retainer washer caught on th point of the nut. Who knows how long I rode the bike that way?

I wonder if that was the reason I had the speedometer freak out on me about 10 years ago? I thought that might have been caused by water. Could the engine sprocket slipping cause the speed sensor to go crazy?


08 MIDNIGHT SAPPHIRE BLUE ZX-14 Now Deceased, will be resurected 2024 ZX-14R bran friggin NEW!

Link | Top | Bottom

Grn14


Grn14's Gravatar

Location: Montana

Joined: 02/25/09

Posts: 15511

RE: Sprocket/Drive Chain Replacement
05/16/20 2:41 PM

Wow.That aint good.Glad ya caught that.I normally flat at least two sides of that washer in there.Sometimes 3 sides.Never had one move...yet;)You can flat em all.It won't harm anything.(?)


* Last updated by: Grn14 on 5/16/2020 @ 2:42 PM *

Link | Top | Bottom

Rook


Rook's Gravatar

Joined: 03/28/09

Posts: 20856

RE: Sprocket/Drive Chain Replacement
05/16/20 9:33 PM

I would think you could flatten over as many as you want without causing any problems. Only thing is, it will be more work to remove the washer next time. Also flattening right next to the other might tend to straighten the other back out. Never tried it. I think I will go for every other flat this time. That'll make three sides. I'll be checking it often for a while too. I also only greased the nut this time and I used an oil grease solution as recommended by the SM. Last time I put pure molybdenum all over everything. I'm getting a load cell to make sure I have the correct torque this time too.


08 MIDNIGHT SAPPHIRE BLUE ZX-14 Now Deceased, will be resurected 2024 ZX-14R bran friggin NEW!

Link | Top | Bottom

Rook


Rook's Gravatar

Joined: 03/28/09

Posts: 20856

RE: Sprocket/Drive Chain Replacement
06/12/20 11:25 PM

Got a couple questions as I finish this job up.

What do you do to dispose of old parts? I don't want to hold onto this old chain and sprockets. IDK if they will take it at the city garbage.

Any suggestions on bending that countershaft lock washer over? I pried it up by twisting with a screwdriver about as much as I can. I tried using the claw of a hammer a little but that seemed like it would be kind of brutish. I hate to hammer on on it from the side too much. That's how I did it before using a screwdriver against the washer and tapping on the handle. If there's any way to get that thing mostly bent up before I flatten it against the nut, that would seem better to me.


* Last updated by: Rook on 6/12/2020 @ 11:31 PM *


08 MIDNIGHT SAPPHIRE BLUE ZX-14 Now Deceased, will be resurected 2024 ZX-14R bran friggin NEW!

Link | Top | Bottom

Grn14


Grn14's Gravatar

Location: Montana

Joined: 02/25/09

Posts: 15511

RE: Sprocket/Drive Chain Replacement
06/13/20 2:42 AM

I use a 'chisel' that's about an inch wide.Do it just like you did with the screwdriver just to get it up a bit about 45 degrees,then take a socket extension and use the male end to tap the washer edge up flat against the nut.Works for me.

Link | Top | Bottom

Hub


Hub's Gravatar

Joined: 02/05/09

Posts: 13800

RE: Sprocket/Drive Chain Replacement
06/13/20 11:24 AM

Recycle bin for plastic, paper. It's metal. What are we talking here, a used fold over lock washer, for a better term? It's the last time, so fold every flat over, or a triangle. Take an old screwdriver flat tip and hammer the back between washer and sprocket. Then something fatter and hammer over the flat the full length of the tab. Grn has some other ideas to crush the tabs over and down.

Extend the channel locks and muscle up. Pair of pliers with the widest jaws. Tape speed bump part. No nicks or it may wrinkle a wave length.


* Last updated by: Hub on 6/13/2020 @ 11:27 AM *


Tormenting the motorcycling community one post at a time

Link | Top | Bottom

Rook


Rook's Gravatar

Joined: 03/28/09

Posts: 20856

RE: Sprocket/Drive Chain Replacement
06/13/20 1:47 PM

What are we talking here, a used fold over lock washer, for a better term?

No reuse on the lockwasher. I reused the first one and it almost failed on me. I suspect that was caused by a number of things but if it had anything to do with reusing the washer, that is easily avoided by just using a new one. Could be the the lockwasher looses some crush where it adjoins the nut and that might allow the nut to come loose easier. I used a new lockwasher this time. I will talk about all the factors that that I think might have contributed to that nut coming loose in a future post. To tell you the truth I don't think I was really expecting that washer to ever be necessary. It did hold the nut on but it didn't stop it from coming loose. The nut was hanging by a hair if you look at the pics above.

I use a 'chisel' that's about an inch wide.Do it just like you did with the screwdriver just to get it up a bit about 45 degrees,then take a socket extension and use the male end to tap the washer edge up flat against the nut.Works for me.

Take an old screwdriver flat tip and hammer the back between washer and sprocket. Then something fatter and hammer over the flat the full length of the tab. Grn has some other ideas to crush the tabs over and down.
Extend the channel locks and muscle up. Pair of pliers with the widest jaws. Tape speed bump part. No nicks or it may wrinkle a wave length.

I'm going to try all of those. Thanks fellas. I like the channel locks idea but yeah, better be careful not to gouge the nut or it might interfere with the Gen1 speed sensor.


* Last updated by: Rook on 6/13/2020 @ 2:50 PM *


08 MIDNIGHT SAPPHIRE BLUE ZX-14 Now Deceased, will be resurected 2024 ZX-14R bran friggin NEW!

Link | Top | Bottom

Grn14


Grn14's Gravatar

Location: Montana

Joined: 02/25/09

Posts: 15511

RE: Sprocket/Drive Chain Replacement
06/13/20 2:14 PM

I noticed one thing on your 'before' pic.May be allowing the nut to turn.Your 'flat' with the washer is not creased the full length of the nut flange.The outermost edges are not connecting to the nut.That washer edge should be completely contacting the nut.Not just in the center there.That's one reason I use the extension to bend it for complete mating.I use a longer extension cause there's little room to get a screwdriver to sit right for the folding process.The extension doesn't gouge the washer like your pic shows.Plus I fold at least two edges on that nut.Opposite sides.I also use an electric power wrench.I don't torque it like the book mentions.The gun is set to 125ft/lbs.I run it in then allow the drive to stop holding the gun lightly in my hands.Then I give it one or two additional bursts to set it 'tighter'.But I don't hold it on there cranking it.Never had one loosen OR refuse to come off.


* Last updated by: Grn14 on 6/13/2020 @ 2:19 PM *

Link | Top | Bottom

Grn14


Grn14's Gravatar

Location: Montana

Joined: 02/25/09

Posts: 15511

RE: Sprocket/Drive Chain Replacement
06/13/20 2:26 PM

Hitting it as you did with the screwdriver to fold it up has made that edge weaker(damage to the washer material).You don't want to deform that edge.Once she's folded that becomes a weak spot if trying to reuse.I always use a new one.


* Last updated by: Grn14 on 6/13/2020 @ 2:26 PM *

Link | Top | Bottom

Rook


Rook's Gravatar

Joined: 03/28/09

Posts: 20856

RE: Sprocket/Drive Chain Replacement
06/13/20 3:20 PM

I noticed one thing on your 'before' pic.May be allowing the nut to turn.Your 'flat' with the washer is not creased the full length of the nut flange.The outermost edges are not connecting to the nut.That washer edge should be completely contacting the nut.Not just in the center there.

I just noticed that too and I think that might have been the main reason the nut turned after it came loose. I probably didn't want to do too thorough of a job flattening it against the nut. It is a bit of work to get that thing pushed back down again when you need to change the sprocket. I guess I better worry more about getting it on properly and worry about getting it off when the time comes.

That's one reason I use the extension to bend it for complete mating.I use a longer extension cause there's little room to get a screwdriver to sit right for the folding process.The extension doesn't gouge the washer like your pic shows.Plus I fold at least two edges on that nut.Opposite sides.

Yes, in order to get any tool in there, it has to be a long handled tool inserted from under the swingarm. I will be folding opposite sides this time. The washer's fit to the splines has a little slop in it. If you only fold one side, the washer might slide a millimeter away from the nut or turn a few degrees. If you fold two opposite sides, that locks it in place better.

I also use an electric power wrench.I don't torque it like the book mentions.The gun is set to 125ft/lbs.I run it in then allow the drive to stop holding the gun lightly in my hands.Then I give it one or two additional bursts to set it 'tighter'.But I don't hold it on there cranking it.Never had one loosen OR refuse to come off.

The book says 92.2 ft lb. I gave it that with my cheap torque wrench. Then I checked it with a digital torque adapter set to 92.2 ft lb and the nut didn't move. It's at least 92.2 and if its over-torqued, it's not by much. If there are bearings inside the case, they might be able to get side loaded from too much torque. I'd think they would put a spacer on the bearings to prevent that. I might have under-torqued it last time since people have reported this thing can be difficult to remove. I also used pure grease last time. It should be an oil/molybdenum solution of 10:1 by weight.

Hitting it as you did with the screwdriver to fold it up has made that edge weaker(damage to the washer material).You don't want to deform that edge.Once she's folded that becomes a weak spot if trying to reuse.I always use a new one.

It does get dinged up flattening it with a screwdriver. The edge where the metal folds is what takes the most stress and that's why I'm hesitant to hammer a chisel under there much. Bending 45 degrees might fatigue the metal a bit. Bending it flat again definitely does. I wouldn't bend it in the same place twice. Last time, I used a different portion to bend up. That might have been another problem, the portion I bent up was high in the center and low out at the corners of the nut. As you observed, I only bent the washer tight to the nut at the center of the flat and left those low corners unseated. A lockwasher is cheap. Just use a new one and I think it's a lot better to bend a portion that is parallel to the flat. You know how the washer has flats like the nut has flats? Choose a portion for bending that is parallel to the nut flat.

My 45T rear sprocket must produce more backtorque too and that would tend to loosen the sprocket nut.

That about covers it:
45T rear sprocket exerts higher backtorque on the nut.
Pure molybdenum is too slippery and lubricates potential threading or unthreading of the nut.
I might have under-torqued the nut.
The washer was not bent flat across the whole surface of the nut flat.
The washer was bent at a point where its edge was not parallel to the nut flat.
The washer was reused and was not able to crush.

Those are all my possible reasons that nut came loose.


* Last updated by: Rook on 6/13/2020 @ 3:35 PM *


08 MIDNIGHT SAPPHIRE BLUE ZX-14 Now Deceased, will be resurected 2024 ZX-14R bran friggin NEW!

Link | Top | Bottom

Grn14


Grn14's Gravatar

Location: Montana

Joined: 02/25/09

Posts: 15511

RE: Sprocket/Drive Chain Replacement
06/13/20 10:08 PM

"inserted from under the swingarm."...I've never had to do it that way.Say a 10" extension.That's what I use.Use the chisel(since the blade is much wider than a driver)and tap till the edge lifts up.Keep tapping till it gets to 45 degrees to the vertical.Then finish off with that male end extension(1/2" drive).No problem.Or a 3/8".That'll work also.You shouldn't be needing to go in through the swingarm.I can't even visualize that.I'm sitting on the left side right in front of the sprocket.


* Last updated by: Grn14 on 6/13/2020 @ 10:12 PM *

Link | Top | Bottom

Rook


Rook's Gravatar

Joined: 03/28/09

Posts: 20856

RE: Sprocket/Drive Chain Replacement
06/14/20 1:26 AM

under the swingarm will work with a long screwdriver. I'm going to try a different method this time. I bought a set of pry bars that worked pretty good for bending the washer up but I'll be tapping it against the flat with some other tool. A cold chisel ground to the correct angle might work well


08 MIDNIGHT SAPPHIRE BLUE ZX-14 Now Deceased, will be resurected 2024 ZX-14R bran friggin NEW!

Link | Top | Bottom

Rook


Rook's Gravatar

Joined: 03/28/09

Posts: 20856

RE: Sprocket/Drive Chain Replacement
06/14/20 6:05 PM

I got this now guys. Hammer and a 3/4" cold chisel works great. Finish it off with a 5/8" punch. I don't know if its even necessary to pry the washer's edge up with a flat object. Just be careful with the angle of the chisel and avoid cutting into the washer. I did two opposite sides and the second one, I didn't even pry it up with anything the cold chisel can be used to bend it almost all the way flat to the nut if you want. THe punch is a little more delicate so I like using that rather than pounding the bearings on the output shaft any more than necessary.


* Last updated by: Rook on 6/17/2020 @ 8:07 PM *


08 MIDNIGHT SAPPHIRE BLUE ZX-14 Now Deceased, will be resurected 2024 ZX-14R bran friggin NEW!

Link | Top | Bottom

ominousone


Location:

Twin Cites So Burbs, MN

Joined: 07/19/16

Posts: 218

RE: Sprocket/Drive Chain Replacement
06/21/20 10:16 AM

Is lower fairing removal necessary to get to the countershaft sprocket on my 2016 ZX14R.

Link | Top | Bottom

Rook


Rook's Gravatar

Joined: 03/28/09

Posts: 20856

RE: Sprocket/Drive Chain Replacement
09/03/20 5:12 PM

I don't know ominousone. Mines an 08. I take my lower off but it might not be necessary. It's just a whole lot less trouble to take it off. You will want to hang the cover from some string if you leave the slave on. Otherwise you have the slave off and it's got a C-clip on it hanging there. Might as well get the lower out of the way.


08 MIDNIGHT SAPPHIRE BLUE ZX-14 Now Deceased, will be resurected 2024 ZX-14R bran friggin NEW!

Link | Top | Bottom

Rook


Rook's Gravatar

Joined: 03/28/09

Posts: 20856

RE: Sprocket/Drive Chain Replacement
09/03/20 5:17 PM

I came back to report my my test of the countershaft nut lockwasher. The bike has been ridden 400 miles. I removed the speed sensor from the sprocket cover and looked in the hole with a flashlight to inspect the lockwasher. It's bet over and holding just like I installed it. One screw and you can turn the rear wheel to look all around the washer. I don't think the Gen2 has a speed sensor on the sprocket cover so you'd need to take the whole cover off to check that the washer was holding the nut. I believe the last one I had on there let the nut slip almost as soon as I rode the bike hard so it's probably a good idea to check it after the first ride.


08 MIDNIGHT SAPPHIRE BLUE ZX-14 Now Deceased, will be resurected 2024 ZX-14R bran friggin NEW!

Link | Top | Bottom


Welcome to zx14ninjaform.com!
 
New Topic Reply
Next Page

Page: 1 2 3 4

Previous Page

New Post

Please login to post a response.