


Solo Suspension Tuning
Suspension tuning is something that is best done with the rider and a helper because it is necessary for the rider to sit on the bike to take measurements. The only difference in the solo method is that you will need to follow a few esoteric procedures to arrive at a final number rather than having someone take a single, quick measurement with a tape measure. Use the techniques I describe exactly the same each time you check your suspension to dial it. I think the solo method will get you close to the same results that a helper would.
The most important procedure in suspension tuning is to achieve the proper sag. Proper sag optimizes the height and tension of the suspension which has an effect on all aspects of handling. Sag impacts chassis geometry and if the chassis geometry is wrong, braking, cornering, accelerating, shock absorbing and stability will not be at their best. Sag is the height that the motorcycle rides on its suspension.
Everything seems to have an effect on sag. A few pounds of weight, tilting of the bike, heat in the suspension, an off level floor, the type of stands the bike is supported on all may add up to a difference of a few millimeters in spring compression. Make your tests consistent. Use the same equipment and measure from the same points each time you adjust your suspension. As you get closer to perfecting your suspension settings through measuring, testing and adjusting, a few millimeters of sag might make a big difference to you.
One thing I cannot stress enough is that you write your measurements and adjuster positions down IMMEDIATELY after you take them. Keep records of all of this information for the future. It is inevitable that you will forget these figures if you proceed without recording them and you will become confused and never be sure where the suspension was set before you started fiddling with it. Fortunately, the ZX-14 service manual specs stock settings for the suspension and you will always be able to resort to those if you thought you would remember a setting only to discover you forgot it. Also, I state in this tutorial the settings I have my suspension at. If you are about my size, you can probably just copy my suspension setup with pretty good results.
Lets talk about a shock absorber and the three adjustments of the suspension so we know what we are adjusting.
A shock absorber is two tubes that slide, one inside of the other. The shock absorber is filled with oil and has a spring inside of it. The tubes telescope together against the internal forces of the spring and the oil. The spring is mainly responsible for maintaining the internal pressure while the oil’s job is mainly to control how fast the spring compresses and extends. The spring’s tension can be changed by squeezing it more or less so that it is shorter or longer. If it is squeezed shorter, the spring will be tighter and produce more internal pressure against the shock’s natural tendency to yield to gravity. The amount of tension the spring is set to is called the spring preload because the spring is literally loaded partially before any external forces create a load on it.
The oil in the shock must pass through a reed valve and an orifice(s) as it is compressed by the telescoping effect of the tubes closing. The oil traveling through the orifice slows the compression of the spring so that the shock does not telescope closed abruptly. The size of the orifice the oil travels through can be adjusted so that the oil flow will be restricted more or restricted less. If the pathway for the oil to pass through is restricted more, the shock will compress more slowly. The degree to which the oil is restricted as the shock compresses is called compression damping.
The oil in the shock must pass through a different valve and orifice as the spring opens. The oil flow is restricted when the spring rebounds in the same way as when it compresses. The oil flow can be restricted to a greater amount or a lesser amount depending on how much it is restricted. The amount of restriction placed upon the oil as the shock opens is called rebound damping.
Spring preload, compression damping and rebound damping are the three settings we have to tune for each the front suspension and the rear suspension.
Here are some links where you will find more info about tuning your suspension.
Tune Your ZX-14 Suspension, by 06blue
Worldwide Metric metric conversion calculator
How Does Valving Work, Too Tech Suspension
Special tools
Spanner wrench
A spanner or “hook wrench”, as it is sometimes called will be necessary to adjust the rear preload. Spanners come in different sizes so you will need to verify whatever spanner you select will fit the ZX-14 rear shock preload adjuster nut and locknut. Motion Pro makes a spanner for the ZX-14. You can also order the Kawasaki OEM tool for about $40. The part # for the Kawasaki rear suspension hook wrench is Special Tool - Hook Wrench T=3.2 R37: 57001-1522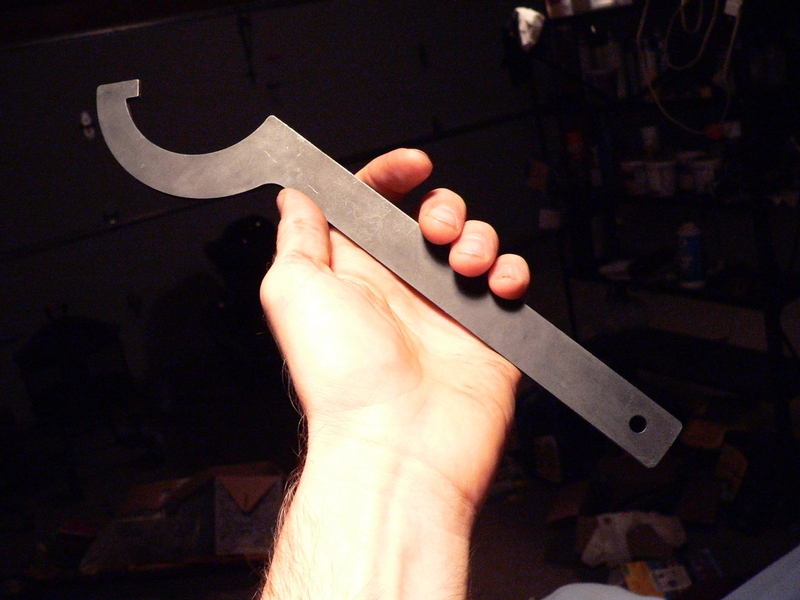
Rear sag test card
You make one of these yourself. Cut a strip of stiff cardboard to approximately 2” x 21”. It must be long enough to reach from the tail subframe to the rear axle. You can place tape across the surface where the pen will mark so that the card can be written on over and over.
Front and rear stands and wheel chock
there are a number of different types of stands suggested in the following steps. You might actually get by without using any of them if you have a helper but for the solo method, you will need all of them unless you can contrive some safe way to fully unload your suspensions and measure it at the same time.
Tools:
swing arm pivot stand or other lift that removes all load from the rear wheel
tape measure
pencil and paper
steering pivot stand or other lift that emoves all load from the front forks
spool stand and fork lift stand or a wheel chock
fine point felt tip marker
tape
3 rubber bands
2 zip ties
Rear sag test card
all gear and equipment carried on the bike
14 mm wrench
teflon pipe thread sealing tape
Sharpie
Spanner wrench straight slot screwdriver
short straight slotted screwdriver
Do First:
Get the suspension hot. Get all your tools and materials ready and then take the bike for a long ride. Come back and get right to work on suspension tuning before the suspension cools off.
Wear all gear and equipment. It’s important to have the same weight on the bike and distributed in the same way when you measure your adjustments as when you are riding the bike. At least have your gear ready to throw over your shoulder and on top of the fuel tank if you don’t want to work in it.
Measuring Sag
1. Raise the bike on a swing arm pivot stand so that the rear shock is fully extended. The method for smaller bikes is to lift the tail by hand until the rear suspension tops out but if you do not have a helper, it would be impossible to do that and take the measurement described in the next step. I also think lifting on the suspension leaves a margin of error where lifting the whole bike is definitely unloading it 100%.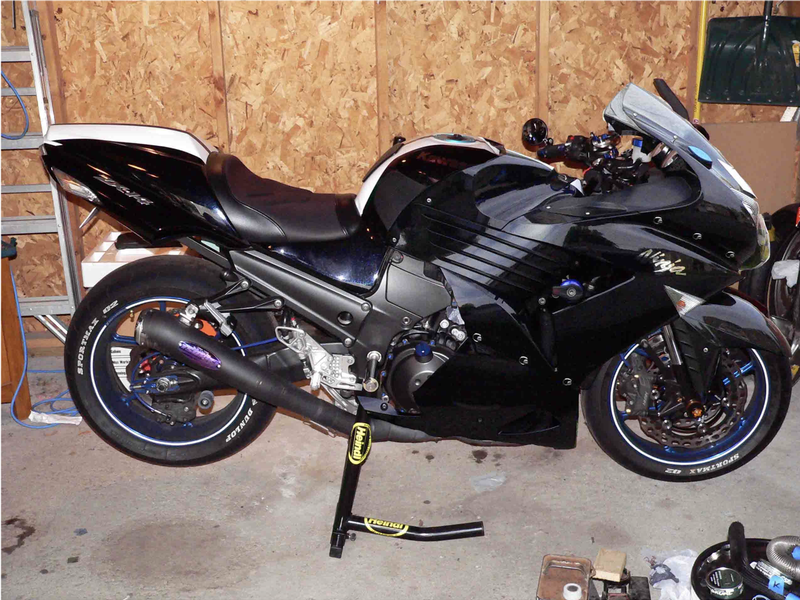
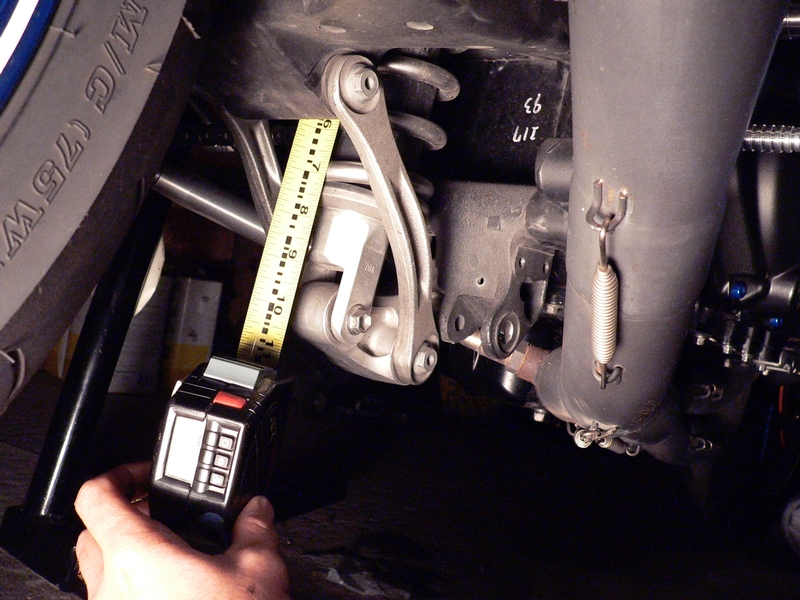
2. Use a tape measure to determine the distance from the center of the rear axle hole to a fixed point on the tail. We will call this the “unloaded sag” for the rear suspension. Write it down.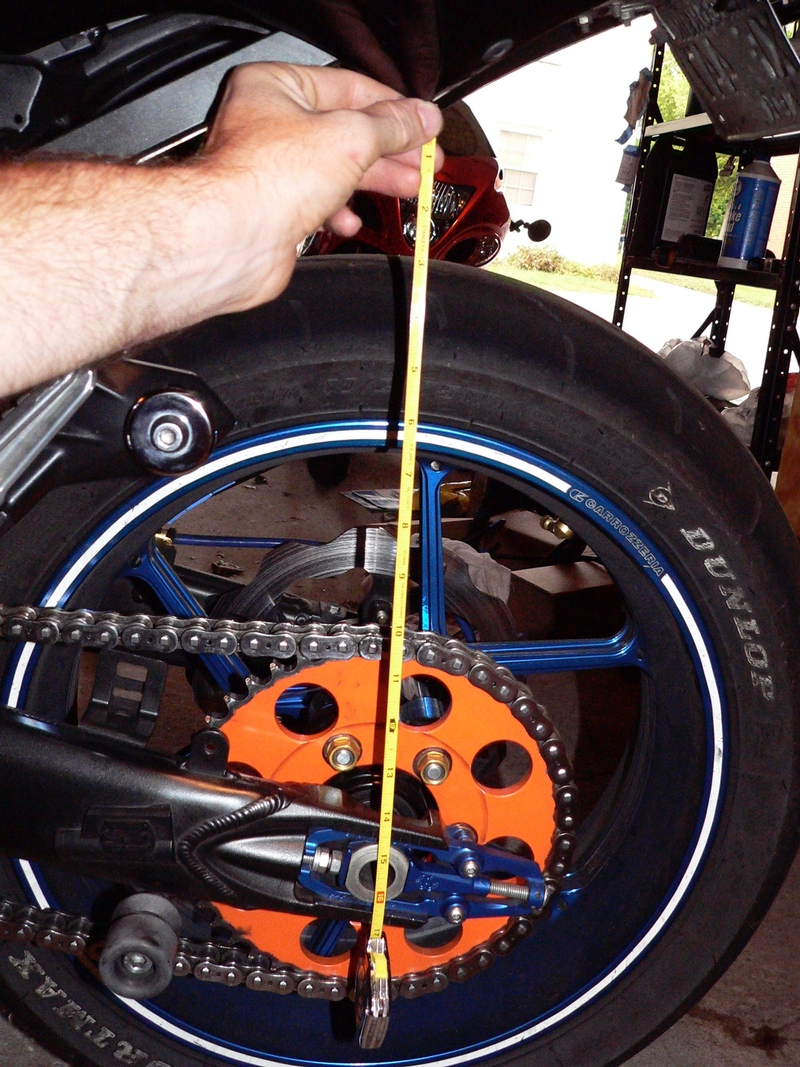
Find the seam between the rear tail fairing and the undertail where the two come to a point directly above the rear axle. It’s an excellent fixed point to take an unloaded sag measurement from.
3. Now lift the front wheel off of the ground with a steering pivot stand so that the forks are fully extended. Instead of using the stand, you may try having a helper lift on the handle bars while you push up on a fork from below to fully extend the suspension. The 14 is probably a bit heavy for this technique.
4. Use your tape measure to to determine the distance between the bottom of the rubber dust boot on the upper fork tube to a fixed point on the lower tube. This is your unloaded sag measurement for the front suspension. Write it down.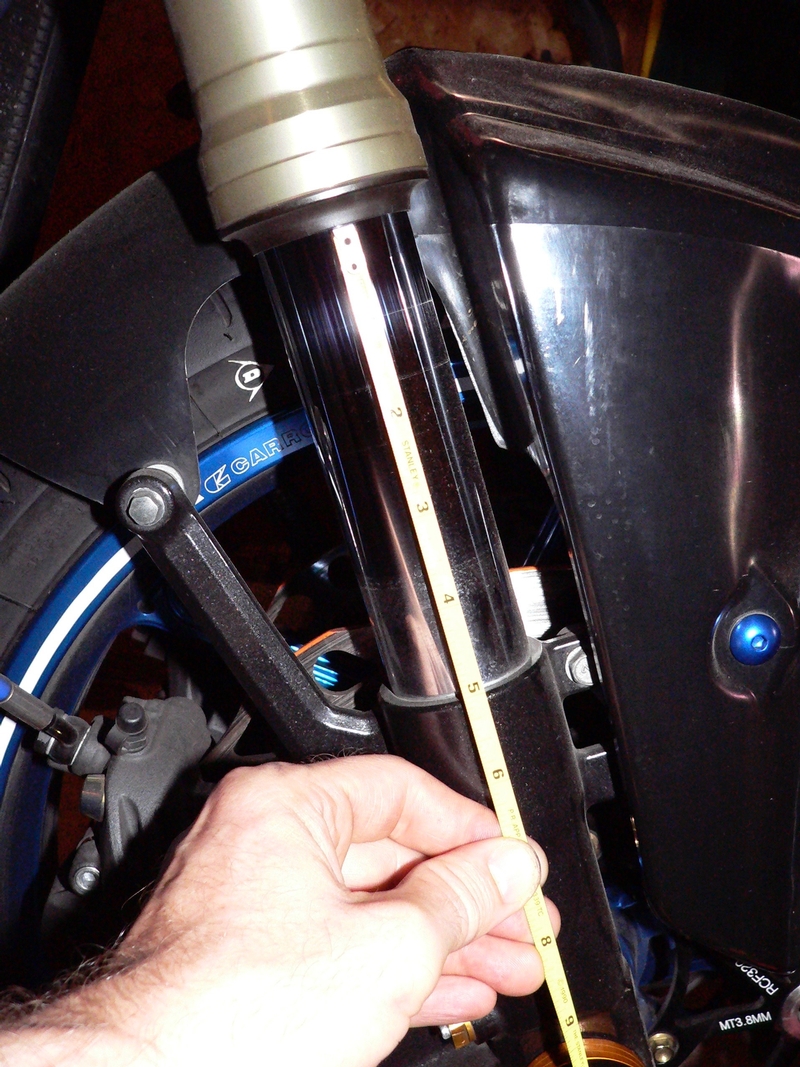
You may use the the front axle hole or any fixed point that you wish but the top of the fork bottom is easy to see.
5. Take the bike off of the swing arm and steering pivot stands stands and make the bike stand vertically with a spool stand and fork lift stand. Make sure the bike is very level front to back. Now the weight of the bike is compressing the suspensions. Compress the suspension, allow it to settle slowly and measure from the same points as you did for the unloaded sag measurement. Do this for both the front and rear suspensions. We will call the measurements with the suspensions compressed by the weight of the bike, "bike sag". Write them down.
Using a spool stand and fork stand causes a path of pressure that is not quite the same as it would be if the bike was standing on its tires. A sturdy wheel chock may be a better choice for holding the bikes weight on its suspension properly.
6. Wrap a fine point felt tip marker with tape so that it will fit snugly in the rear axle hole. Insert the marker into the rear axle. Wrap a rubber band around the swing arm in front and back of the rear axle. Loop one end of each rubber band through its other end like a snare. Pull a third rubber band through the rubber band snares on the swing arm so it is held with a loop on both sides.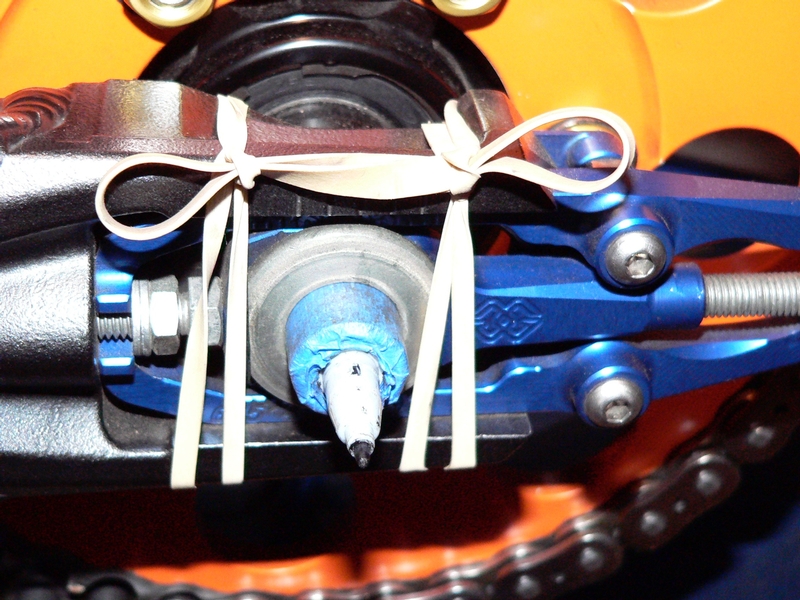
7. Draw a zip tie through the loops. Insert the tongue of the zip tie through the catch backward so that it won’t lock permanently.
8. Slide your test card through the zip tie. Tape the top of the strip to the tail subframe as close as possible to the point on the bike you measured unloaded sag and bike sag from. Tighten the zip tie so that it holds the test card from swaying forward or back but make the zip tie loose enough so that the strip slides through it easily.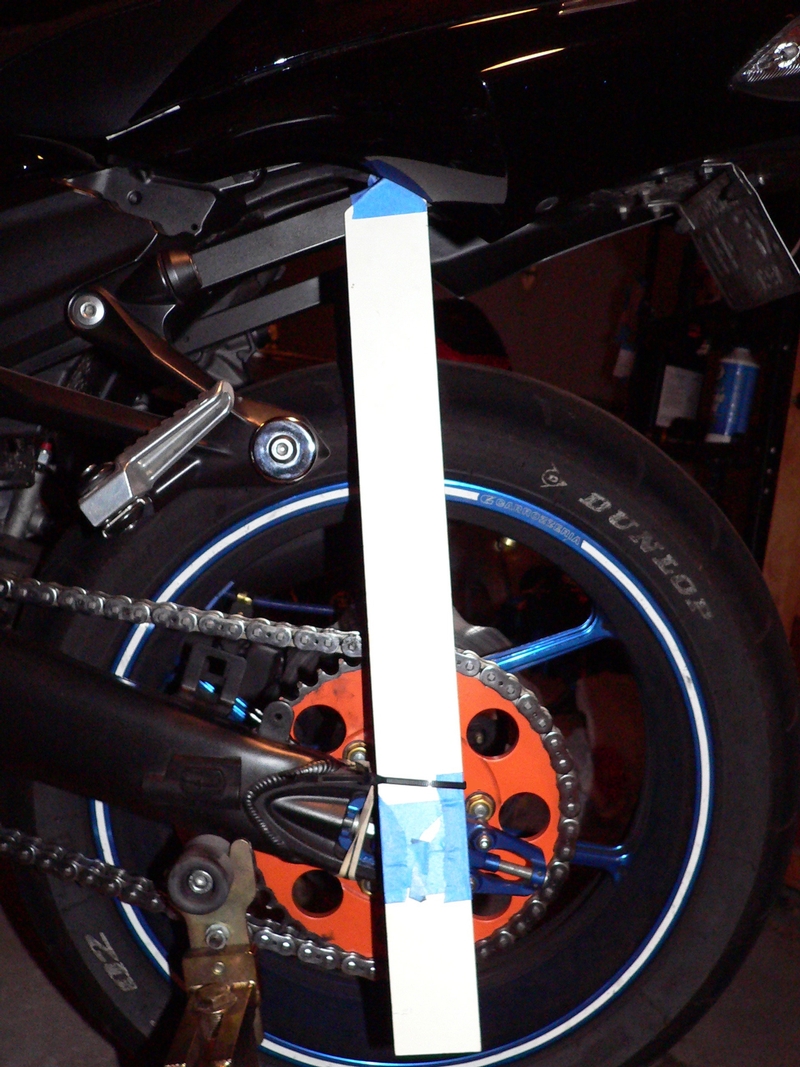
9. Place another zip tie around the lower tube of one front fork. This zip tie should be locked permanently in its catch. The zip tie should be loose enough to slide smoothly on the lower fork tube but tight enough to remain in position. Slide the zip tie all the way up so that it touches the rubber dust seal on the fork.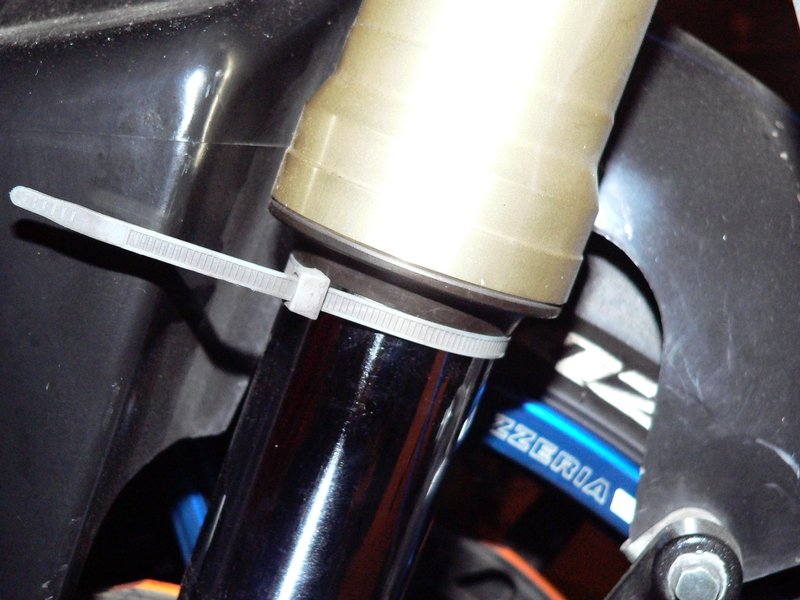
10. Okay, all set. Get your helmet on and climb on the bike as carefully as you can. Place both hands on the grips first and ease your butt down on the seat as straight as possible so that the suspension compresses in one smooth stroke. The one thing you can’t do solo (that you should do if you have a helper as shown in the Dave Moss video)is compress the suspension and let it settle. With the solo method, if the suspension bounces, the marks of the pen and the zip tie on the fork may be off by a couple millimeters or more. Lift your feet up to the pegs slowly, sit very still a moment, Then dismount just as carefully as you got on.
11. Remove the test card and measure the distance the rear suspension was compressed by the weight of the rider and gear as it was marked by the pen. Since the mark on the test card is facing in, you will need to remove the card to measure the height of the line. Subtract this measurement from the rear bike sag measurement you took in step 4 and you have you rear static sag. Write it down.
Go to the front and look at how the zip tie has been pushed down the lower tube by the compression of the fork. Measure the distance form the top of the zip tie to the fixed point you are using on the fork bottom. Subtract this from the front bike sag measurement. This will give you the front static sag. Write it down.
12. Now the math. We are going to establish the distance that the suspensions traveled from full extension with no compression on the suspension to partial compression under the full payload of bike, gear and rider. These are the two numbers we want to arrive at to know what our front and rear sag are.
Below are the measurements I took from my bike. It is a lot lighter than a stock ZX-14. **The bike actually had no fairings on it and had a few engine and frame parts removed when I measured the sag today so the exact figures should serve only as a guide. the suspension was not warmed up. I did not wear any gear. I am 6’ 2” and 190 lbs.
FRONT
unloaded sag: 5 1/8”
minus
static sag: 3 15/16
equals
Front Sag: 1 3/16”
REAR
unloaded sag: 15 1/2”
minus
static sag: 14 11/16”
equals
Rear Sag 13/16”
Convert the fractions to decimals and convert the standard to metric and you have:
Front Sag, 30.16 mm
Rear Sag, 20.64 mm
**If the bike had all fairings and parts on it when I measured today, each sag would be about 10mm longer Checking my maintenance log, I see the sag numbers I had a from couple years ago when the bike was all in one piece and I had all my gear on were 40.48 front and 29.46 rear. Just about perfect.
Sag for street riding should be 35mm to 40mm, front and 30mm to 35mm, rear.
Recheck the sag a couple more times You should get fairly consistent results. If you’re not, you are probable bouncing the suspension when you mount.
Adjusting Spring Preload (and Sag)
Now that you know what your sag is, you can adjust it if necessary. You adjust the sag by changing the spring preload. If your sag number is too high, the preload is too loose and the suspension is softer than it should be. If your sag number is too low, the preload is too tight resulting in a suspension that is too stiff. So what spring preload is right for your sag adjustment? That’s up to you to figure out. Try an adjustment and then repeat the sag measurements described in steps 1-12 to find the result. If you kept track of the number of turns you put on the nut and your spring measurements, you can always go back to exactly where it was. We’ll start with the front forks because they are much simpler to adjust. If one of the sag measurement is effected by adjusting the other, it will be much easier to go back to the front to readjust than the rear.
13. Lift the rear with a spool stand and the front with a fork lift stand so that the suspensions are compressed by the weight of the bike and the bike is level front to back as shown in step 5.
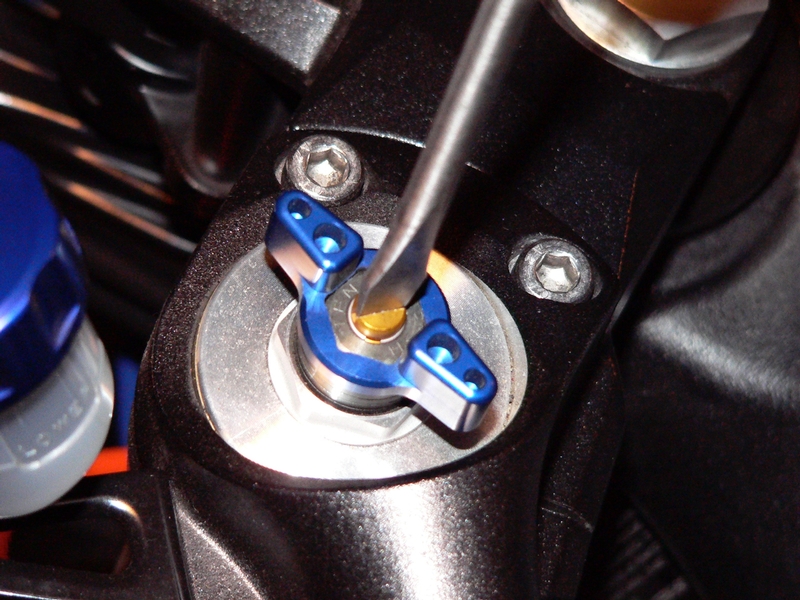
The adjusters for the front preload are the dark grey cylinders that protrude from the fork plugs in the top triple tree. The height of the adjuster is what is used to gauge the setting. There are also lines on the cylinder that can be used for a rough estimate of the height. Measure the height of the adjusters before changing them. This is the front spring preload setting. Write it down.
The service manual gives the following specs for front preload measurement:
Adjuster Protrusion (from top)
Standard: 15 mm (0.59 in.)
Usable Range: 14 ~ 19 mm (0.16 ~ 0.75 in.)
When front preload is at the standard setting, the preload adjusters will be 15 mm in height from the top of the hex on the preload adjuster to the fork plug. The adjuster height may be changed to anywhere from 4 mm ~ 19 mm. I presume any adjustment outside of that range will not cause additional damping force. 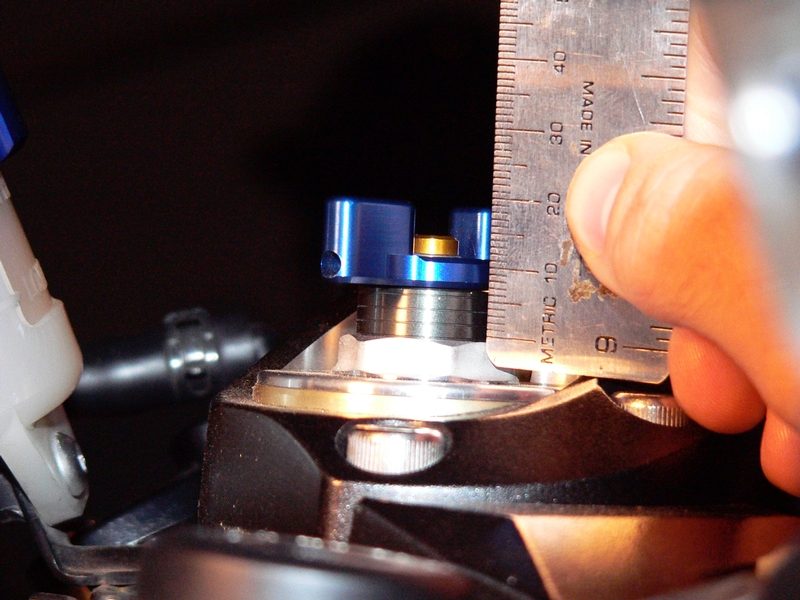
The service manual indicates that hex at the top of the adjuster is to be included in measuring the height of the preload adjusters. I have aftermarket adjuster knobs on my preload adjusters and the top of the nob is flush with the top of the hex. This makes measuring the preload adjustment easy and accurate.
As you can see, my front preload adjusters have been set so that the 4th line is even with the silver fork plug. This is just under 12 mm in height with the hex on top of the adjuster included.
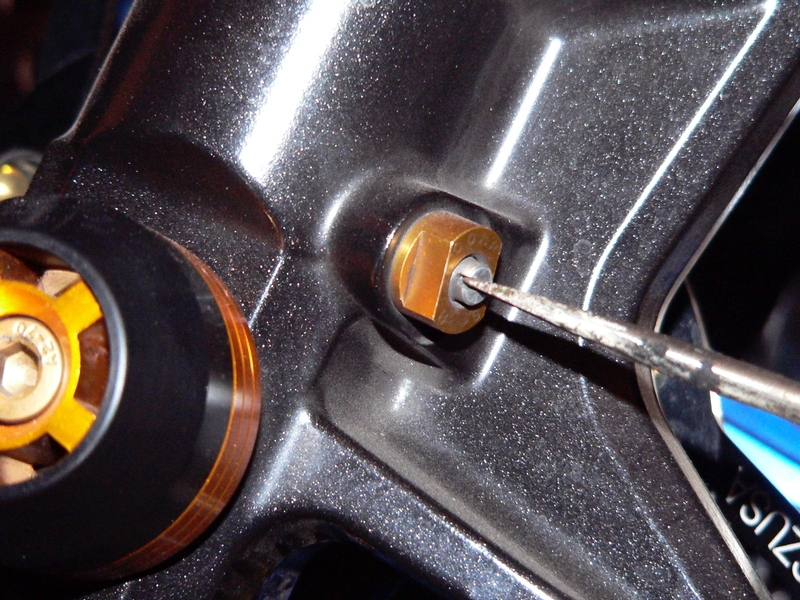
14. Use a 14 mm wrench turn the front preload adjuster counterclockwise to make the fork spring longer (adjusting for sag that is too small and a suspension that is too stiff). Turn the front preload adjuster clockwise to make the fork spring shorter (to adjust for sag that is too large and a suspension that is too soft). Measure to make sure both adjusters are set at exactly the same height after the front preload is changed. Write it down.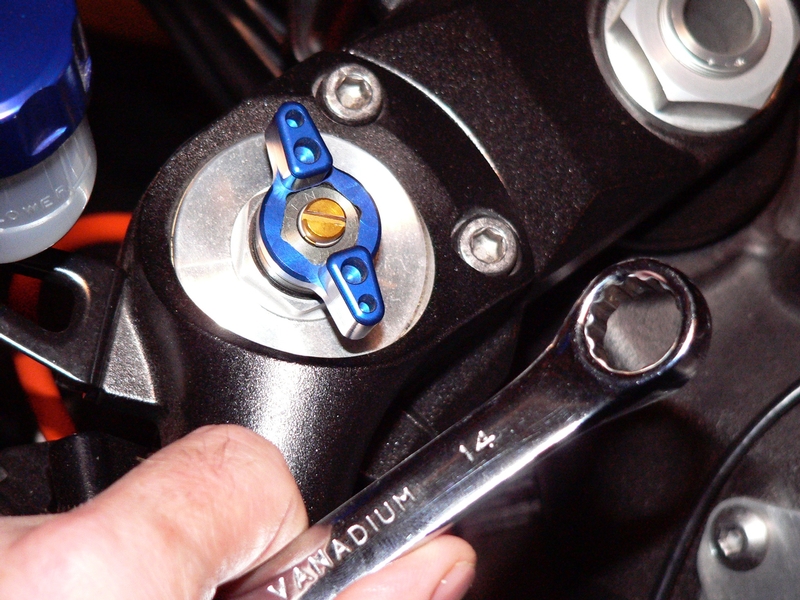
If you have preload adjuster knobs, you can just turn them to adjust preload. Use teflon pipe thread sealing tape to protect the finish on the front preload adjusters if you use a wrench.
15. Compress the front suspension and let it settle slowly. Measure the front static sag (see steps 9-12 of this tutorial) and take note of the change in front sag. Redo steps 14 and 15 if the proper front static sag was not achieved.
16. Lift the rear of the bike on a swing arm pivot stand so that the rear suspension is fully extended like in step 1. Use a tape measure to find the length of the rear shock spring
Measured from the top of the spring to the bottom of the spring. This is the rear shock spring preload setting. Write it down.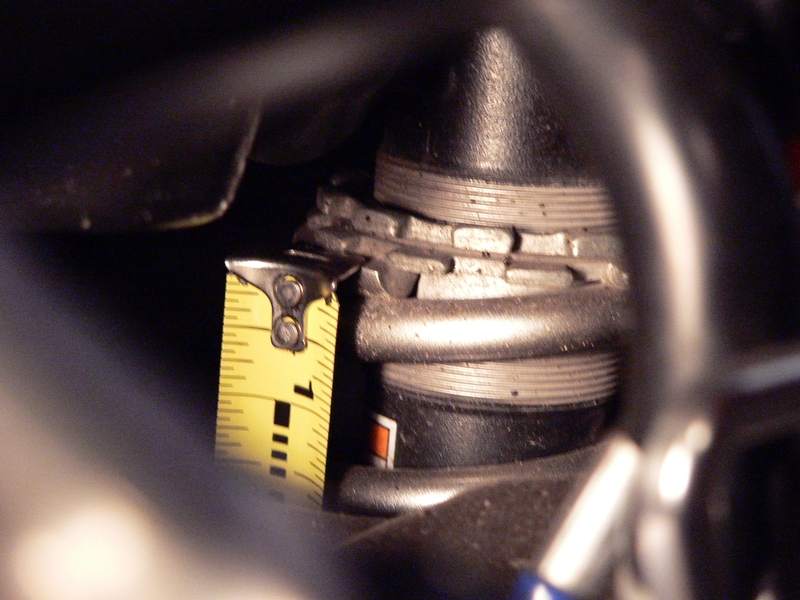
17. ZX-14 service manual:
Spring Preload Setting Standard: Spring length 175.5 mm (6.9 in.)
Usable Range: Spring length 175.5 ? 191.5 mm (6.909 ? 7.539 in.)
The standard rear shock spring length is 175.5 mm. The spring may be adjusted anywhere between 175.5 mm ~ 191.5 mm. The standard spring length is as tight as the shock can be made which is probably good for two up riding but too stiff for some of us riding solo.
18. Remove the chain guard so that you can reach the shock with a wrench and turn it. It may be necessary to remove the left heel guard also.
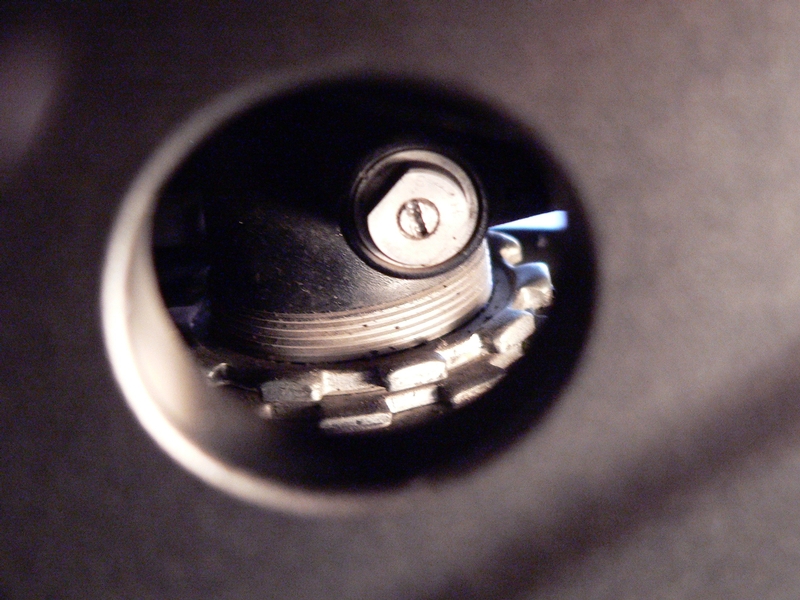
19. Mark one of the castles on the rear shock preload adjuster nut (the bottom
castellated nut) with a Sharpie so that you will know where it was positioned before adjusting. Also so that you can count the number of turns the nut makes when you adjust the preload. It is very important to mark the nut. Don’t skip this. Mark it good on top and edge because the ink is likely to rub off when you use the spanner wrench on it. 
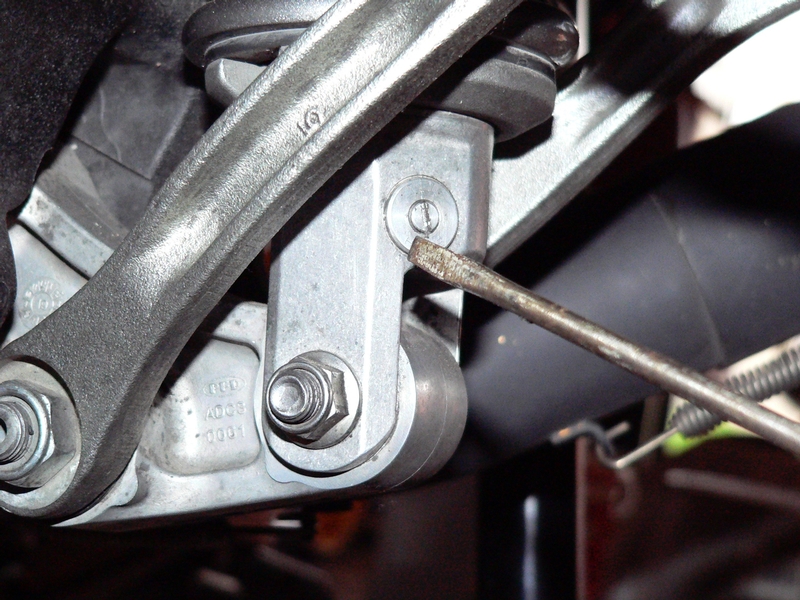
20. Place the hook on the spanner wrench between two castellations and place the inner curved edge of the spanner so it contacts the outer edge of the rear preload adjuster locknut. (the top castellated nut). Turn counter clockwise (looking from above) to loosen the lock nut. Take note of how tight the locknut was so you have an idea of how much to tighten it after the adjustment is done.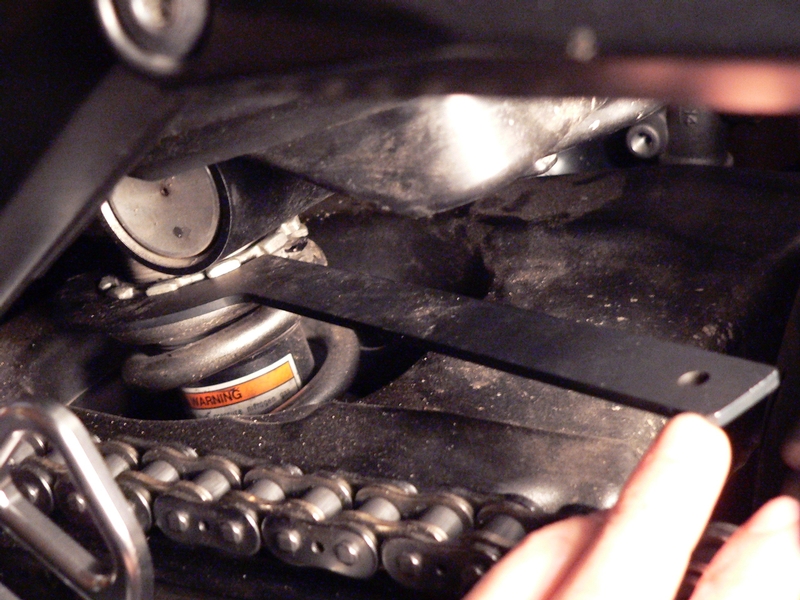

The spanner wrench has a hook on the tip that fits between any two castellations on the rear preload adjuster locknut or rear preload adjuster nut.
Now the rear preload adjuster nut can be turned in the same manner. Turn the rear preload adjuster nut counterclockwise (looking from above) to make the rear shock spring longer (to adjust for sag that is too small and a suspension that is too stiff). Turn the rear preload adjuster nut clockwise to make the rear shock spring shorter (to adjust for sag that is too large and a suspension that is too soft).
MAKE SURE THAT YOU KEEP VERY CLOSE TRACK OF THE NUMBER OR TURNS, HALF TURN, QUARTER TURN, ETC!!!! REALLY, I’M NOT KIDDING. WRITE IT DOWN AS YOU ARE LAYING ON THE GARAGE FLOOR WORKING.
What I have indicated in my maintenance log is that each 360° turn of the adjuster nut results in approximately a 3.5 mm increase/decrease in loaded sag. I turned my rear preload adjuster nut 4 complete revolutions from where it was set when brand new. My rear shock spring with no load now measures 7 1/8 inch in length.
21. Don’t tighten the rear preload adjuster locknut just yet. Hate to tell you but the front sag may have been effected by the adjustment you made to the rear preload. Measure both front and rear sag again (as shown in steps 1-12) and adjust the front (as shown in steps 13-15) or both front and rear (as shown in steps 13-20) if necessary.
22. Tighten the rear preload adjuster locknut and remove the pen, rubber bands and zip ties from the swing arm and fork.
* Last updated by: Rook on 8/15/2019 @ 12:06 PM *