


How To Calibrate Torque Wrenches
It’s a good idea to check the calibration of a torque wrench when brand new especially if it is an inexpensive one. Testing torque wrenches for accuracy should also be done periodically because the spring can get compressed from repeated use or storing the torque wrench with it set at higher than the lowest setting. A 3%~4% tolerance in torque value is acceptable. More expensive torque wrenches should be accurate over a wider range of their torque value settings than cheaper torque wrenches.
You can use this tutorial to test the accuracy of any torque wrench whether it is a clicker or an old fashioned flex beam torque wrench. Keeping a record of tested torque values will provide helpful reference for future use of the tool.
It is possible to adjust the spring of a clicker torque wrench so that it clicks easier or harder across the entire scale. A beam torque wrench cannot have its spring adjusted but the scale can be remarked to reflect accurate torque values.
The video below describes how to test and adjust the calibration of a clicker torque wrench. It does not recommend doing the adjustment yourself.
Tools:
5” to 6” long hex head bolt
bench vice
torque wrench
socket
masking tape
tape measure
marking pen
objects to create weight
accurate scale Weigh the torque wrench , wire etc
Inch Pound Clicker Wrenches
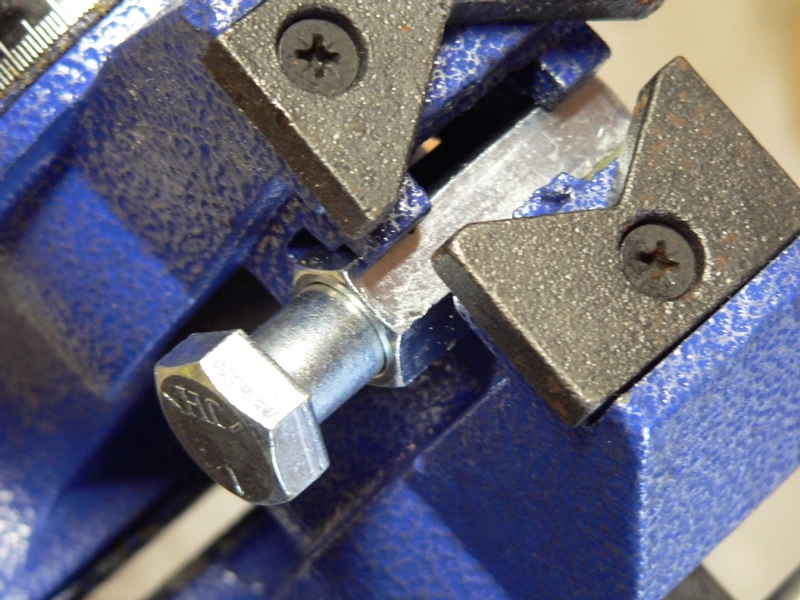
For testing light torque values, place a 5” to 6” long hex head bolt in a bench vice. It is important that you use a bolt that is about as long as the width of jaws of your vice or the bolt will slip. It does not matter exactly what thread diameter the bolt is as long as the torque wrench you intend to test can be fitted with a socket that fits the head of the bolt. If you are going to test torque values greater than 12 ft lbs, you should use a shorter bolt tightened into a coupling nut held in a pipe vice as shown in the Foot Pound section which follows step 10.
Situate the bolt head on the LH side of the vice as you face the vice screw handle.
1. Set the torque wrench so that it indicates a middle torque value on the scale.
If it is a ratcheting torque wrench, set the ratchet pawl so that it locks at clockwise rotation.
2. Place a socket on the torque wrench that matches the size of the bolt head.
Place the socket on the bolt so the handle of the torque wrench points straight out toward you as you face the vice screw handle.
3. Wrap a piece of masking tape around the torque wrench handle. Use a tape measure and marking pen to make a lever mark eight to ten inches from the center of the square drive.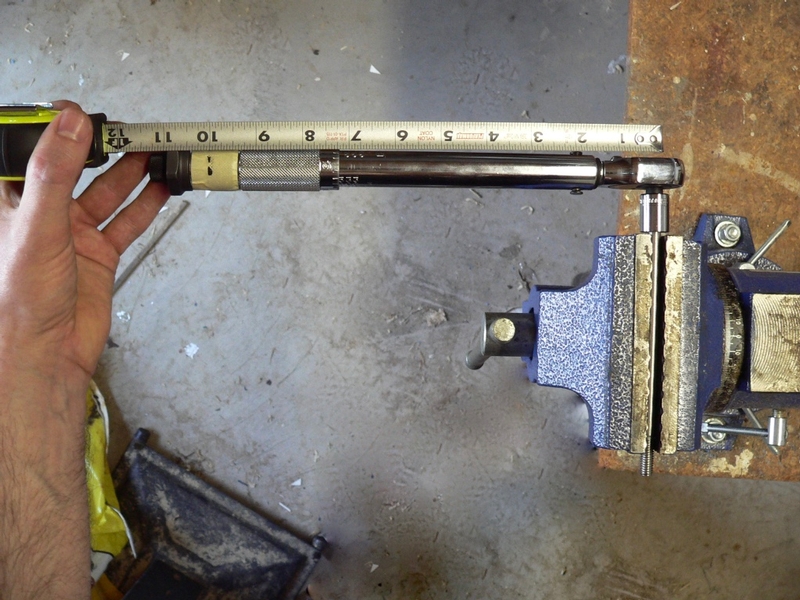
4. To determine the amount of weight required to create the torque value your torque wrench is set at, divide the indicated torque value by the lever length. If the indicated torque value is accurate, this much weight suspended on the lever mark should click the wrench.
Torque divided by Leverage equals Weight.
EXAMPLES
Inch Lb clicker torque wrench
Torque Setting: 100 inch lbs
Lever Length: 10 inches
100 : 10 = 10
10 lbs at a distance of 10 inches is required to create 100 inch lbs of torque.
Torque Setting: 60 inch lbs
Lever Length: 8 and 1/4 inches
60 : 8.25 = 7.27
7.27 lbs rounds to about 7.25 or almost exactly 7 lbs, 4 oz.
7 lbs, 4 oz at a distance of 8 1/4 inches is required to create 60 inch lbs of torque.
5. When determining the amount of weight required to test any torque value, inherent weight must be considered. This includes equipment used to suspend the weight and the wrench handle itself. The amount of torque exerted by inherent weight may be very significant for low torque values.
Remove the socket from the torque wrench and support the wrench at the back while resting the head of the wrench on an accurate scale. Also weigh any equipment that may be used for hanging items from the handle. Record the weight for each item for reference and subtract the total from the weight you calculated in step 4. 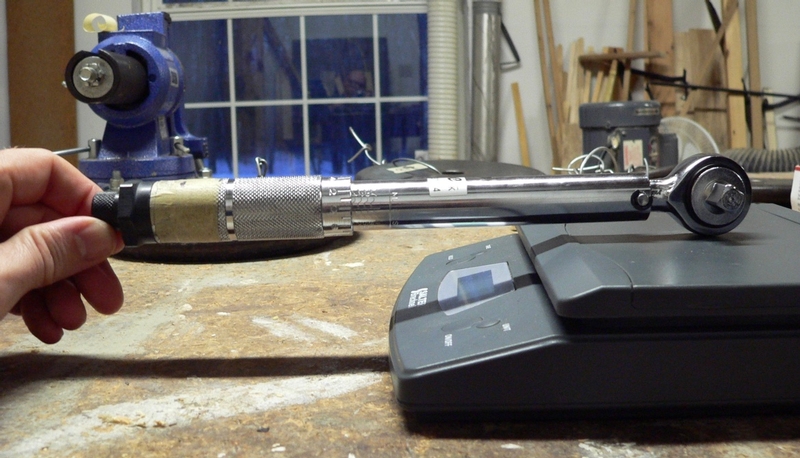
Vertical positioning of the handle during testing eliminates any influence its inherent weight has on the true torque value but obviously weight cannot be applied if the handle is vertical. Using a fish scale to exert the force on the handle has been suggested so that the the handle can be positioned vertically. If you use a fish scale, you will need to test it’s accuracy by weighing test objects between it and a high quality scale to compare the indicated weights of each.
6. Have an assortment of objects bound with wires and ready for hanging. These objects (including wire) should be weighed on an accurate scale to verify that they are within an ounce or two of the exact weight you determined you would need. If you use weight lifting plates, do not trust the accuracy of the number molded into the plate.
7. Hang the weights you created at the lever mark on the torque wrench handle. If the clicker just barely trips with all weight suspended, the set torque value is accurate.
If the wrench clicks before it bares the full weight, lift the weight and move it closer to the square drive. Find the point where the wrench has just enough leverage to trip the clicker. Measure the distance the weight is hung from the square drive.
If the wrench does not click after baring the full weight, move the weight farther away from the square drive. Continue thusly until you find the exact lever length required to trip the clicker.
If you have small enough objects to make very fine modifications to the weight, you may add or remove them to achieve the same effect.
Record the lever length you arrived at. Add the inherent weight to the weight you suspended and record the total.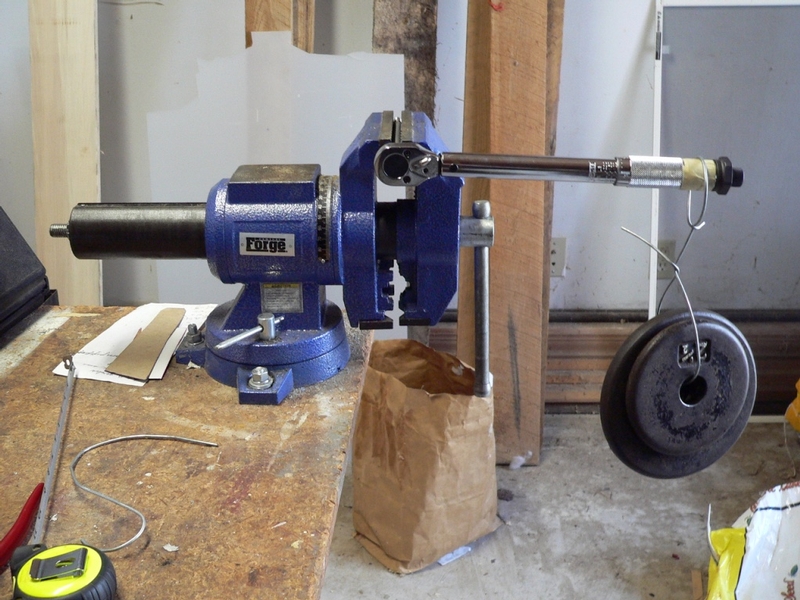
8. Now that you have established the coinciding values for weight and leverage, you can determine the true torque value that the wrench is set at.
Leverage times Weight equals Torque.
EXAMPLE
Lever Length: 7 1/2 inches
Weight: 7 lbs, 4 oz (suspended weight + inherent weight)
7.5 x 7.25 = 54.375
7 lbs, 4 oz at a distance of 7 1/2 inches creates 54.375 inch lbs of torque.
9. After the true torque value is known, you may calculate how many percent it differs from the indicated setting.
If the indicated torque value is 60 inch lbs but the true amount of torque is 54.375 inch lbs, the percentage of the discrepancy is calculated as follows:
what % of 60 is 54.375?
.__ x 60 = 54.375
54.375 : 60 = .90625
.90625 = 90.625% at this point, I would just round it to 91%
54.375 inch lbs is 91% of 60 ft lbs.
SO—the indicated torque value is 9% greater than the true torque value.
The indicated torque value has a +9% discrepancy. The wrench is indicating higher than the actual amount of torque required to make it click.
If you really want to get closer to the true torque value of 60 ft lbs, you might increase your indicated torque value by as much as 9% (.09 x 60 = 5.4 ft lbs). There is no guaranty this will be accurate without testing it but you can use the math as a guide. If you really need an exact torque value from any torque wrench, you should test the wrench using the exact amount of weight and leverage as described previously.
Remember, it is acceptable for a torque wrench to vary 3%~4% from what it indicates. If a torque wrench indicates 103 inch lbs and the true torque value is 100, that is only a 3% discrepancy. The next time you use the torque wrench, the discrepancy might only be 2%.
10. After determining the true torque value and percentage of discrepancy for the indicated middle torque setting, you should check at least two higher settings and two lower settings. You will probably notice a pattern that will help you make reliable estimated adjustments to all torque settings on the wrench’s scale. After all, you probably don’t want to test every single one!
You will need to measure a new lever length any time you test a new torque setting on a clicker torque wrench. The handle changes length when you change torque settings.
If you know the values of two variables, you can figure out the third with simple math. If your testing a foot lb beam torque wrench, don’t forget to covert foot pounds to inch pounds (and vice versa) if your lever was measured in inches.
Torque : Leverage = Weight
and
Torque : Weight = Leverage
or
Leverage x Weight = Torque
Foot Pound Clicker Wrenches
Be extremely careful if you test torque values over 70 ft lbs. The weight and leverage is very strong and you will need to be sure your vice is rigid enough to hold the bolt securely and without over-tightening the screw. You will also need to be certain your vice is securely mounted and the bench is strong and heavy enough to handle the leverage without tipping over. I was able to test up to 120 ft lbs but I decided 125 was just too much to tackle. The vice was actually being pried open by the torque (gives me an idea of how powerful our bike’s torque is!). Without beefing up my bench, vice and probably switching to a bolt welded between a couple plates of steel it seemed unsafe to test the really high torque values.
A bolt setup like the one shown below may be used in a flat jaw vice by joining it to additional coupling nuts with sections of threaded rod. A bolt welded to a flat piece of steel could also be held securely in a vice.
For moderate to high torque values, a long skinny bolt won’t cut it. I used a 1/2” diameter x 2 1/2” bolt in a 3 inch long coupling nut. This held in a pipe vice worked fine. Joining another coupling nut on there might be necessary for use in a straight jaw vice. 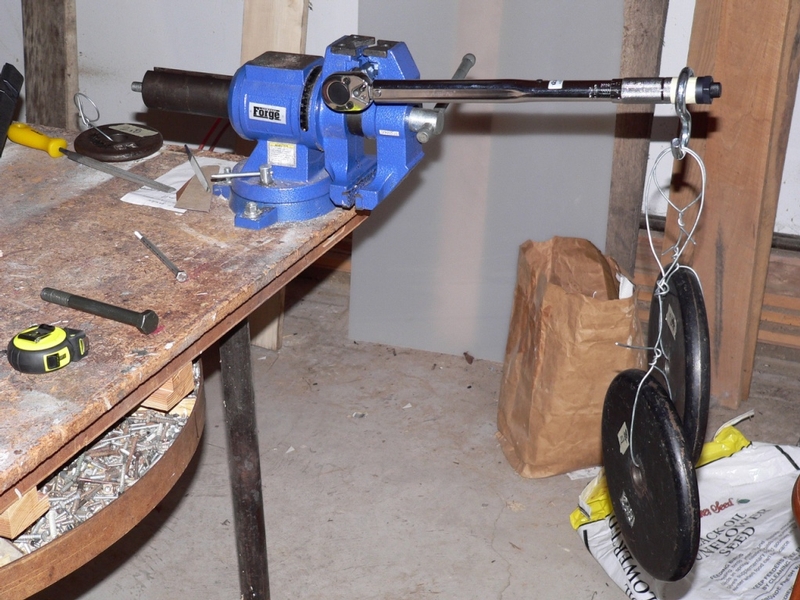
I found it convenient to use a large S hook with the setup so weights could hung from the same point and be taken on and off quickly. Also, labeling each item you use with its exact weight including the weight of wire, S hook and any other equipment helps a great deal to keep tally.
11. Follow steps 1 through 3 to set up the indicated torque value and lever length for a foot lb clicker torque wrench. Make your lever mark at 1 foot or more.
12. Determining the amount of weight that should be required to equal the indicated torque is exactly the same for foot lb wrenches as it is for inch lb wrenches (step 4). Also determine the inherent weight of your foot lb torque wrench just as you would for an inch lb torque wrench (step 5).
EXAMPLES
Foot Lb clicker torque wrench
Torque Setting: 70 ft lbs
Lever Length: 1 foot
70 : 1 = 70
70 lbs at a distance of 1 foot is required to click the torque wrench.
That was too easy. Lets say I don’t want to hang an entire 70 lbs off the torque wrench. All I need to do is lengthen the lever. It would be convenient if i could just double the length of the lever to 2 feet but typical ft lb torque wrenches are under a foot and a half long. Sixteen inches is about the maximum length lever that can be achieved. Since a 16 inch lever length cannot be expressed in even feet (and using the decimal equivalent would be more complicated), I will need to convert the lever length into inches. For this reason, I will also need to convert the foot pound torque setting to inch pounds.
Torque Setting: 70 ft lbs
Lever Length: 16 inches
I will convert my indicated torque setting to inch lbs.
70 x 12 = 840
70 foot lbs of torque equals 840 inch lbs.
Now I divide my torque setting as expressed in inch lbs by the number of inches the lever is.
840 : 16 = 52.5 = 52 and one half pounds.
52 lbs, 8 oz at a distance of 16 inches should be required to click the torque wrench.
I could go on with more complex examples that include fractions of an inch that require conversion to decimals and decimals of pounds that require conversion to ounces. I think it is very worth while to be as precise as possible and not too difficult if you use a calculator. If you are satisfied to get a close estimate of your foot lb torque wrenches calibration, you can just round the numbers off in the later computations and you will still get very close. That is far more valuable than assuming the torque wrench is accurate without testing it.
13. Follow steps 5 through 7 to prepare and hang the weights on the torque wrench handle.
14. Determine the true torque value that the wrench is set at using the same computations as you did for inch lbs (step 8).
Leverage times Weight equals Torque.
EXAMPLE
Lever Length: 15 1/2 inches
Weight: 52 lbs, 8 oz (suspended weight + inherent weight)
52.5 x 15.5 = 813.75 inch lbs
BUT—Since we are working with a ft lb torque wrench, divide your inch lbs by 12 inches to convert to foot lbs.
813.75 : 12 = 67.8125 foot lbs
52 lbs, 4 oz at a distance of 15 1/2 inches creates 67.8125 foot lbs of torque.
Call it 68 ft lbs.
15. Follow steps 9 and 10 to finish the tests in the same way for ft lb torque wrenches.
Beam Torque Wrenches
If you are testing a beam torque wrench, you can use use the same formulas to find or reduce the proper amount of weight or to change the lever length just as you would with a clicker wrench. Rather than waiting for a click, you can just hang a known amount of weight at the lever mark and look at the scale to find the discrepancy. Testing foot lb beam torque wrenches is very fast if you use a 1 foot lever mark. For inch lb beam torque wrenches, I’d use a 10 inch lever and just divide the weight by 10 to compare to the number indicated on the scale.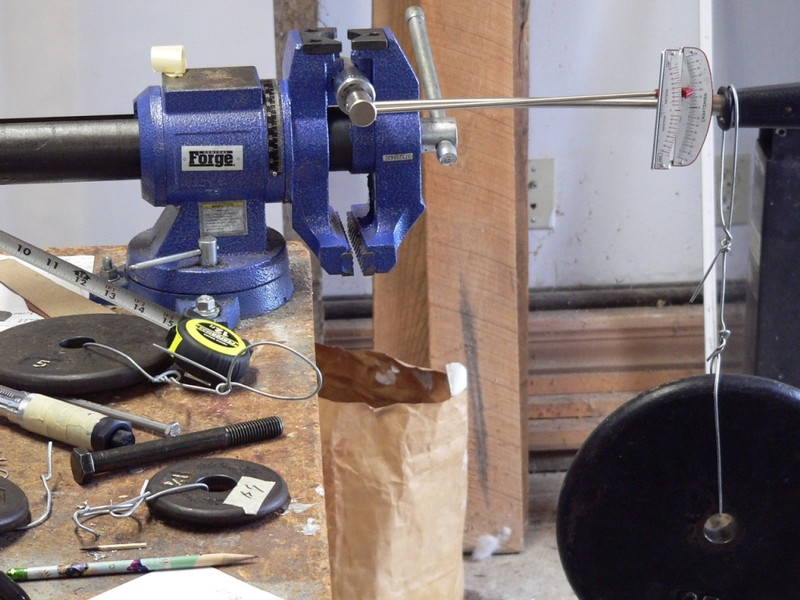
* Last updated by: Rook on 8/20/2017 @ 12:23 AM *