


Clutch Pack, Springs and Spring Plate Inspection
My clutch has lasted 49,000 miles and the friction plates have about 75% ware. The clutch pack height was 2-1/8” which is 25% of the specced clutch pack height range. Individual measurements of the clutch plates thickness also indicated a 75% reduction in specced thickness. The innermost friction plate had no measurable wear at all. All of the plates were far below the service limit for warpage. The clutch springs were all very close in free length and all within spec. The steels did not appear to be glazed or have been overheated.
As is the case with all procedures involving clutch disassembly, do not allow yourself to be interrupted while handling the clutch plates. Maintain the marks on all plates so they may be kept in the order and orientation they were removed. If you are not sure you have preserved the exact order and orientation that all the plates came out, that is nothing to loose sleep over but you must have the innermost fiber and outermost fiber in the correct positions when you reinstall the plates.
Tools:
small ruler
micrometer or digital calipers
surface plate
feeler gauge
clean plastic bag
calipers
Do First:
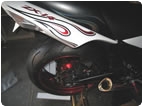
A quick check of clutch wear is to remove the oil filler cap and view the amount of clutch pack that protrudes past the clutch basket and the depth that the clutch spring plate recedes into the fingers of the clutch basket. Below is a picture of a nearly new clutch pack. If the clutch pack appears to have receded just one millimeter deeper into the basket fingers, you should proceed with measuring the clutch pack thickness.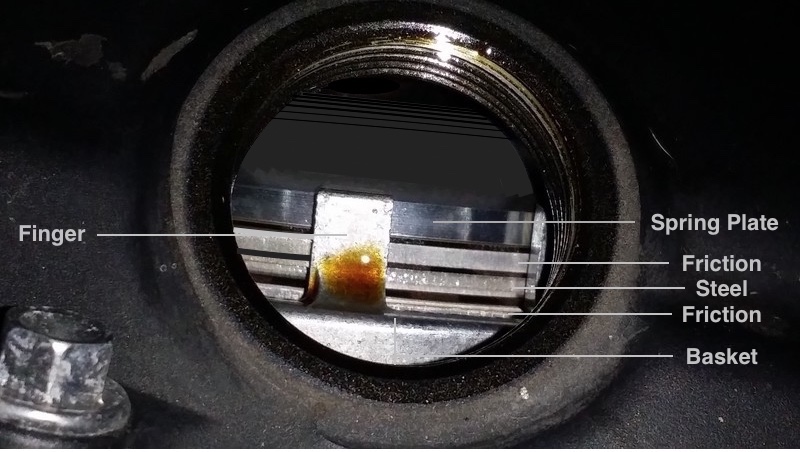
The clutch spring plate rides just below the ends of the clutch fingers with this clutch pack that has low mileage street and sport riding. The thickness of the first friction plate is entirely visible and so is that of the first steel. Half of the second friction plate can be seen.
1. Remove the clutch cover (see Clutch Cover Removal, steps 1 through 3).
2. Use a small ruler to check total clutch pack thickness by measuring the distance between the the innermost fiber pad to the outermost fiber pad. Considering that the limit of proper clutch pack thickness is within one millimeter, this is difficult to do accurately enough for assessing the exact height the clutch pack.
Clutch Plate Assembly Length
Standard: 53.52 ~ 54.52 mm (2.11 ~ 2.15 in.) 
It’s not necessary to remove the spring plate to measure clutch pack height.
The small steel pocket ruler made by General is ideal for measuring down the channel between the fingers in the basket. Because it is impossible to determine exactly where the inner pad is with the clutch pack installed, this procedure is not entirely reliable but it should provide a very close estimate before determining to remove the clutch pack. I believe you can assume the inner surface of the rectangular window is parallel to the inner surface of the inner fiber pads.
If the clutch pack thickness seems out of spec, there is definitely a need to continue with the entire clutch pack inspection.
3. Remove clutch pack (see Clutch Springs, Spring Plate and Clutch Pack Removal, steps 1 through 6).
4. Visually inspect the outermost friction plate for signs of seizure or uneven wear. Check for discoloration which indicates overheating.
Use a ruler to measure the clutch pack from the inner surface of the innermost fiber pad to the outer surface of the outermost pad. It should be 2 1/8” +/- one sixty-fourth of an inch. 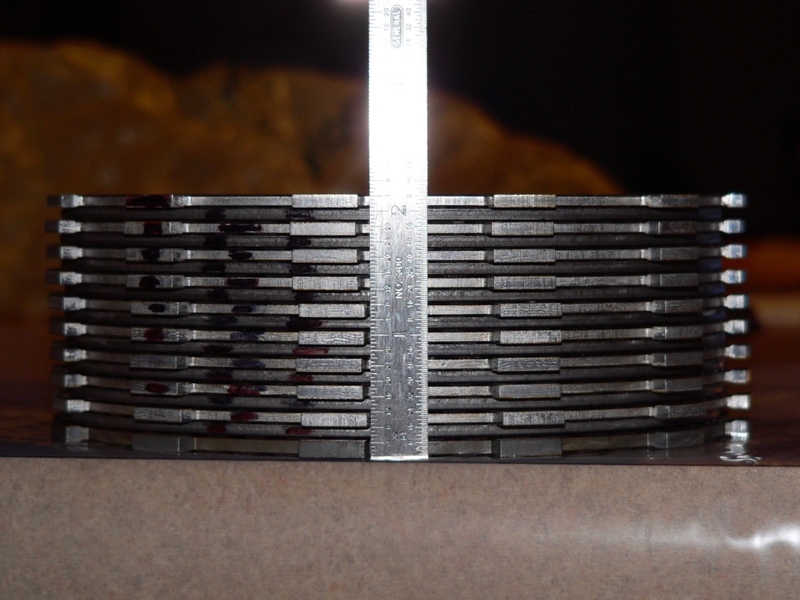
This picture shows the height of the clutch pack tongues. If you position the ruler at the inside of the ring to measure from the bottom fiber pad in the stack to the fiber pad on top, you'll get the most accurate clutch pack height measurement. Avoid measuring the height between tongues because that could be a little different than the height between pads.
5. Measure each clutch plate individually. Use a record sheet like the one at the end of this tutorial to record the measurements you take.
Use a micrometer or digital calipers to measure the thickness of the outermost friction plate. Measure on the fiber pads at several points around the plate. These fiber pads should have worn fairly uniformly around the entire friction plate. Record the smallest measurement to indicate the amount of wear that has taken place.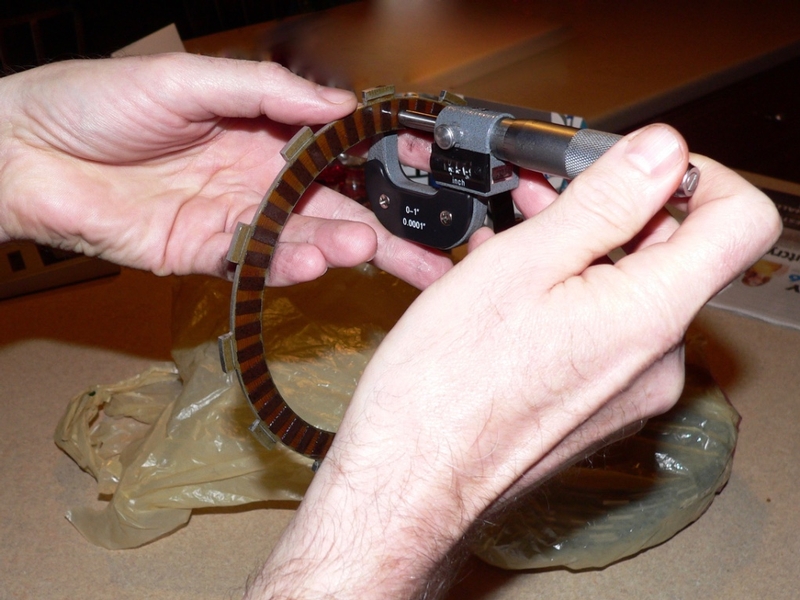
6. Now place the friction plate on a surface plate and use a feeler gauge to measure from several positions around the plate. Find the largest gap between the fiber pads and the surface plate. Record this as the amount of warpage that is present in the plate.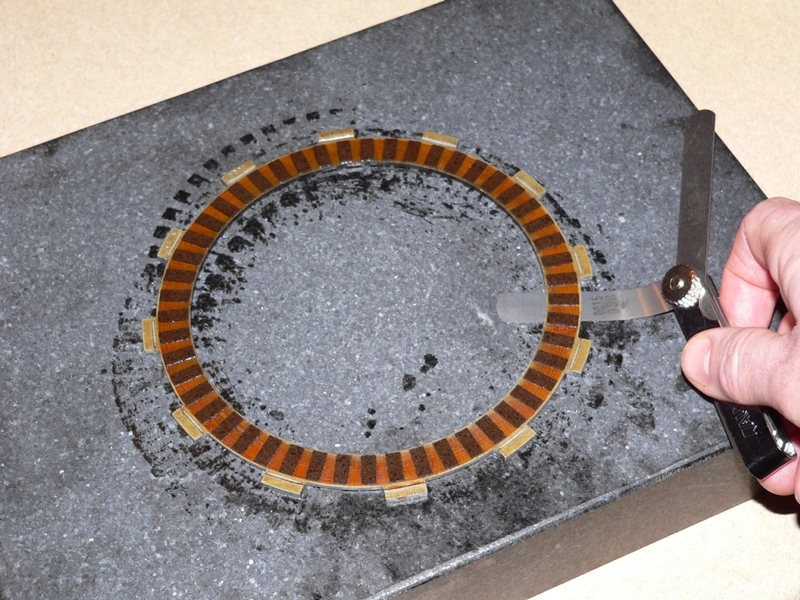
I suggest washing the surface plate with soap and water and letting it drip dry to eliminate dust and fibers that have settled on it. The oil on the plates may make measuring the gap less accurate but I do not recommend wiping oil off the plates.
7. Place the outermost friction plate, outer face down in a clean plastic bag. Mark each side of the bag INNER and OUTER to easily maintain proper order and orientation of plates.
8. Visually inspect the next plate in the stack. This will be a steel plate. Look for signs of seizure, uneven wear and overheating. There is no need to measure the thickness for wear of the steels.
Place the steel on the surface plate and conduct the warpage test as you did with the friction plate. Record the largest gap found.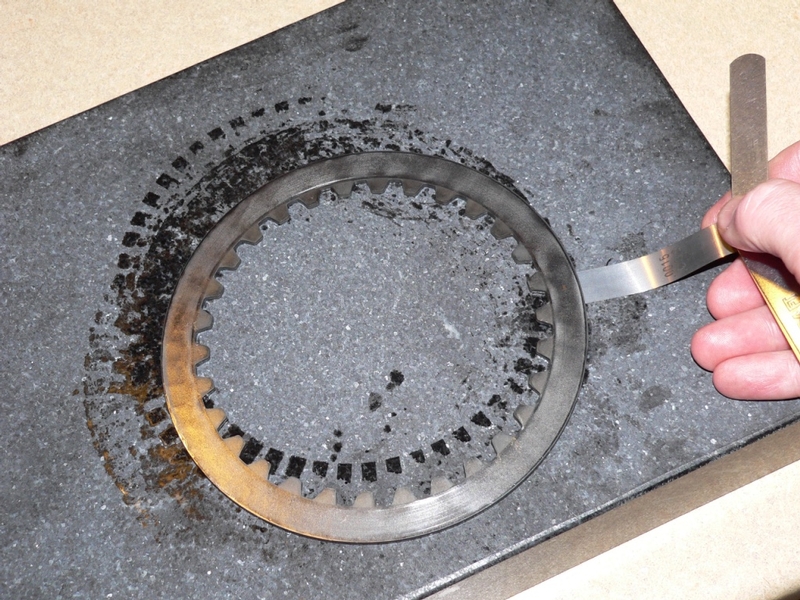
Place the steel plate, outer face down on top of its adjacent friction in the plastic bag.
9. Repeat these tests for all of the remaining friction and steel plates. Record the measurements and stack the plates in the proper order and orientation inside the plastic bag.
Replace any plates that appear worn or are past the service limit for thickness or warpage.
10. Measure the free length of each clutch spring using a calipers.
Clutch Spring Free Length Standard: 65.0 mm (2.56 in.)
Service Limit: 62.0 mm (2.44 in.) 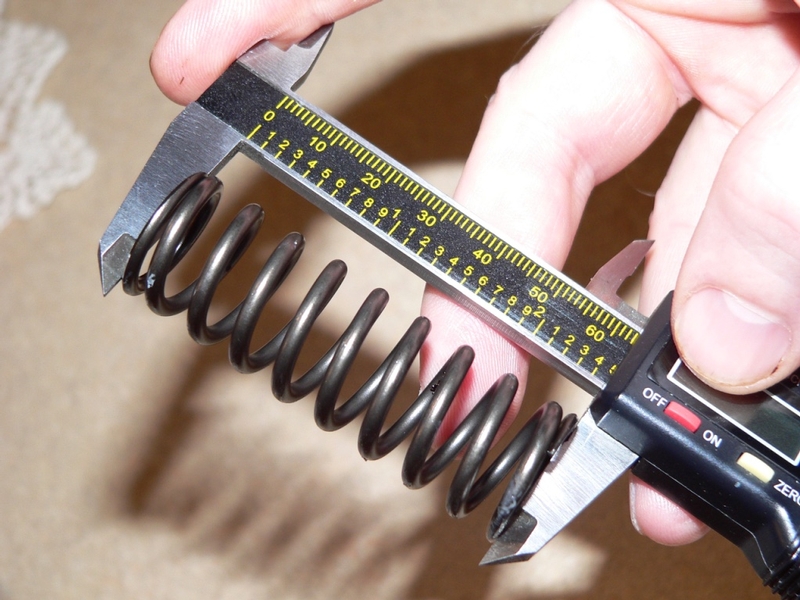
Replace any spring that has a free length measurement shorter than the specced service limit.
11. Inspect the wells in the clutch spring plate for excessive wear from contact with the springs.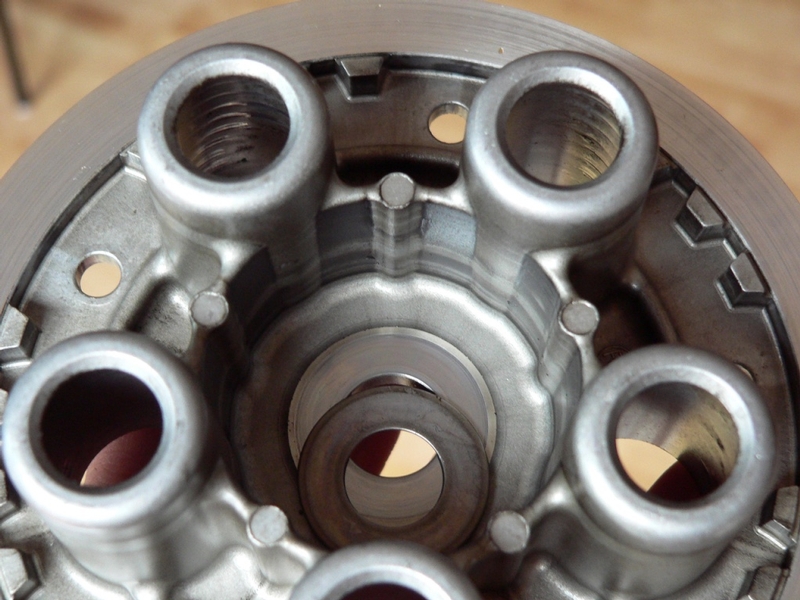
Grooves are worn by clutch springs inside of the clutch spring wells in the clutch spring plate. Centrifugal force throws each spring against the inside of its well and the spring rubs against the well when the clutch is disengaged. This is probably why you might find non magnetic silver particles in your drained motor oil. The particles wash to the oil pan where they are caught by the oil pick up screen or the oil filter. No harm as long as the oil pick up screen is cleaned occasionally.
Brock’s clutch springs have spacers that are designed to keep the springs centered in the wells to prevent wear.
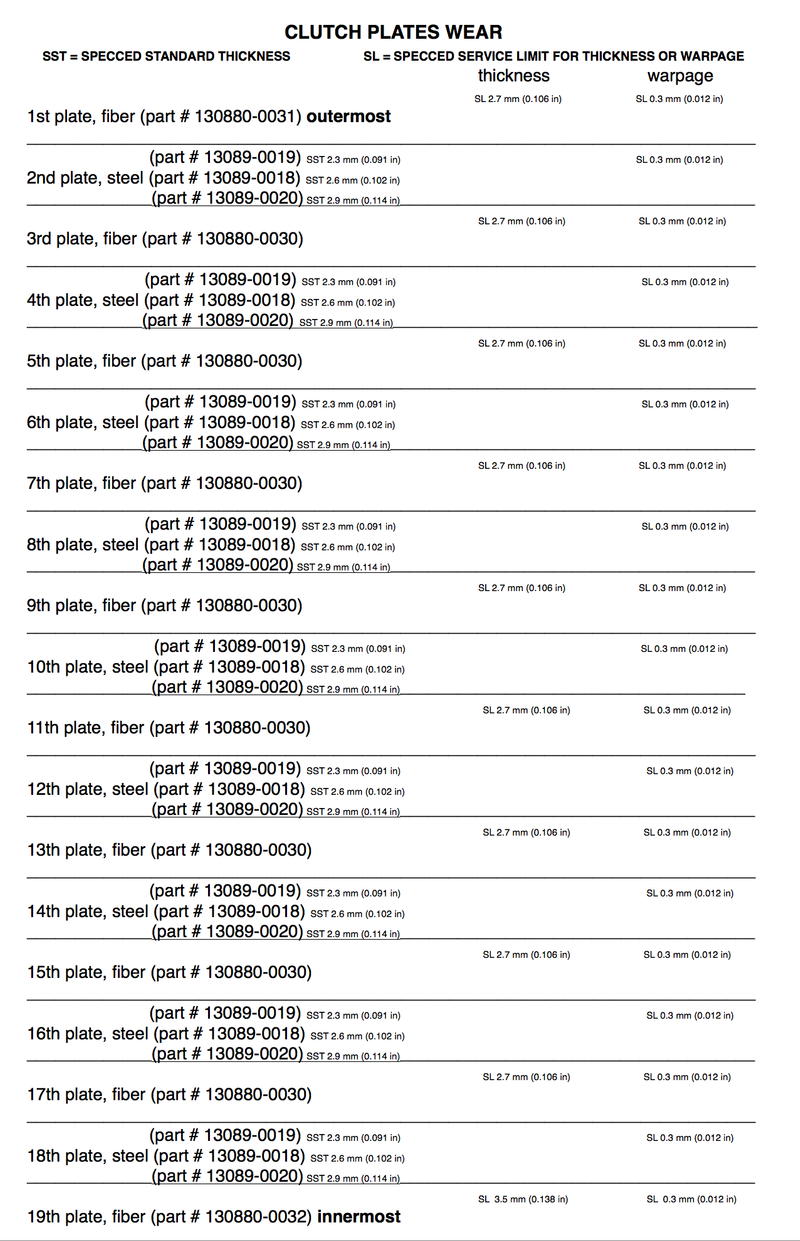
SERVICE MANUAL SPECS FOR CLUTCH WEAR
Thickness, Outermost Friction Plate (part # 130880-0031), all eight Middle Friction Plates (part # 130880-0030) —
Standard 3.72~3.88 mm (0.146~0.153 in)
Service Limit 2.7 mm (0.106 in)
Thickness, Innermost Friction Plate (part # 130880-0032)—
Standard: 3.72 ~ 3.88 mm (0.146 ~ 0.153 in)
Service Limit: 3.5 mm (0.138 in)
Warpage, Outermost Friction Plate (part # 130880-0031), Innermost Friction Plate (part # 130880-0032)
Standard: 0.15 mm (0.0059 in) or less
Service Limit: 0.3 mm (0.012 in)
Warpage, all eight Middle Friction Plates (part # 130880-0030) —
Standard: 0.2 mm (0.008 in) or less
Service Limit: 0.3 mm (0.012 in)
Warpage, All Steel Plates (part # 13089, 13089A, 13089B)—
Standard: 0.15 mm (0.0059 in) or less
Service Limit: 0.3 mm (0.012 in)
Stated more directly:
The first nine frictions (the outermost, part # 130880-0031) and all eight middle (part # 130880-0030) are at the service limit when their thickness is at 2.7mm. The innermost friction (part # 130880-0032) is at the service limit when its thickness is at 3.5 mm.
The nine steels do not normally wear so it is not necessary to measure their thickness. You should measure the thickness of steels to determine what part number they are. If you are adjusting the thickness of the whole clutch pack, you may need to change some steels out for a thinner or thicker steel with a different part number. I may cover clutch pack thickness adjustment in a future tutorial.
All nineteen plates, both steel and friction are at their service limit for warpage at 3.0 mm.
There is no spec for thickness or warpage on the anti-judder rings and it does not appear to me that they could influence the thickness of the clutch pack. However, I suppose it could be possible their performance would be impaired if the spring or seat wore against adjoining parts too much. I guess if they look in good shape, don’t bother to replace them.
* Last updated by: Rook on 9/9/2017 @ 9:00 AM *