Move Close
Welcome to zx14ninjaform.com!

You are not logged in.
New Topic Reply
   Next Page

Page: 1 2 3 .. 13 15 16 17

Previous Page

Thread: Engine Build + RCC Ultimate Build Gallery

Created on: 04/16/25 08:54 PM

Replies: 416

danmin


danmin's Gravatar

Location:

Fort Worth, Texas

Joined: 03/19/25

Posts: 350

RE: Engine Build + RCC Ultimate Build Gallery
01/21/26 7:18 PM

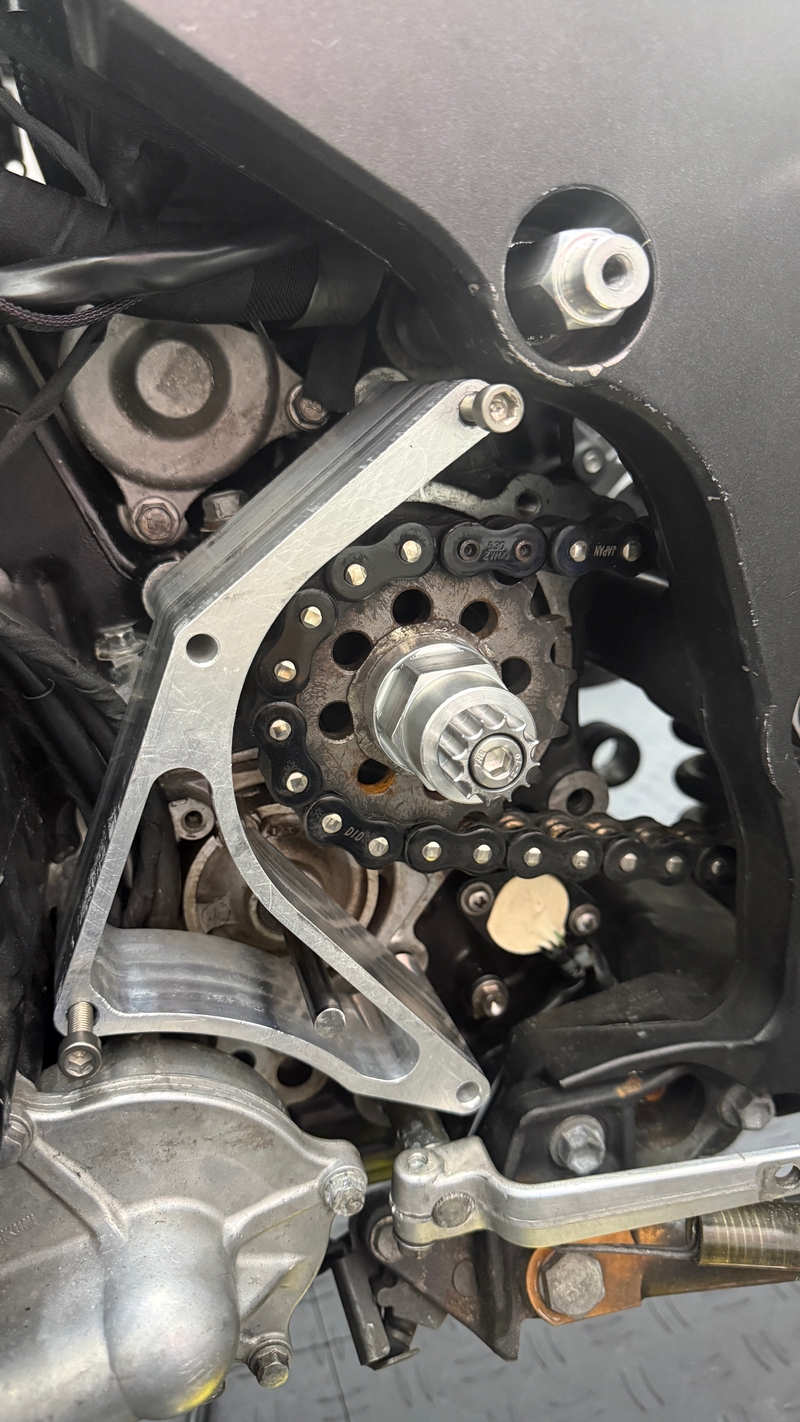
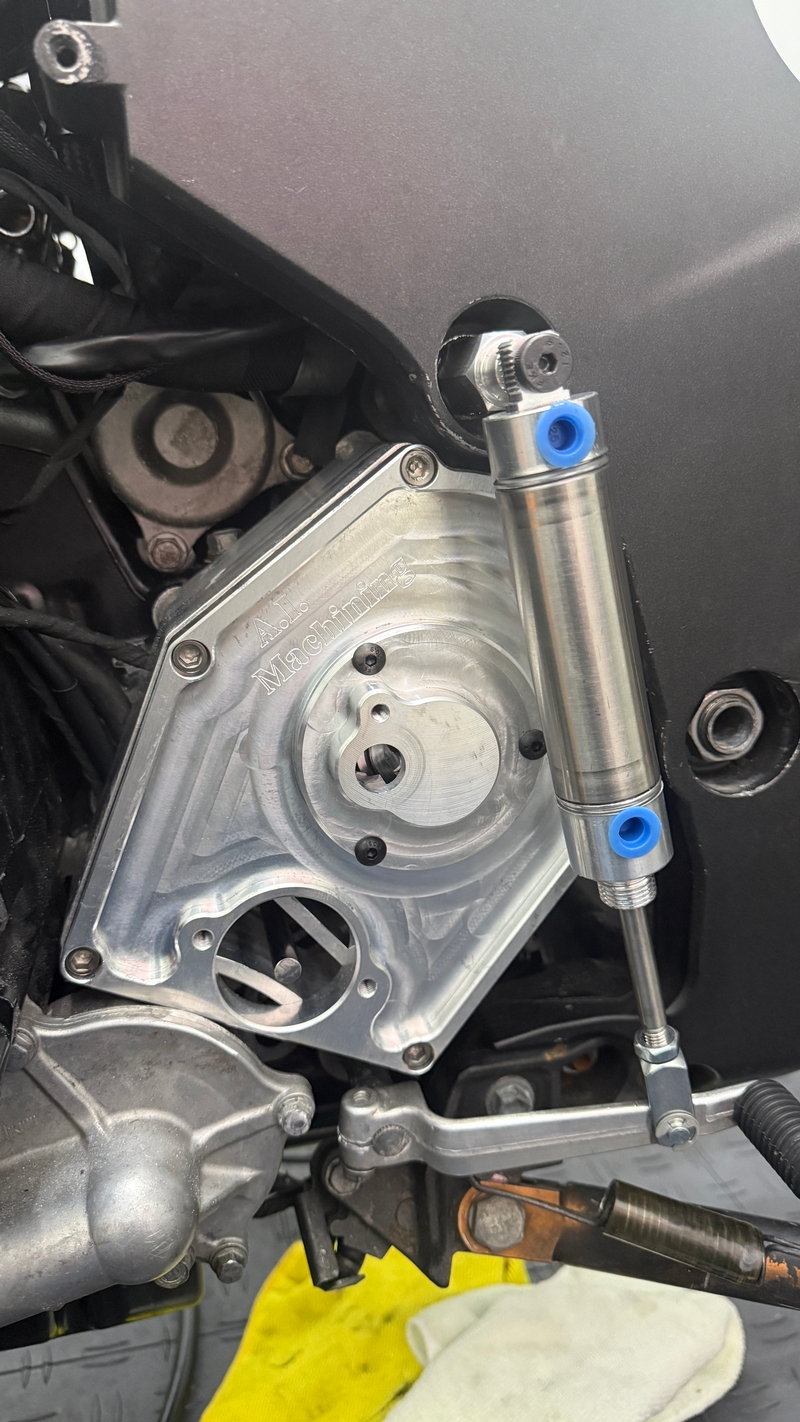
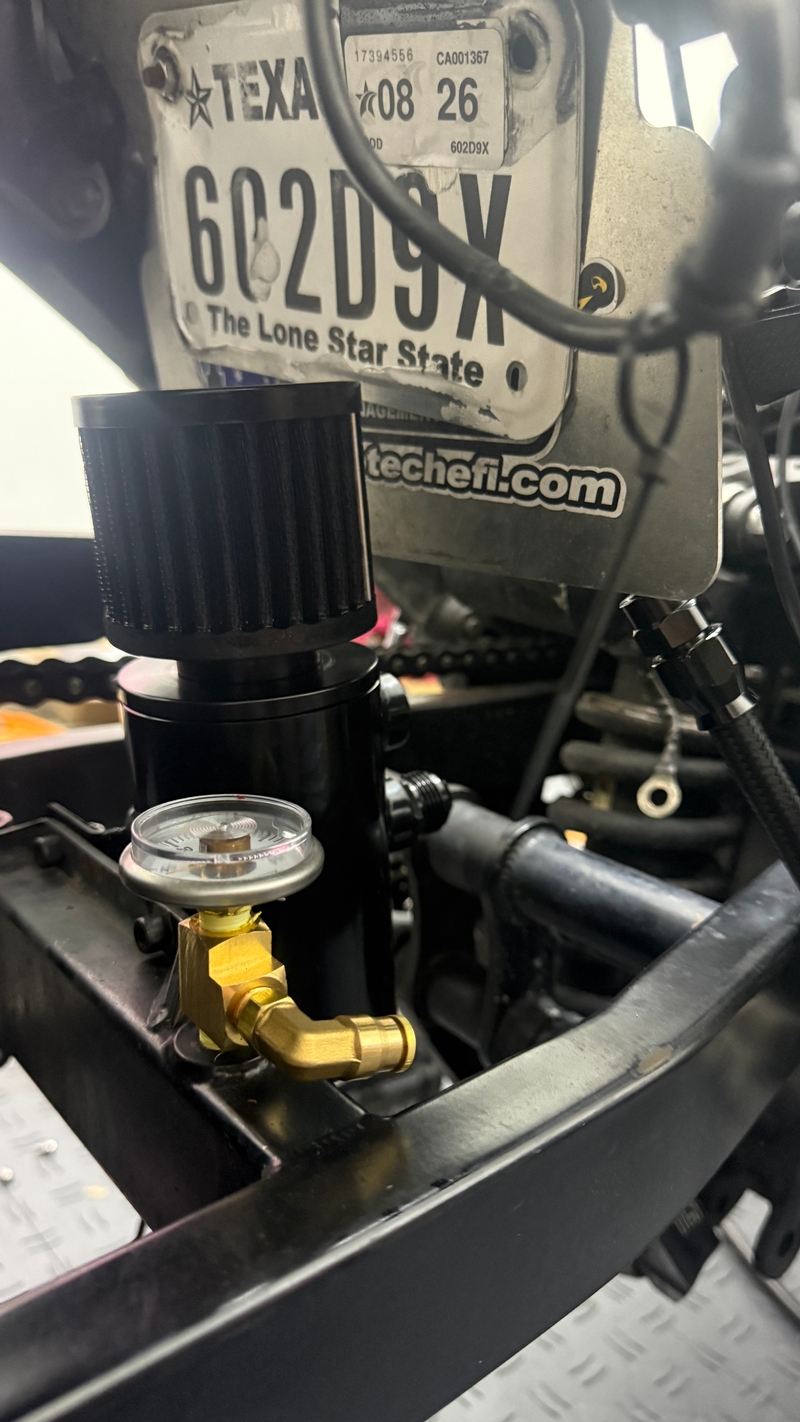
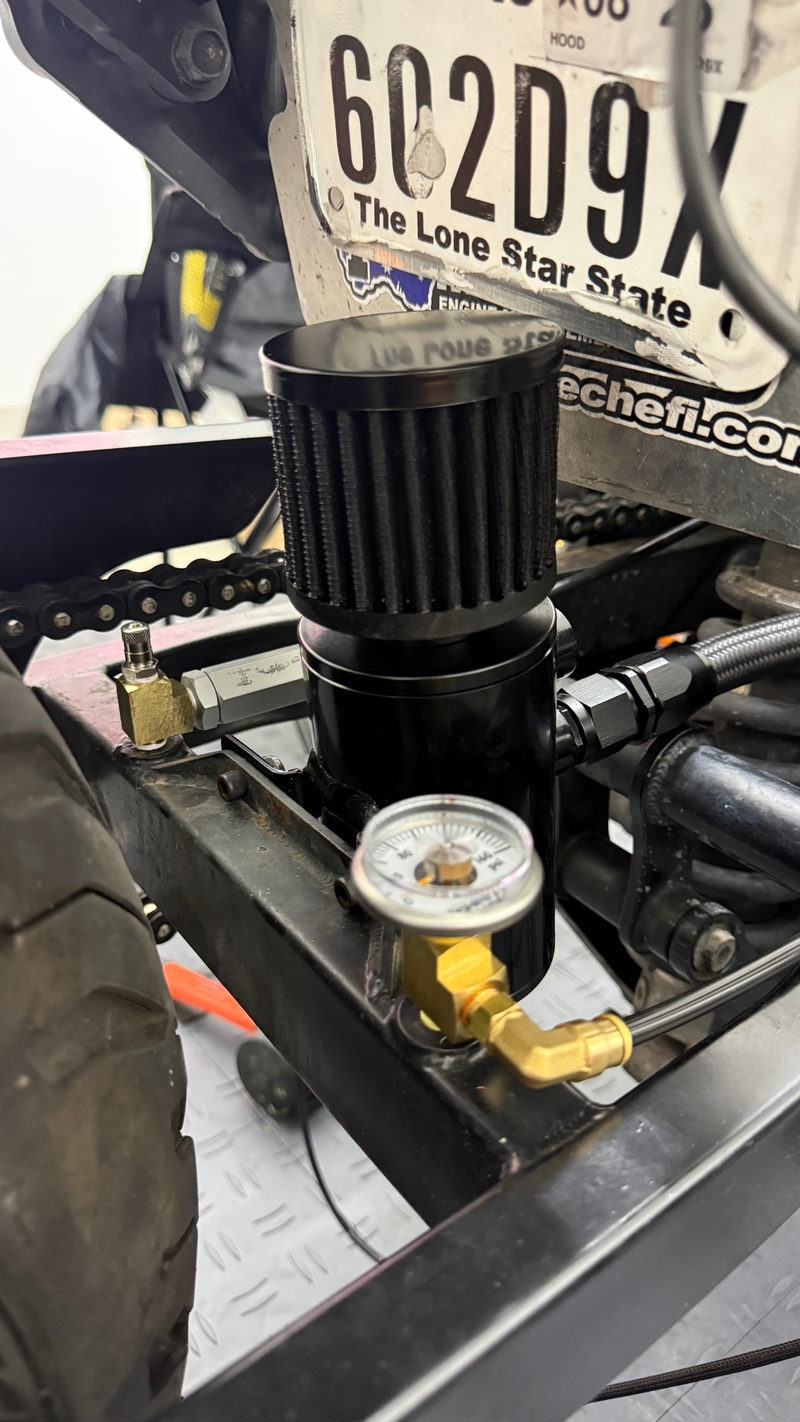
This finally came in. Just waiting for the hayabusa slave cylinder. You have to cut 5/8" off the pushrod. Fingers crossed- there is some tolerance with that. Also did some test fitting with my new catch can. Started adding fittings for the air shifter setup as well. Just waiting on more hours in the day to wrap up the whole install.


Link | Top | Bottom

Rook


Rook's Gravatar

Joined: 03/28/09

Posts: 22077

RE: Engine Build + RCC Ultimate Build Gallery
01/22/26 3:01 PM

What is "this?" , a billet front sprocket chain guard? The sprocket nut looks very unusual. it has sprocket teeth of its own and it has a bolt in it. Is that a locking bolt? It has no flats to bend the lock washer over.

Why the Hayabusa slave cylinder? It has a steel plate to prevent it from popping out when you remove it but I think I took that off that. The Hayabusa slave is known to crack the sprocket cover when you torque it but it looks like you're going aftermarket on the cover.


08 MIDNIGHT SAPPHIRE BLUE ZX-14 Now Deceased, will be resurrected, 08 Hayabusa, 2024 ZX-14R bran friggin NEW and 2026 hayabusa!

Link | Top | Bottom

Rook


Rook's Gravatar

Joined: 03/28/09

Posts: 22077

RE: Engine Build + RCC Ultimate Build Gallery
01/22/26 3:09 PM

I see you got your fuel pressure regulator fit up. It looks like it was meant to be be there. That's obviously not a stock swing arm though. i suppose that is a location where people often put a nitrous bottle?


08 MIDNIGHT SAPPHIRE BLUE ZX-14 Now Deceased, will be resurrected, 08 Hayabusa, 2024 ZX-14R bran friggin NEW and 2026 hayabusa!

Link | Top | Bottom

danmin


danmin's Gravatar

Location:

Fort Worth, Texas

Joined: 03/19/25

Posts: 350

RE&#x3a&#x3b; Engine Build &#x2b&#x3b; RCC Ultimate Build Gallery
01/22/26 5:09 PM

Check out this link:
https://www.agmotorsports.net/product-page/zx14-billet-case-savers-with-bearing-support

"This" is a sprocket cover as well as output shaft support. Cheap insurance if things start flexing. I see/hear that they aren't needing on most builds, but if I'm aiming for 500hp, there's no such thing as "too safe". The sprocket nut sits inside a sealed ball bearing in the sprocket cover. The gear on the top of the nut is to be used as a reference for a speed sensor (gen 1 sensor), replacing the rear wheel speed sensor.

I'm debating on throwing in the steel shift shafts as well, but those are quite a bit more labor-intensive to install. Fuel rail came in the mail today. Huge freeze is going to hit my area really hard for the next few days. I'll probably have more and more updates as the week goes on.

And yeah, Evil brand swingarm. That bracket I believe is for NOS bottles, but I've seen lots use it for catch cans too. Figured it was a good spot for it.


* Last updated by: danmin on 1/22/2026 @ 5:11 PM *

Link | Top | Bottom

Rook


Rook's Gravatar

Joined: 03/28/09

Posts: 22077

RE: Engine Build + RCC Ultimate Build Gallery
01/23/26 3:43 PM

"This" is a sprocket cover as well as output shaft support. Cheap insurance if things start flexing. I see/hear that they aren't needing on most builds, but if I'm aiming for 500hp, there's no such thing as "too safe". The sprocket nut sits inside a sealed ball bearing in the sprocket cover. The gear on the top of the nut is to be used as a reference for a speed sensor (gen 1 sensor), replacing the rear wheel speed sensor.

OK, now I remember you talking about this. I've heard of the output shaft support for the Hayabusa. I'd do it too. What's the advantage of reading the wheel speed off of the output shaft over the rear wheel? ...unless you're deleting ABS which i believe is responsible for wheel speed input on the Gen2.

I'm debating on throwing in the steel shift shafts as well, but those are quite a bit more labor-intensive to install.

Here's my thoughts: I removed the shift shaft on my Gen1 and it was very light. Is it aluminum? Aluminum is hard and light. It doesn't flex and snap back into shape though, it bends permanently. If shifting isn't currently a problem, I'd stick with the stocker. It's removal of the clutch cover and the sprocket cover but other than that, it's just a couple circlips. There's a bearing in there you can change. If the bike is shifting poorly, then chase down those demons. Personally, I'd look at the shift dogs if there was a shifting problem. This was run as a stock bike until you got ahold of it. A stock bike would run forever on the stock shift shaft.

And yeah, Evil brand swingarm. That bracket I believe is for NOS bottles, but I've seen lots use it for catch cans too. Figured it was a good spot for it.

Excellent use of available space!


08 MIDNIGHT SAPPHIRE BLUE ZX-14 Now Deceased, will be resurrected, 08 Hayabusa, 2024 ZX-14R bran friggin NEW and 2026 hayabusa!

Link | Top | Bottom

danmin


danmin's Gravatar

Location:

Fort Worth, Texas

Joined: 03/19/25

Posts: 350

RE: Engine Build + RCC Ultimate Build Gallery
01/24/26 12:56 PM

The only advantage or relocating the speed sensor is to clean up the lines running alone the swingarm. Makes for a neater appearance. We'll see if I can make it work.

Link | Top | Bottom

danmin


danmin's Gravatar

Location:

Fort Worth, Texas

Joined: 03/19/25

Posts: 350

RE: Engine Build + RCC Ultimate Build Gallery
01/24/26 12:57 PM

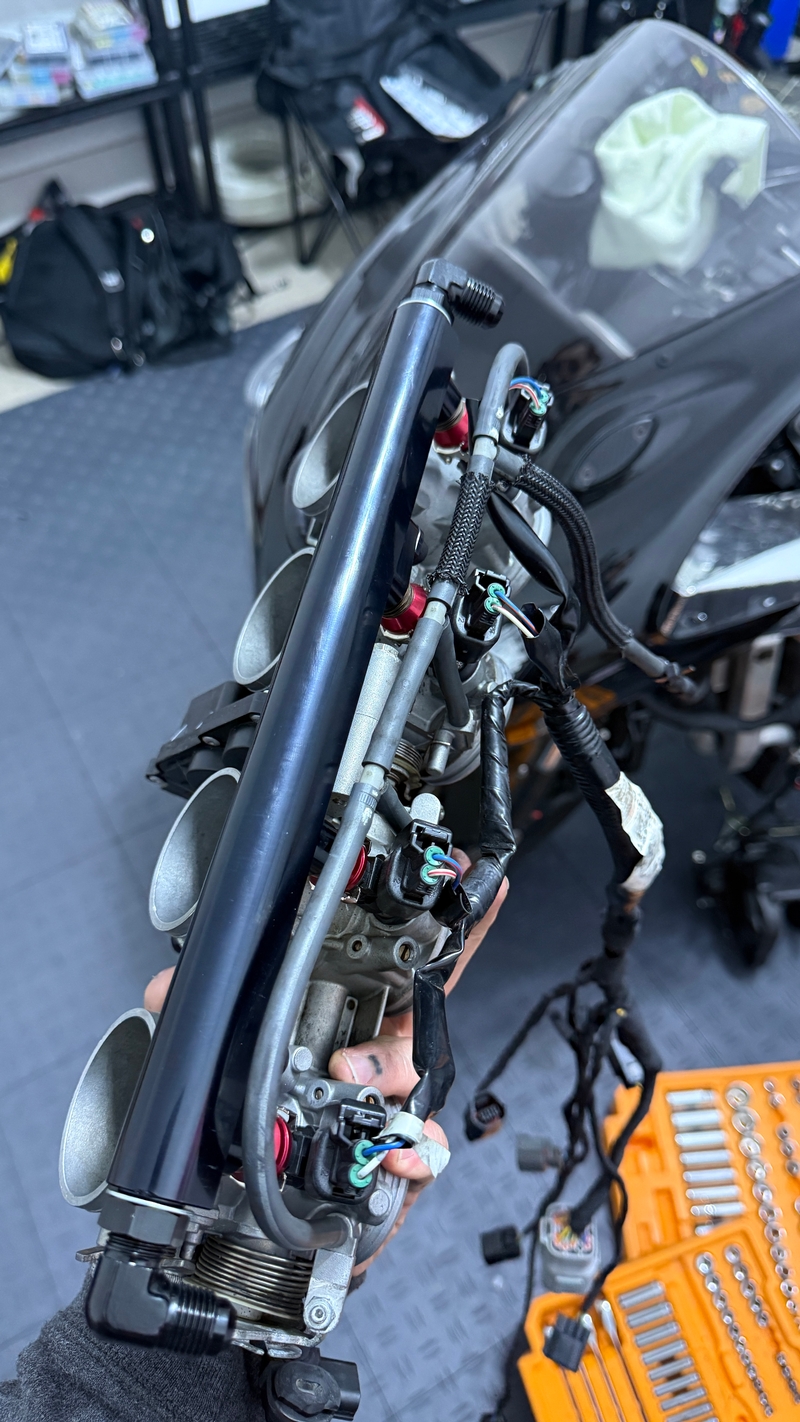
I added an Adams billet fuel rail.

Link | Top | Bottom

Rook


Rook's Gravatar

Joined: 03/28/09

Posts: 22077

RE: Engine Build + RCC Ultimate Build Gallery
01/24/26 4:57 PM


08 MIDNIGHT SAPPHIRE BLUE ZX-14 Now Deceased, will be resurrected, 08 Hayabusa, 2024 ZX-14R bran friggin NEW and 2026 hayabusa!

Link | Top | Bottom

danmin


danmin's Gravatar

Location:

Fort Worth, Texas

Joined: 03/19/25

Posts: 350

RE: Engine Build + RCC Ultimate Build Gallery
01/24/26 9:59 PM

Added the fittings for the air system I needed. Also finished the AN10 hose and fittings going to the catch can. Just need to cut my hose and shove it onto the crankcase breather elbow to finish that part up.

Air fittings: Gauge. Filter. Tire valve (to preload tank if desired).

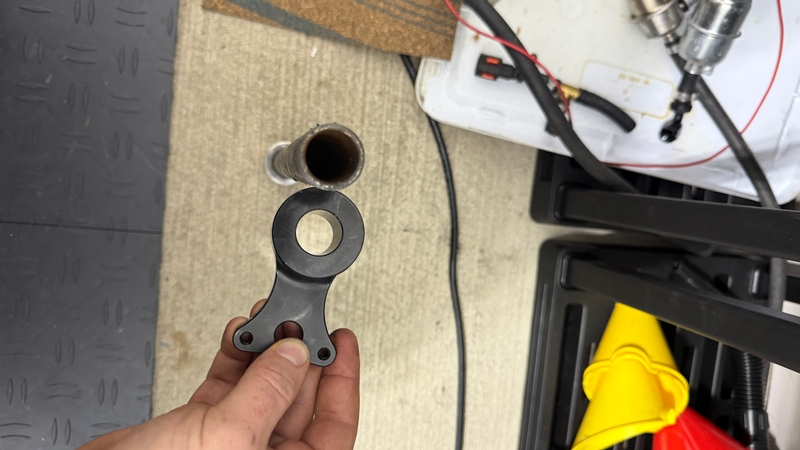
Here is a photo of the rear brake delete I bought from Schnitz, next to a zx14 axle....... Not even close to fitting.

Link | Top | Bottom

danmin


danmin's Gravatar

Location:

Fort Worth, Texas

Joined: 03/19/25

Posts: 350

RE: Engine Build + RCC Ultimate Build Gallery
01/24/26 10:11 PM

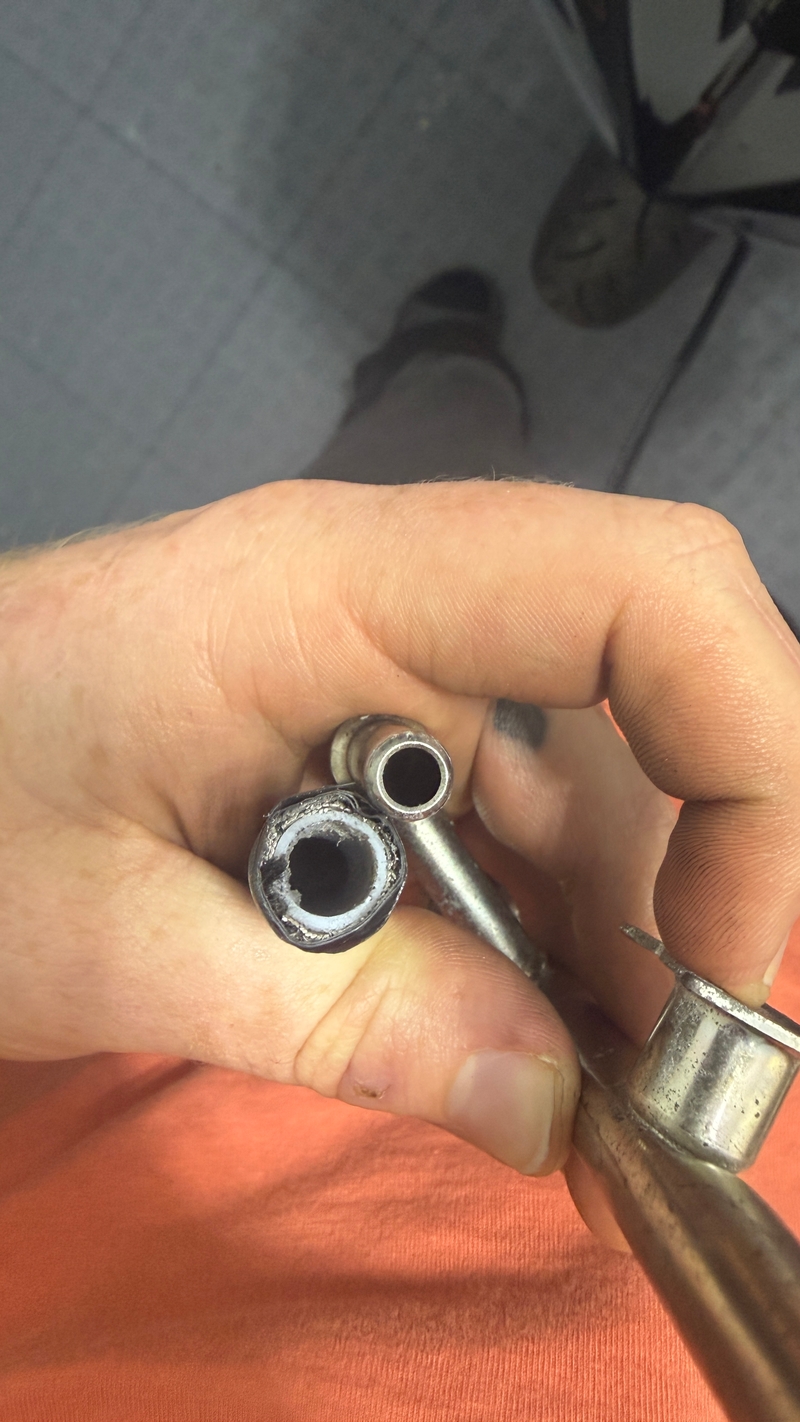
Here is a really good representation of why I'm changing the fuel rail. I mentioned that the size difference between AN6 and the 5/16th's fuel rail was about 20%. Here is the part I failed to mention. The stock rail has an OUTSIDE diameter of 5/16th's, and the AN6 lines have an INSIDE diameter of 3/8th's. So really the hoses are significantly larger than the rail would've been. The rough math is 75-90% more area for fuel to flow with the new rail. This is probably all overkill anyways, at least in most cases, it's just the principal of wanting to make it all cohesive that has been on my mind. I've put too much time money and effort in just the fuel system to bottleneck it with the stock rail. There are more benefits to the larger rail than I realized. For example injector-induced pressure pulsation would lessen because there is a larger volume of fuel in the rail, which is an issue with larger injectors, this can cause rich/lean spikes. Also the fuel pressure sensor will read cleaner with it.


* Last updated by: danmin on 1/24/2026 @ 10:19 PM *

Link | Top | Bottom

danmin


danmin's Gravatar

Location:

Fort Worth, Texas

Joined: 03/19/25

Posts: 350

RE: Engine Build + RCC Ultimate Build Gallery
01/24/26 11:24 PM

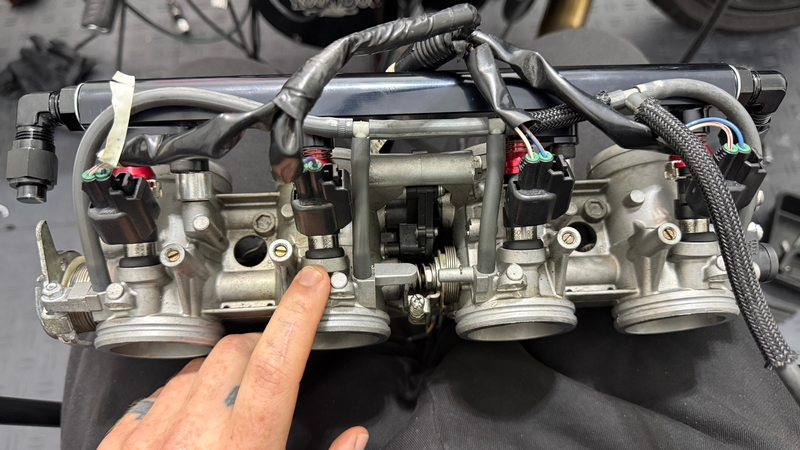
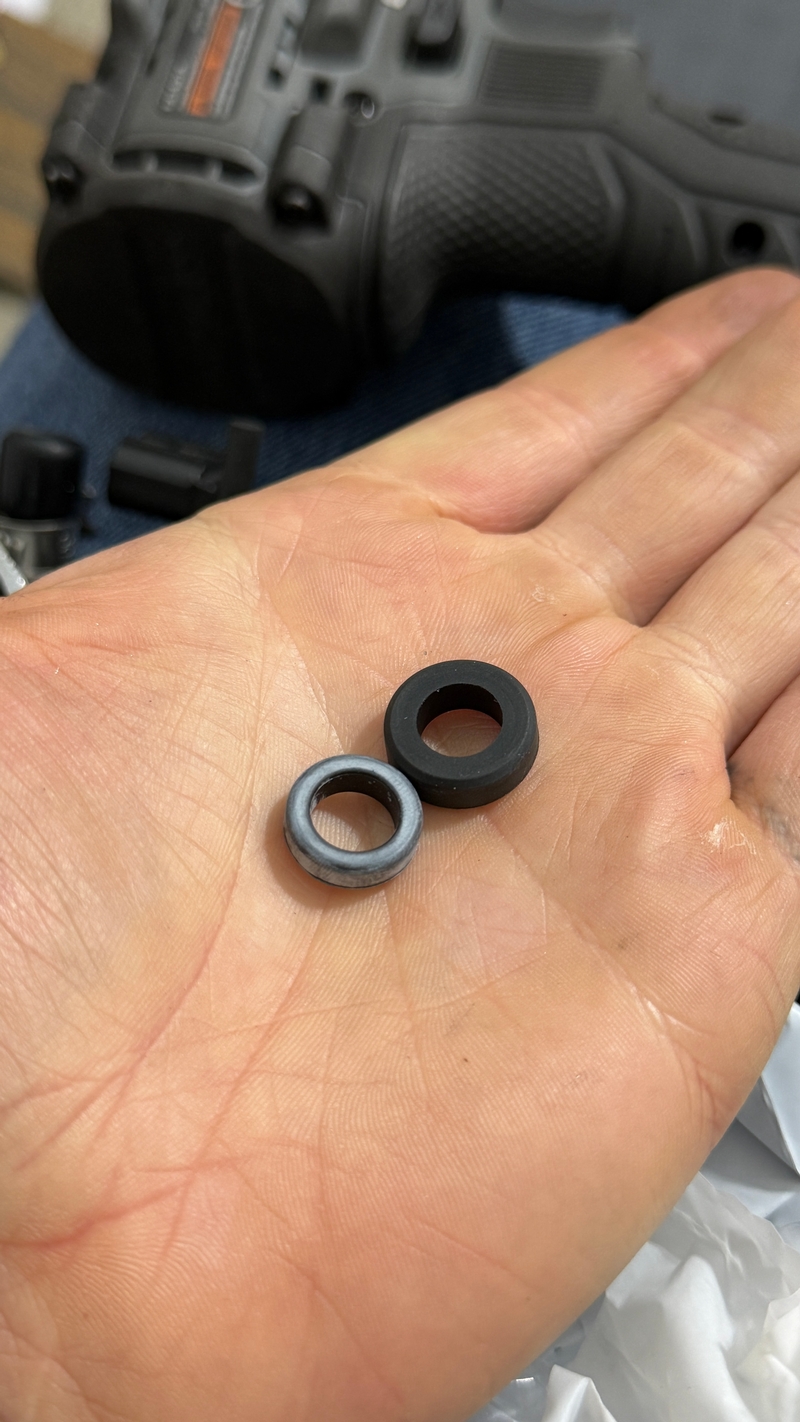
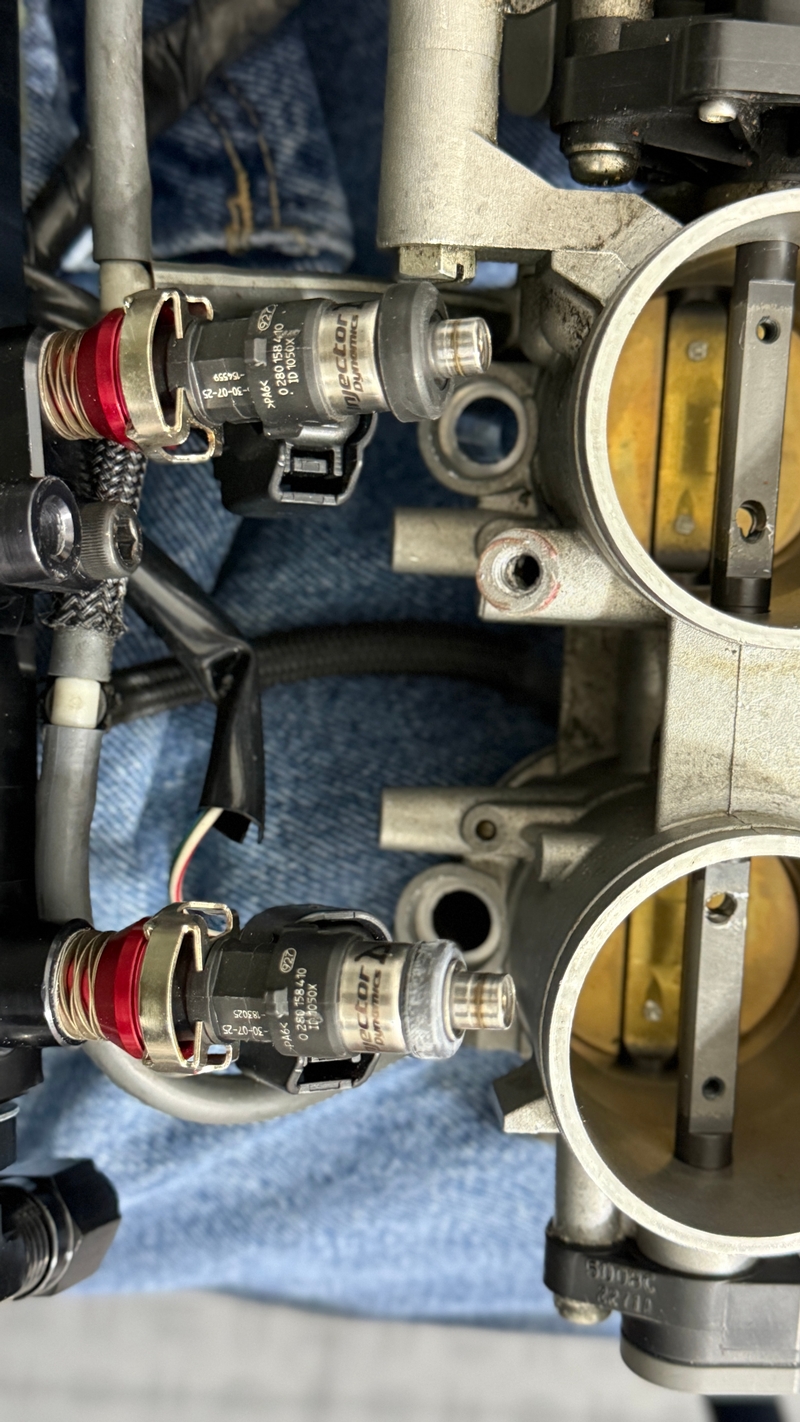
Current issue is finding the right size bottom seal for the injectors. This is what Boomstune gave me when he installed these injectors. But they don't exactly fit great. The injectors aren't centered in the bore and this adds a lot of height to the injector rail compared to OEM. It's causing issues with my install. The injector rail is too tall to allow me to put the throttle bodies back on without dropping the motor.

Link | Top | Bottom

Rook


Rook's Gravatar

Joined: 03/28/09

Posts: 22077

RE: Engine Build + RCC Ultimate Build Gallery
01/25/26 9:56 AM

I really like your air system. As you suggested, an electric shifter might be a lot simpler but I may go with air just because it's so cool. ...and from the little bit I've read, a couple people claim an electric shifter might lack some power for the higher load shifts. Damn, this is some expensive experimentation. All you can do is talk to others and be prepared to spend money.

Here is a photo of the rear brake delete I bought from Schnitz, next to a zx14 axle....... Not even close to fitting.

If I recall, you already have removed the ABS system. If so, all you need is a spacer to replace the caliper mounting plate. I guess I'd grind that incorrect spacer out carefully so it fits. It takes no stress other than the compression of the rear axle nut torque and nothing moves against it. Kinda sucks though because you could have just fabbed one out of a chunk of billet if you're going through all that. This piece would be useful with some work if you still needed to mount the ABS sensor.


08 MIDNIGHT SAPPHIRE BLUE ZX-14 Now Deceased, will be resurrected, 08 Hayabusa, 2024 ZX-14R bran friggin NEW and 2026 hayabusa!

Link | Top | Bottom

Rook


Rook's Gravatar

Joined: 03/28/09

Posts: 22077

RE: Engine Build + RCC Ultimate Build Gallery
01/25/26 10:04 AM

This is probably all overkill anyways, at least in most cases, it's just the principal of wanting to make it all cohesive that has been on my mind. I've put too much time money and effort in just the fuel system to bottleneck it with the stock rail. There are more benefits to the larger rail than I realized. For example injector-induced pressure pulsation would lessen because there is a larger volume of fuel in the rail, which is an issue with larger injectors, this can cause rich/lean spikes. Also the fuel pressure sensor will read cleaner with it.

People poke fun at me for being a perfectionist. Ha-ha. I laugh with them but I'm laughing in happiness because I absolutely know it's so much better to be a perfectionist than a halfass-ist. The really bad fuckups I made in life were from NOT overthinking important decisions.


* Last updated by: Rook on 1/25/2026 @ 10:04 AM *


08 MIDNIGHT SAPPHIRE BLUE ZX-14 Now Deceased, will be resurrected, 08 Hayabusa, 2024 ZX-14R bran friggin NEW and 2026 hayabusa!

Link | Top | Bottom

danmin


danmin's Gravatar

Location:

Fort Worth, Texas

Joined: 03/19/25

Posts: 350

RE: Engine Build + RCC Ultimate Build Gallery
01/25/26 2:15 PM

If I recall, you already have removed the ABS system. If so, all you need is a spacer to replace the caliper mounting plate. I guess I'd grind that incorrect spacer out carefully so it fits.

I got lucky and my bike came without ABS. One of the few Gen2 bikes non-ABS. The rear sensor feeds the speedometer on these. I found out after taking my bike out for a spin and my rear sensor connector wiggling itself loose. Causes KTRC lights to flash and the speedo to read 0 MPH.

These bikes are kind funky in that way, because if you have either of the MAP sensors unplugged- KTRC lights flash, Throttle blade sensors disconnected- KTRC lights flash, front or rear wheel sensors unplugged- KTRC lights flash, Wheel sensors dirty or too far from the plates on the wheels that the sensors read- KTRC lights flash... All without any Error Codes showing on the screen when you check for them. This disables your ability to change power mode as well as traction control levels. I did a lot of troubleshooting these stupid KTRC lights during this project, if you couldn't tell..

The Front is used to determine if there is any wheel spin and maybe wheelies? Not sure what else it would be there for on a non-abs bike.

I found a spacer that gets rid of the sensor mount and rear caliper mount for $29.99 shipped to me. Weighs something like 50g. I think I will put the rear brake on the bike at some point. Right now I am just trying to simplify things and get it ready for my tuner. When it is time to live with it- It will need attention on the full brake system. I really need to find some good non-brembo front rotors for it. Only ones I found at $400 EACH.... Mine are so crazy warped, but you don't really use brakes on a dyno.

Once the bike is ready to take down to Houston for tuning, I will grab pictures showing the full air system setup, wire routing, vacuum hoses and breather hose routing, all the goodies. I am dreading the last part of this build, but I know it will pay off in the long run........


Link | Top | Bottom

Rook


Rook's Gravatar

Joined: 03/28/09

Posts: 22077

RE: Engine Build + RCC Ultimate Build Gallery
01/25/26 8:03 PM

I found out after taking my bike out for a spin and my rear sensor connector wiggling itself loose. Causes KTRC lights to flash and the speedo to read 0 MPH.

My Gen1 was stuttering hard at normal street rpm and the speedo went to zero. The throttle cleared up but the speedo was dead all the way to work. This was right after a washing and I did squirt the hose on the bike. I carried on to work with the speedo not functioning. When I was done with work, I started it up and it was back to normal. I believe the speed sensor at the sprocket cover or its harness connector got some water in it from the bath. The engine was hot, it sat a few hours, dried out and was back to normal. I never used pressurized water of any kind on it again and never had the problem again.


08 MIDNIGHT SAPPHIRE BLUE ZX-14 Now Deceased, will be resurrected, 08 Hayabusa, 2024 ZX-14R bran friggin NEW and 2026 hayabusa!

Link | Top | Bottom

danmin


danmin's Gravatar

Location:

Fort Worth, Texas

Joined: 03/19/25

Posts: 350

RE: Engine Build + RCC Ultimate Build Gallery
02/01/26 2:21 PM

New injector seals. OEM new ones are smaller than the seals that came with the Injector Dynamics ones. Throttle bodies now installed on the bike. Though not a big difference, the smaller seals allowed me to lower the rail height considerably (~1/2"). I'll grab more pictures of the wiring harness and fuel hose routing at some point.


* Last updated by: danmin on 2/1/2026 @ 2:21 PM *

Link | Top | Bottom

danmin


danmin's Gravatar

Location:

Fort Worth, Texas

Joined: 03/19/25

Posts: 350

RE: Engine Build + RCC Ultimate Build Gallery
02/01/26 2:24 PM

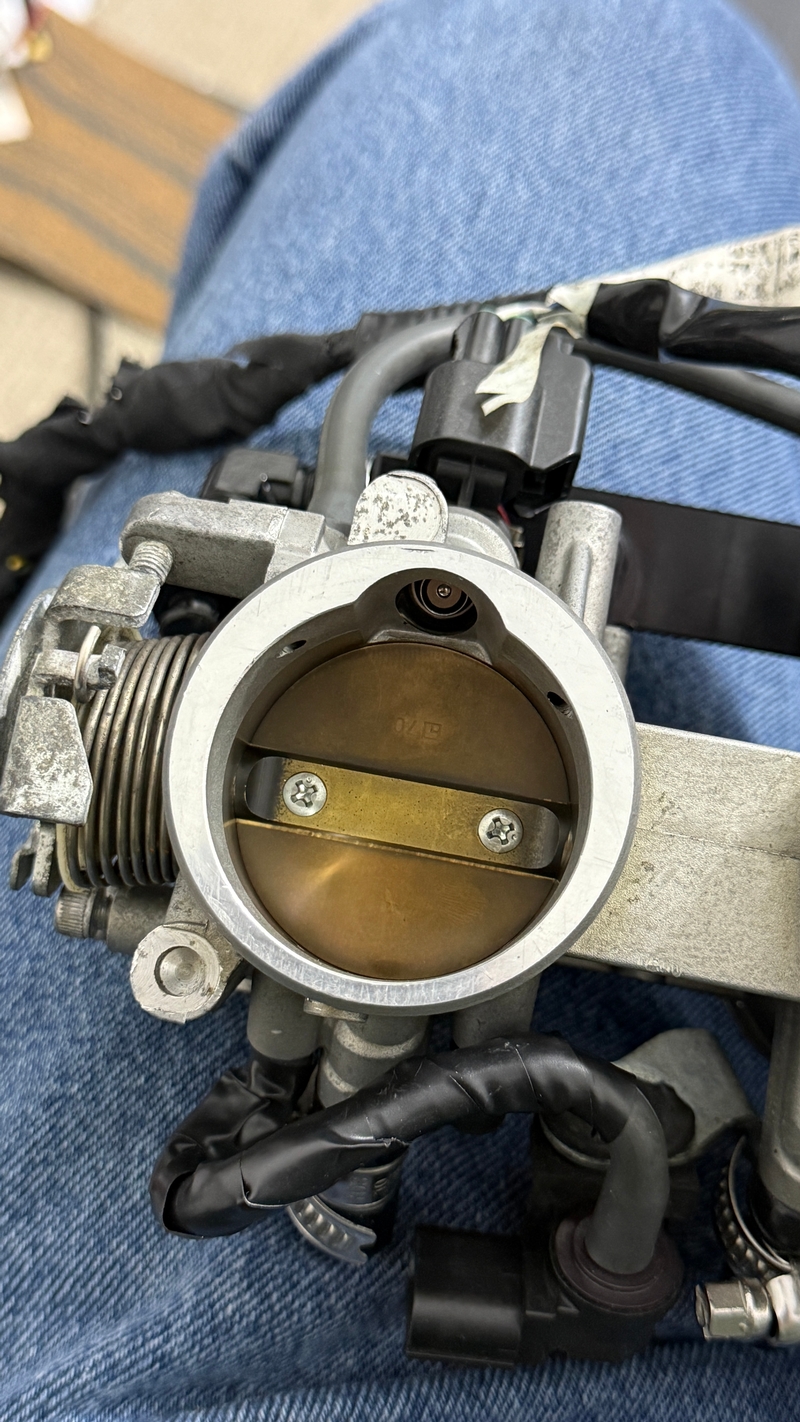
On my #1 cylinder (closest to timing chain), My throttle blade was loose. Check out the shiny bronze versus the dull bronze. I could wiggle the blade freely. I tightened the screws and will inspect any play with it in a few hundred miles. I'm not sure what all this would cause in the loose condition, but maybe making that cylinder run a little lean at part/low throttle? Weird.

Link | Top | Bottom

Rook


Rook's Gravatar

Joined: 03/28/09

Posts: 22077

RE: Engine Build + RCC Ultimate Build Gallery
02/02/26 3:04 PM

If you haven't, I'd use some high temp loctite on the screws. I guess I'd go with high strength.


08 MIDNIGHT SAPPHIRE BLUE ZX-14 Now Deceased, will be resurrected, 08 Hayabusa, 2024 ZX-14R bran friggin NEW and 2026 hayabusa!

Link | Top | Bottom

danmin


danmin's Gravatar

Location:

Fort Worth, Texas

Joined: 03/19/25

Posts: 350

RE: Engine Build + RCC Ultimate Build Gallery
02/03/26 2:47 PM

to do list:
-install steel shift shafts
-pressure test fuel system
-pressure test airbox
-fix air leak in air system (for air shifter)
-wire air shifter solenoid to maxx
-double check clutch springs installed are correct spec (thinking the clutch is slipping before lockup)
-put dragmax on
-bleed clutch
-wire new fuel pump
-change oil
-install little panels for battery and airbox
-install gas tank
-tighten top hose clamp on intake tubes
-double check maxx sensors are securely mounted
-insulate fuel pressure sensor from vibrations
-run new vacuum hose from intake to fuel pump
-get bike to idle

Sounding like I can get it to Boomstune this month.


* Last updated by: danmin on 2/3/2026 @ 2:47 PM *

Link | Top | Bottom

danmin


danmin's Gravatar

Location:

Fort Worth, Texas

Joined: 03/19/25

Posts: 350

RE: Engine Build + RCC Ultimate Build Gallery
02/03/26 2:49 PM

Rook, in hindsight that would be a good idea to add, since they were already out of the bike. It's all back and installed now. I will check them after the tuning sessions and see how the feel. if there is any wiggle, I'll add loctite.

Link | Top | Bottom

danmin


danmin's Gravatar

Location:

Fort Worth, Texas

Joined: 03/19/25

Posts: 350

RE: Engine Build + RCC Ultimate Build Gallery
02/03/26 2:50 PM

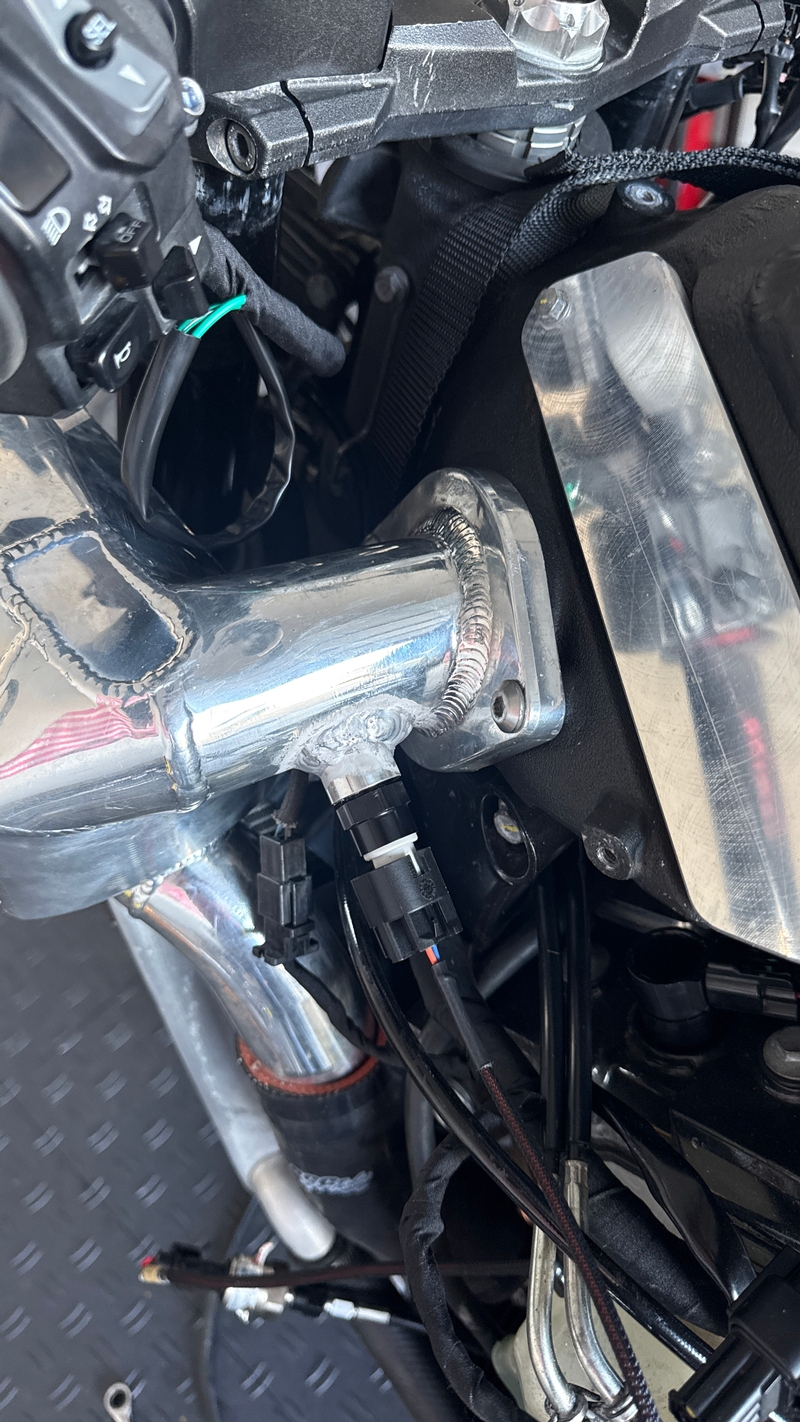
Had a shop weld this bung for the air temp sensor today, onto my intercooler. $48 and about an hour to get it done. Intercooler was easier to install/remove than I remembered. I also did a lot of this initial install under the influence of many Cayman Jacks.


* Last updated by: danmin on 2/3/2026 @ 2:51 PM *

Link | Top | Bottom

danmin


danmin's Gravatar

Location:

Fort Worth, Texas

Joined: 03/19/25

Posts: 350

RE&#x3a&#x3b; Engine Build &#x2b&#x3b; RCC Ultimate Build Gallery
02/06/26 6:53 PM

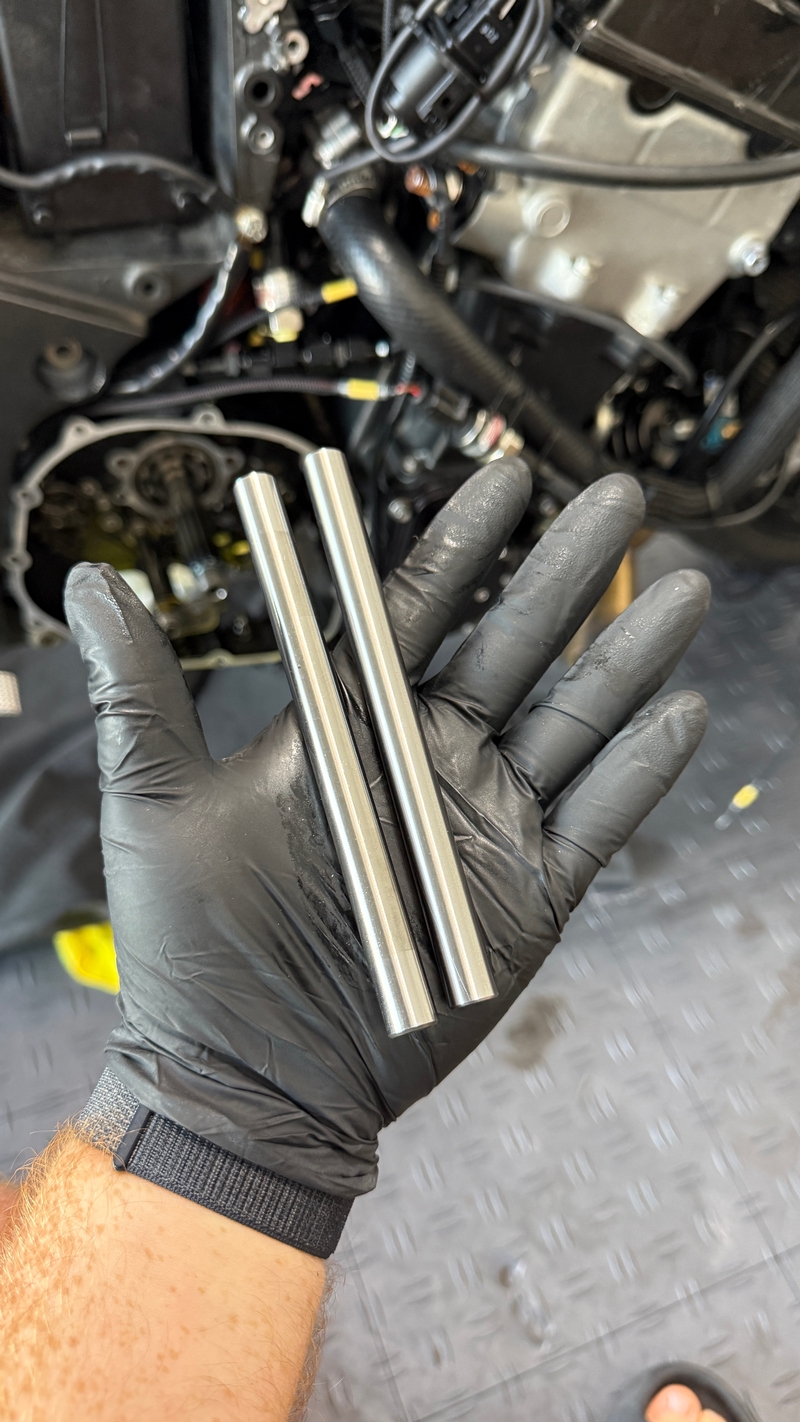
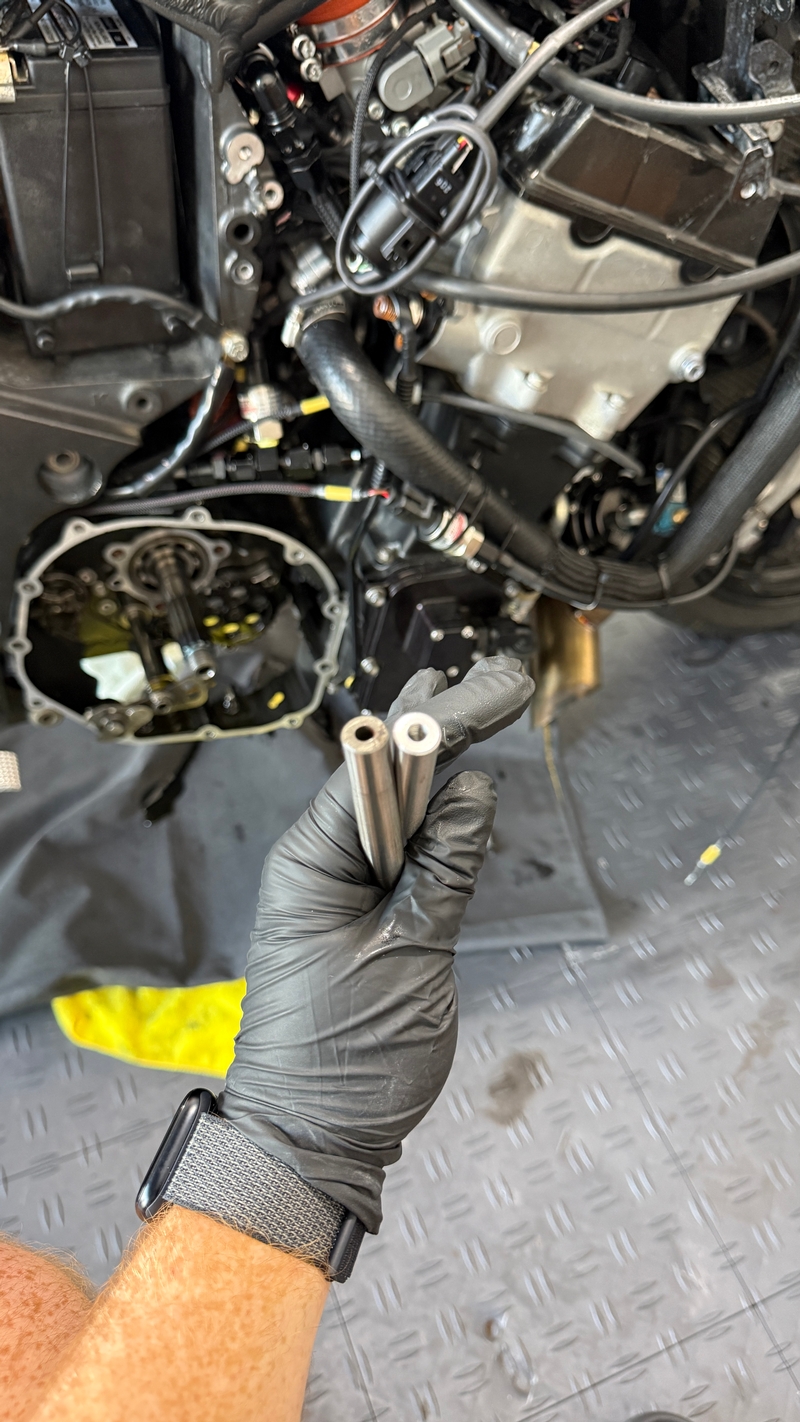
RBM Steel shift shafts installed today. Didn't seem all that different than what was already in the bike as a stock unit. My shifter shaft (that moves shift star and has shifter peg on it) is bent at the tip. Can't remove it. It still works for the bike. I'll keep an eye out for a new shaft I suppose.

Installed heavy duty detent spring in the shifter assembly. Not sure if it's worth it. Can't hurt. My stock one was about half as strong as the RBM upgraded one. My stock one is also now 15 years old and has a lot of miles. Springs don't last forever.... $15 to add it to the $75 shift shafts.

Installed correct clutch springs for the lockup. I had been using HD ZX10 springs, which worked fine, but I may as well use what's actually designed for the lockup.

Had a friend come and help me rewire the shifter solenoid to the Maxx. Now has removable connections and is also waterproof.

Changed the oil. Changed the filter. Wiped out the oil pan. Removed the oil hose that clips to the oil pickup. Apparently getting rid of it is supposed to help with blowby in the catch can? not sure about the science on it, but it's removed now.

Took a few hours to do all that. Had bigger plans for the evening, but I need to resume some work and figure out a good way to spend a 70 degree friday night in february. Bike can wait for the next cold snap or weeknight.


* Last updated by: danmin on 2/6/2026 @ 7:00 PM *

Link | Top | Bottom

danmin


danmin's Gravatar

Location:

Fort Worth, Texas

Joined: 03/19/25

Posts: 350

RE: Engine Build + RCC Ultimate Build Gallery
02/06/26 10:07 PM

Left: Stock Shaft
Right: RBM Shaft

RBM Shaft is threaded. Not exactly sure why, maybe to swap them out easier?

Link | Top | Bottom

danmin


danmin's Gravatar

Location:

Fort Worth, Texas

Joined: 03/19/25

Posts: 350

RE: Engine Build + RCC Ultimate Build Gallery
02/14/26 3:59 PM

Bike is ready for the tuner.

Would take to today, but Boomstune is busy. Going to take it sometime this upcoming week. Thinking Friday or Saturday.

Been getting too busy to keep stuff straight. In hindsight, there was so little to do on the bike, I just never sat down and wrote out what was left. Wrapped up what was left (once the motor was buttoned up from the shift shafts) in maybe 4 hours. I'll see what kind of photos i can grab before the month or three it'll be out of my hands.

Scratch that. New car i bought doesn't have trailer wiring. Adding that before I even try to tow... Looking like I'm making this trip on a saturday. Work has been crazy


* Last updated by: danmin on 2/17/2026 @ 11:44 AM *

Link | Top | Bottom

Puck


Joined: 12/19/25

Posts: 50

RE: Engine Build + RCC Ultimate Build Gallery
02/16/26 7:19 AM

Good point on the larger fuel rail about regulating pressure swings. When I switched to big injectors for e85, I developed a rich tip in that I am having a hard time fully tuning out. Its not super severe, and only happens when lightly cracking the throttle from a steady cruise while off boost, but its noticeable and annoying. Lamda dips about .05-.10 before clearing itself up immediately, just enough to notice. Wonder if a larger AN rail would help?? Im guessing a standalone could fix it too if I could mess with injector scaling and pulse settings, but my woolich+pcV/3bar map setup is not that advanced since I originally only planned to stay on pump gas(which it worked great for!). I went with ID injectors instead of the stock style, so im sure the basic schnitz 750s or w/e most run wouldn't have any issues.FWIW the 1050XDS alse need spacers and to swap the lower orings to stock, contrary to what the site I ordered from listed...thankfully a few minutes on the lathe solved the spacer issue, and I also milled a bit off the throttle center linkage to lower the rail a bit by modifying the mounting brackets while I was there.


* Last updated by: Puck on 2/16/2026 @ 7:39 AM *


Rocket powered land yacht

Link | Top | Bottom


Welcome to zx14ninjaform.com!
 
New Topic Reply
   Next Page

Page: 1 2 3 .. 13 15 16 17

Previous Page

New Post

Please login to post a response.