Move Close
Welcome to zx14ninjaform.com!

You are not logged in.
New Topic Reply
Next Page

Page: 1 2

Previous Page

Thread: Engine Build + RCC Ultimate Build Gallery

Created on: 04/16/25 08:54 PM

Replies: 31

danmin


danmin's Gravatar

Location: Granbury, Texas

Joined: 03/19/25

Posts: 30

Engine Build &#x2b&#x3b; RCC Ultimate Build Gallery
04/16/25 8:54 PM

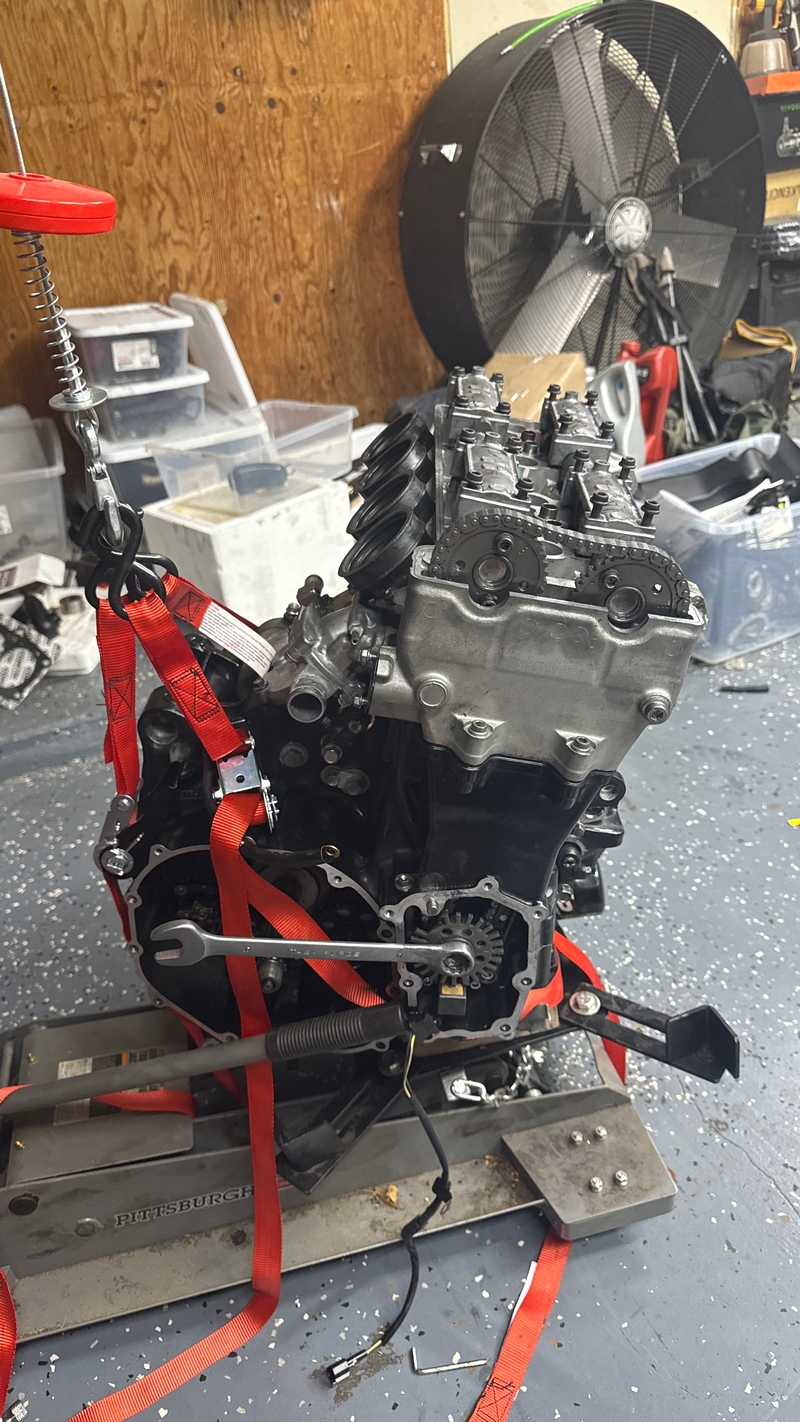
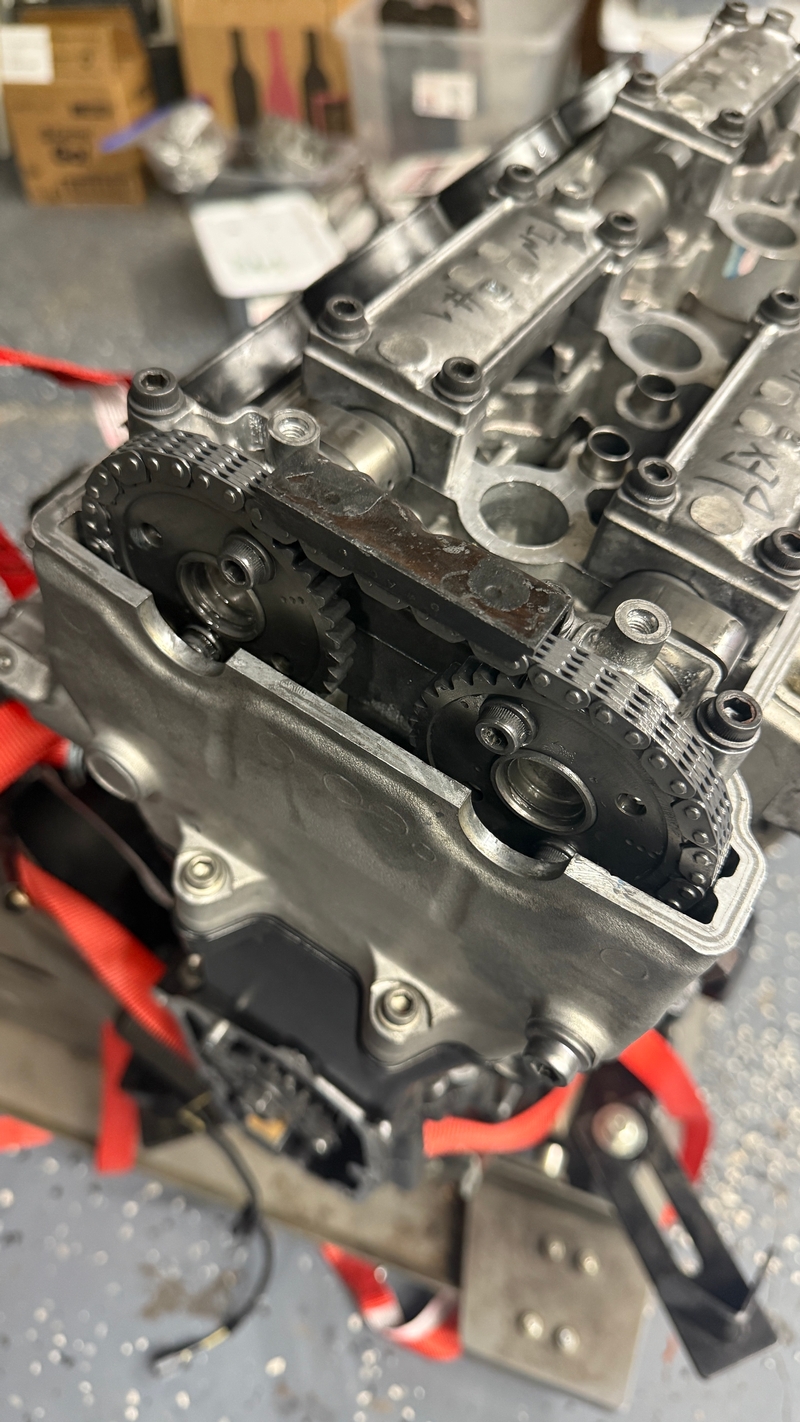
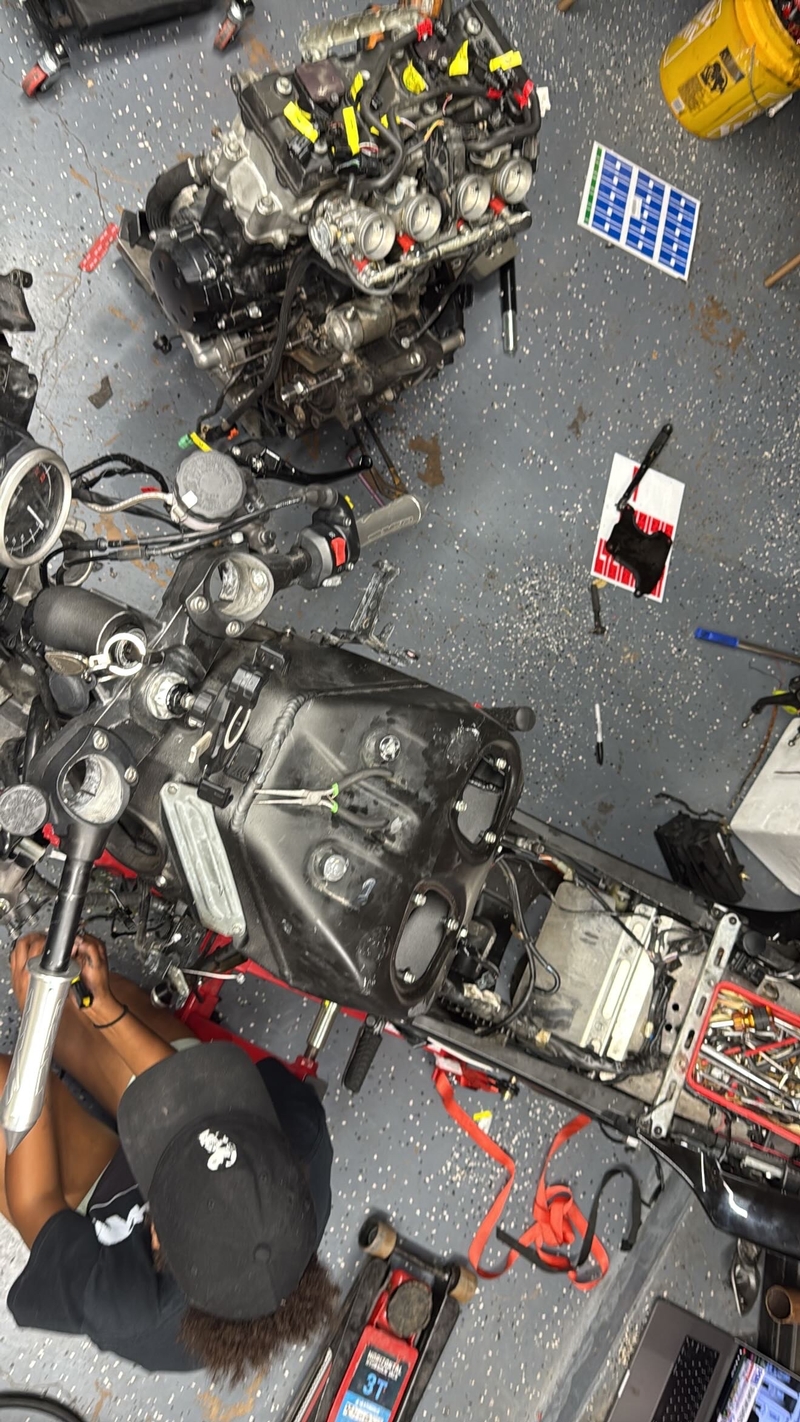
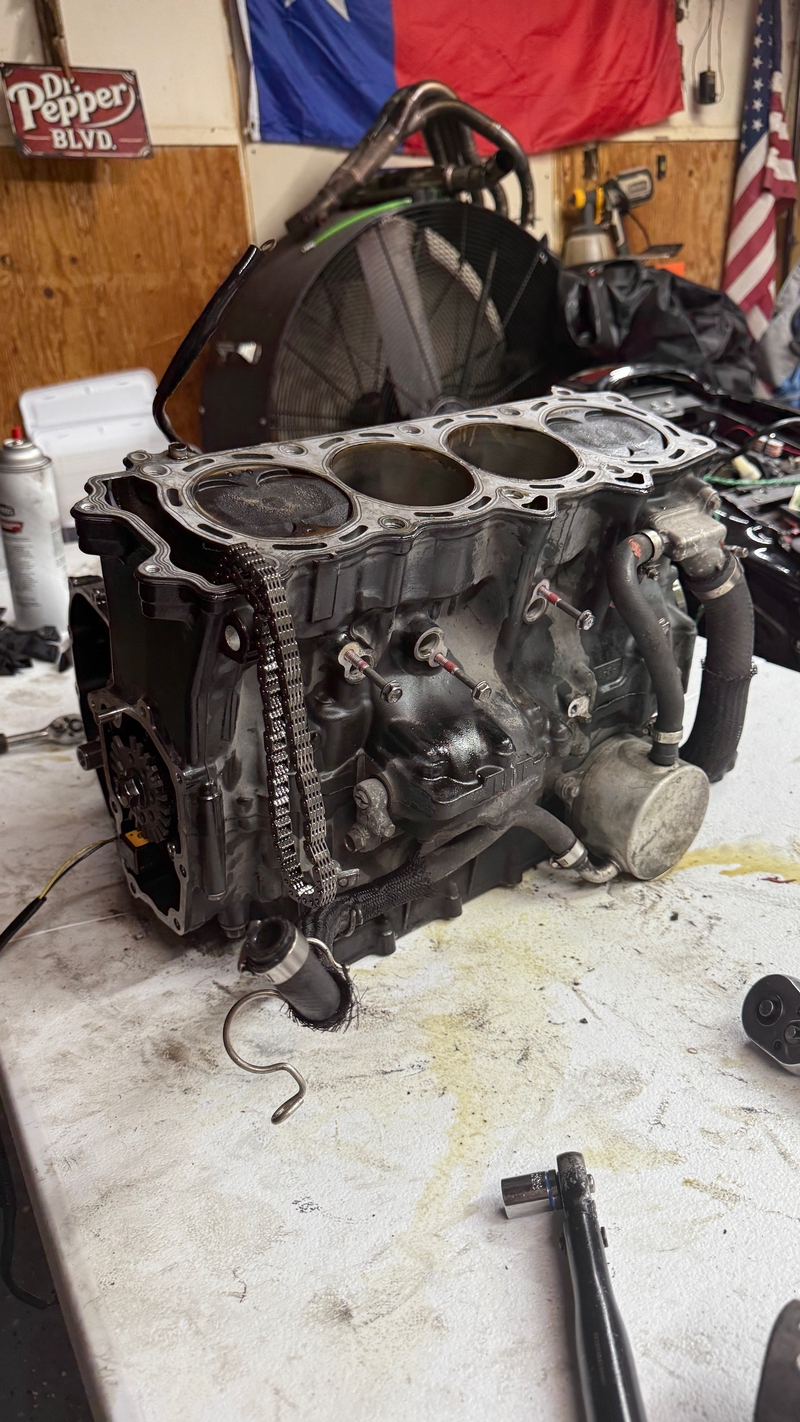
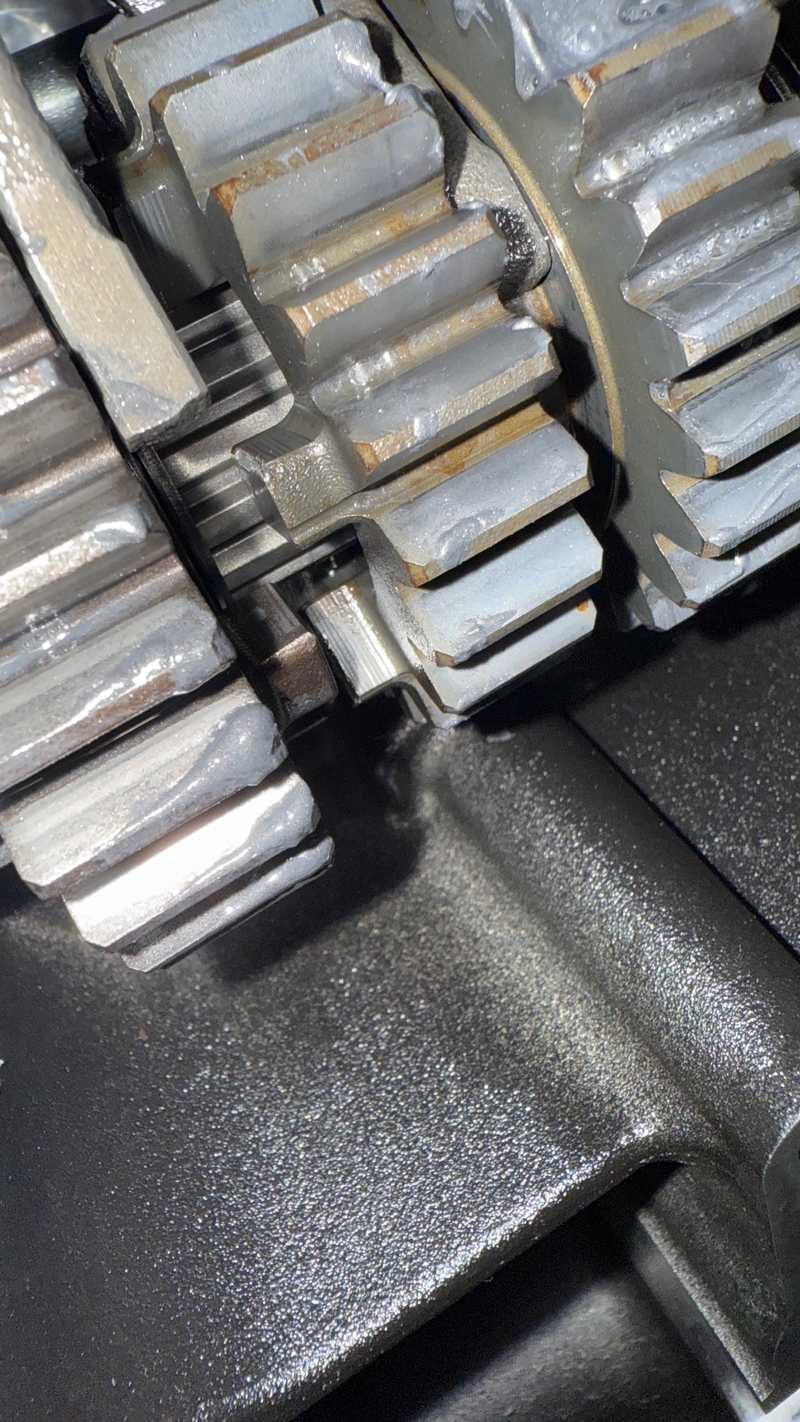
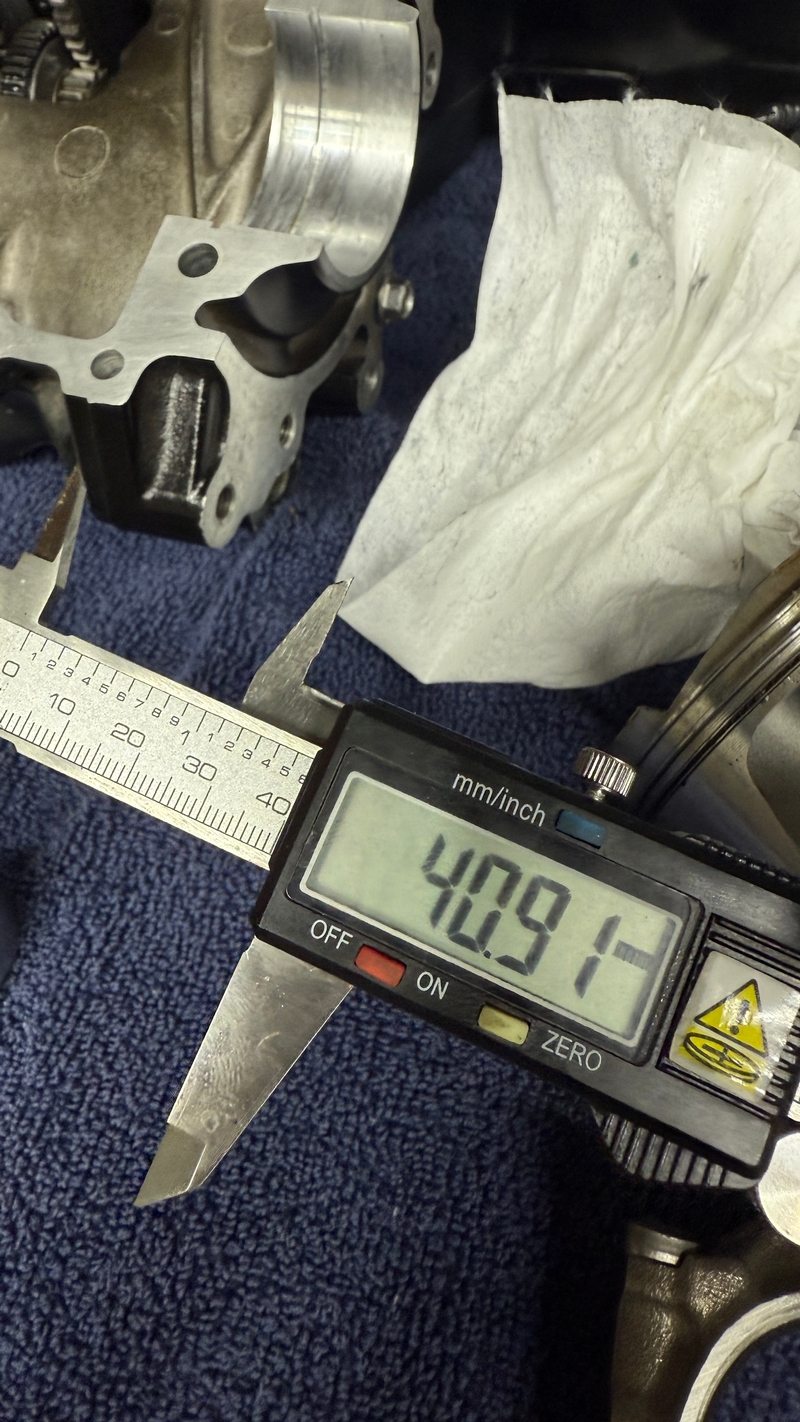
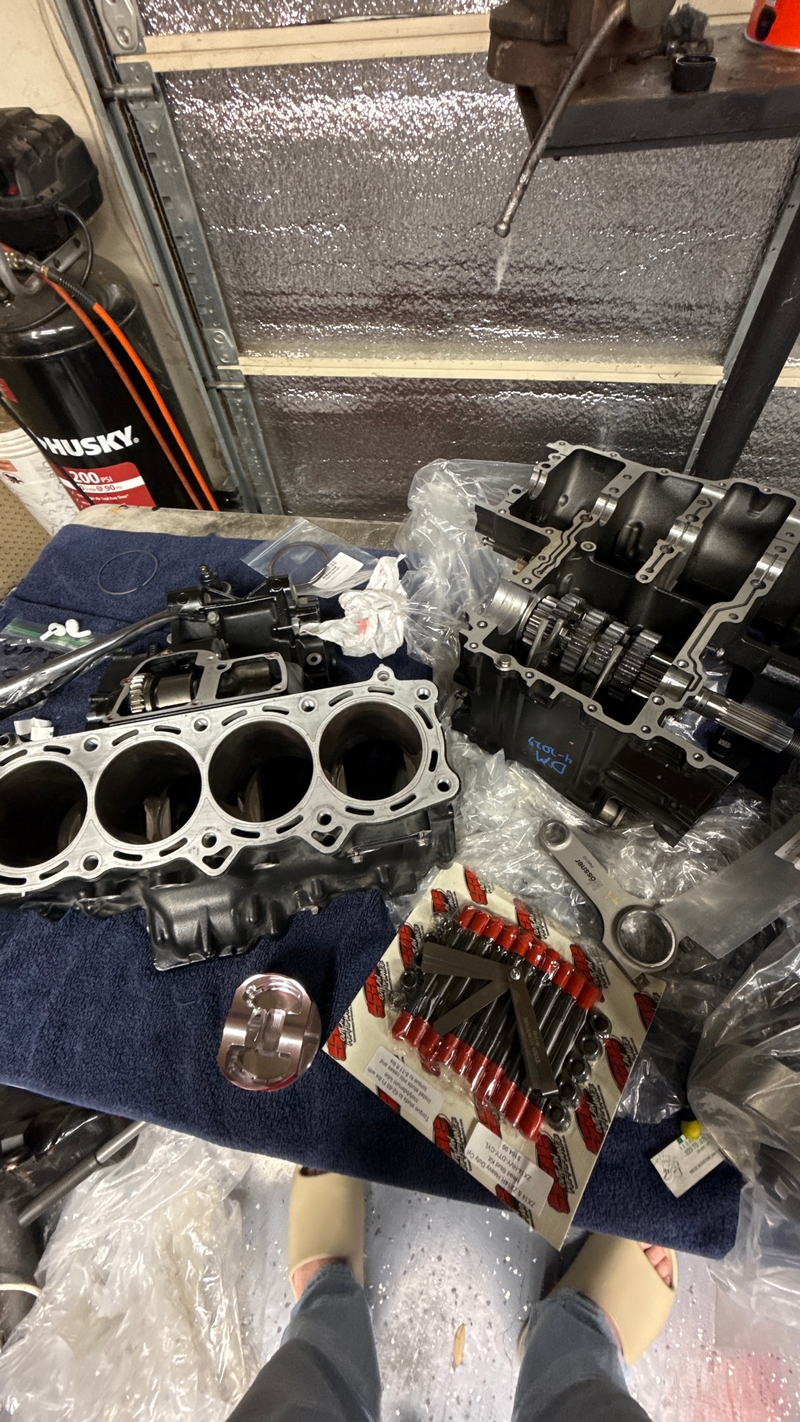
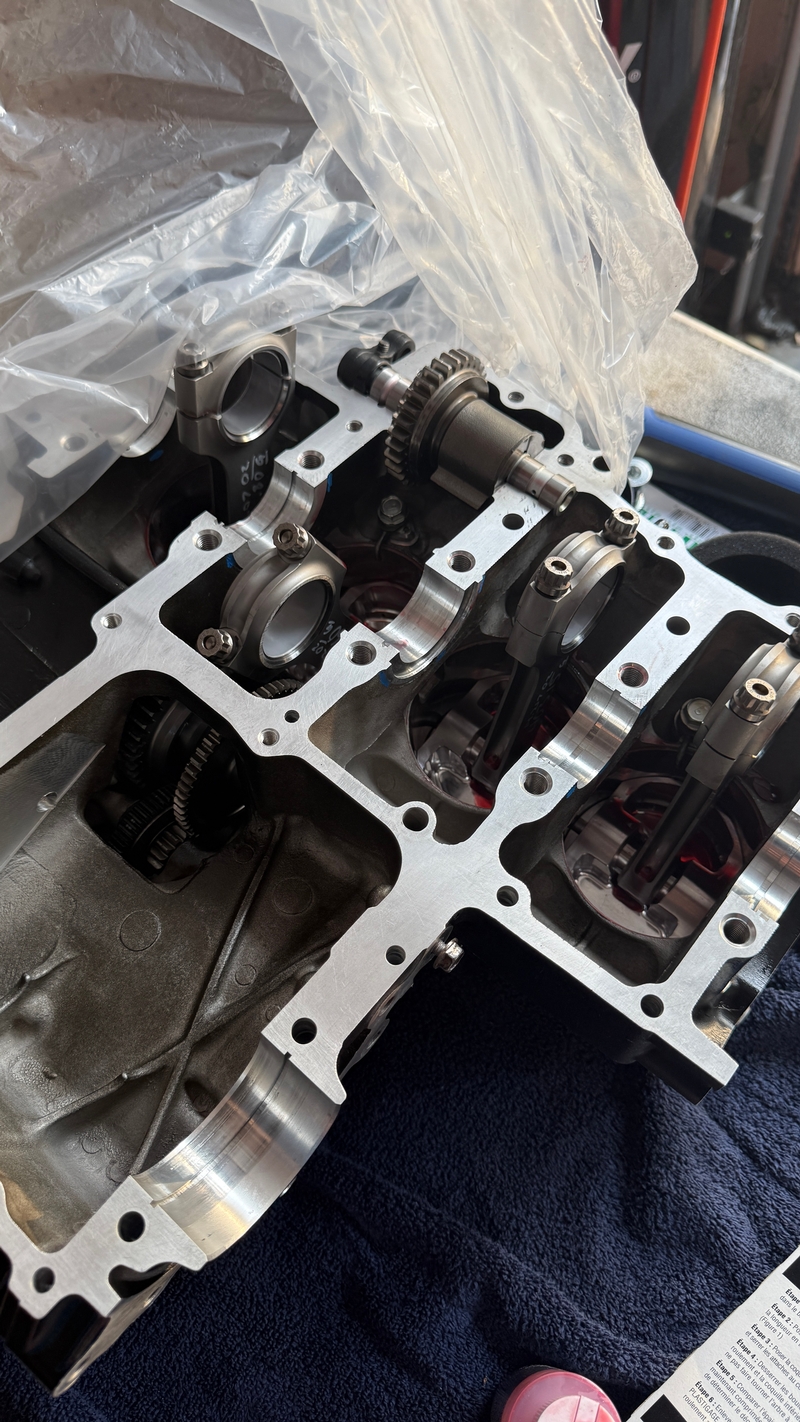
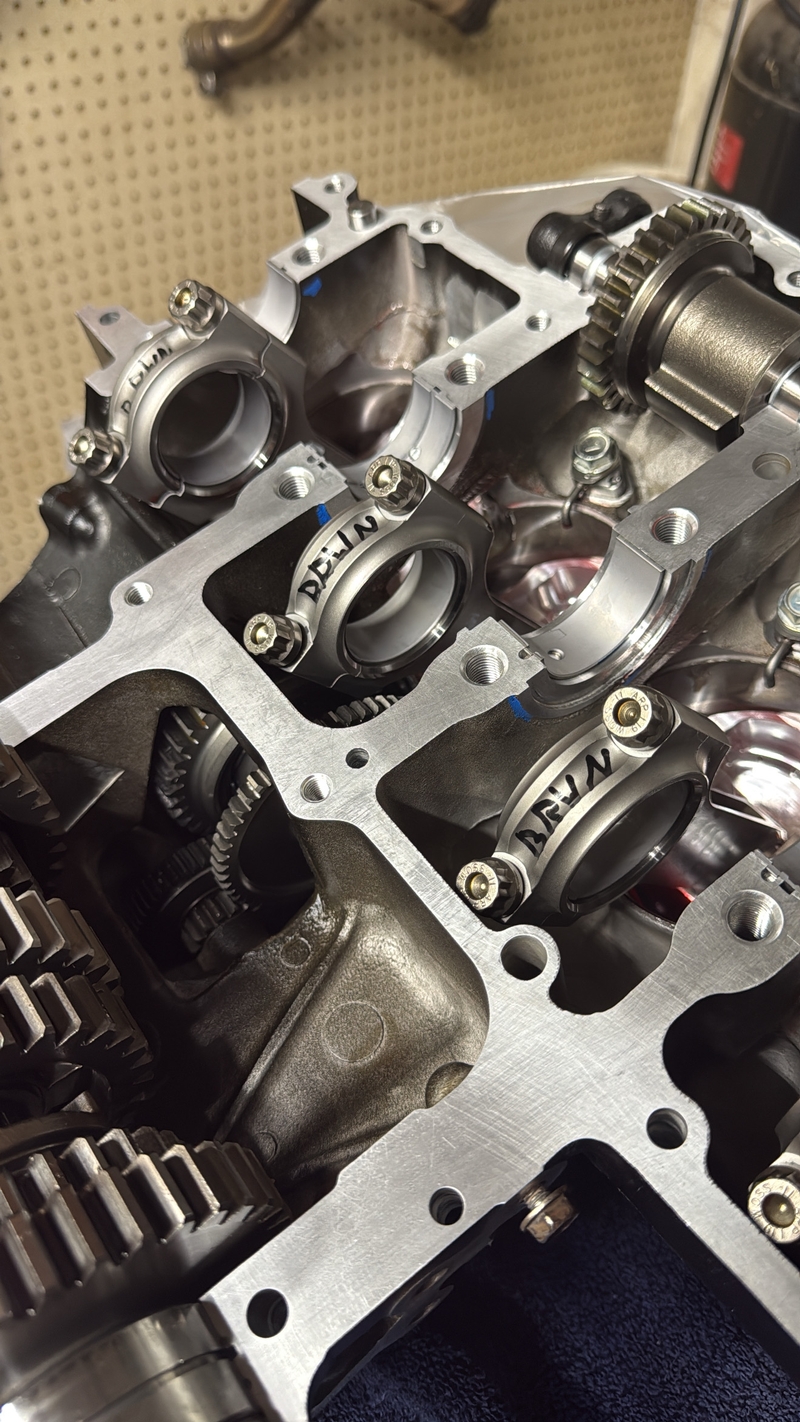
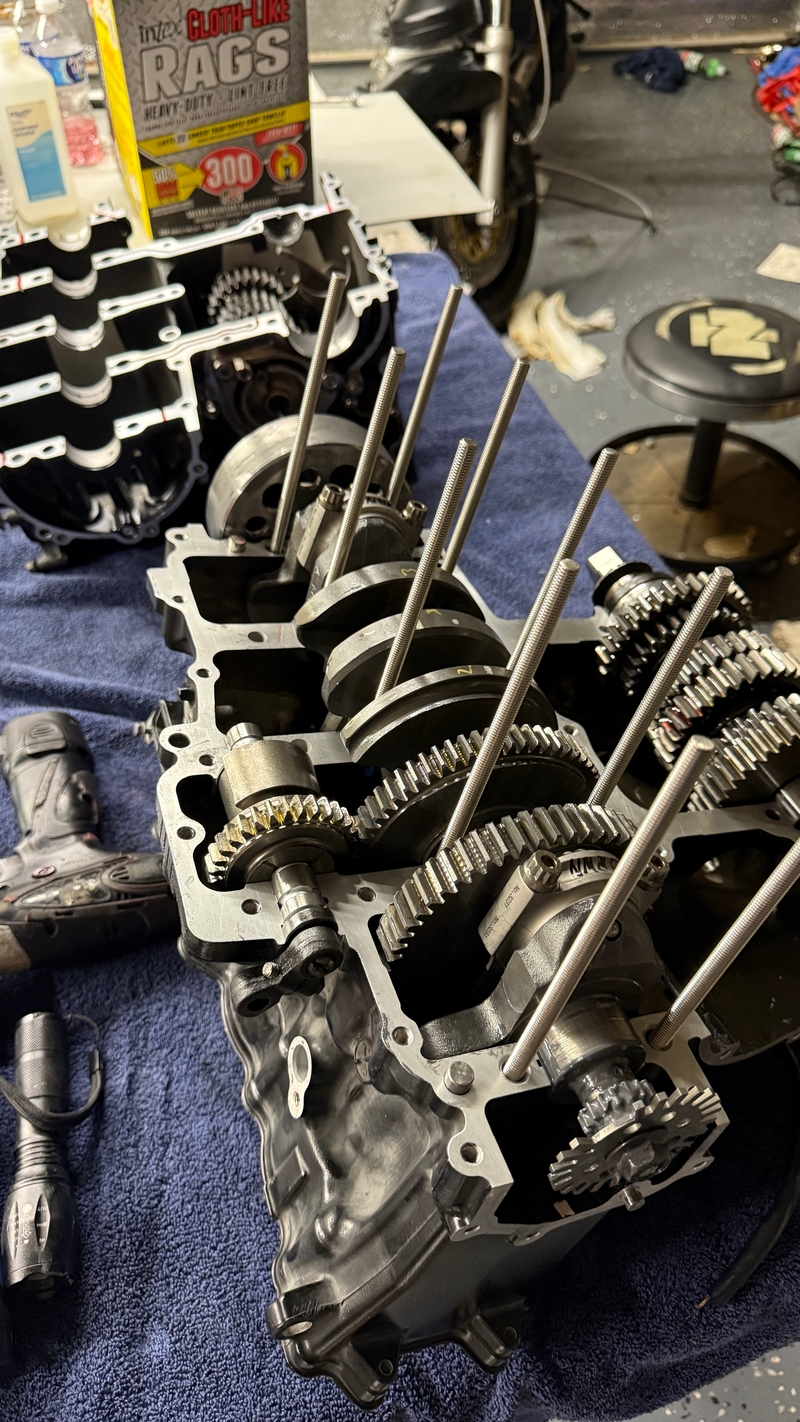
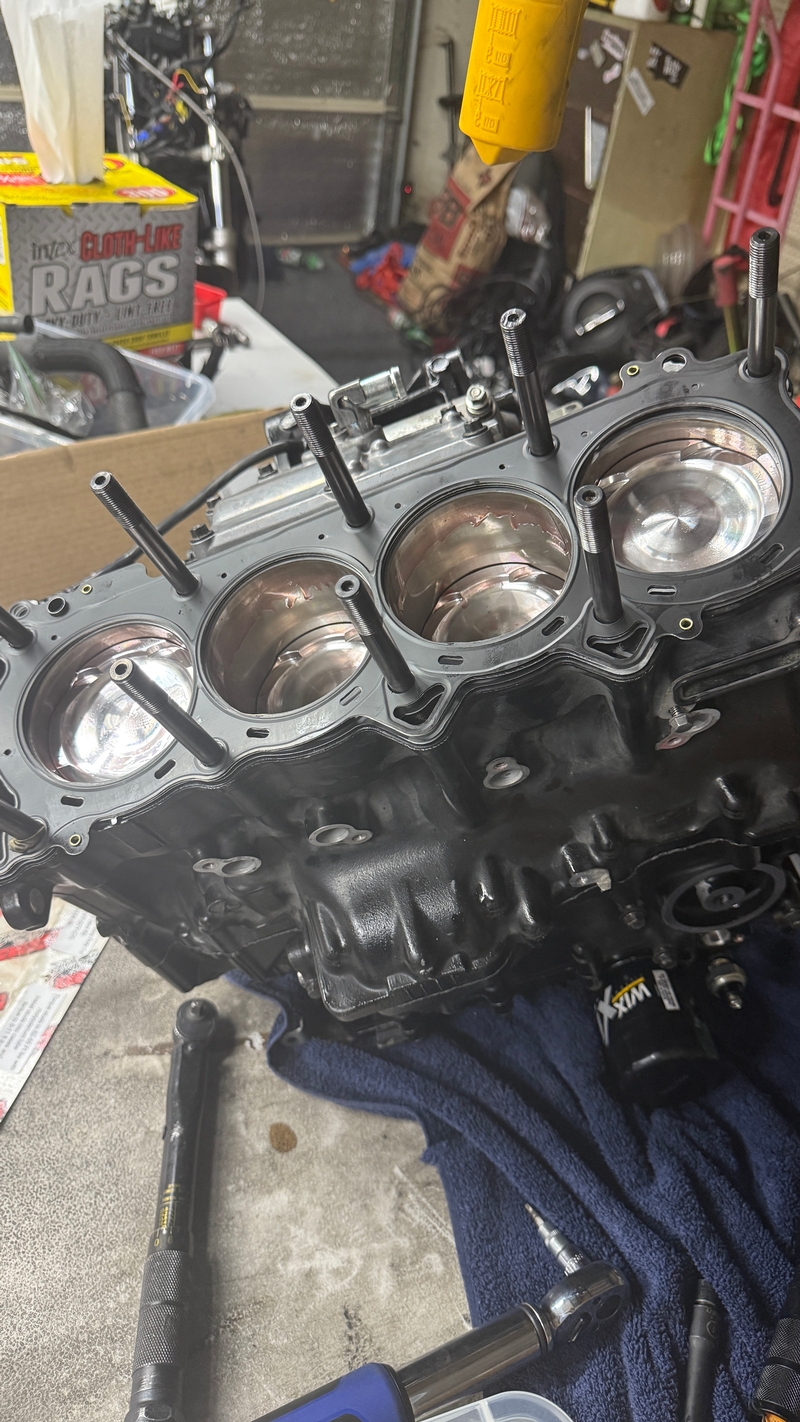
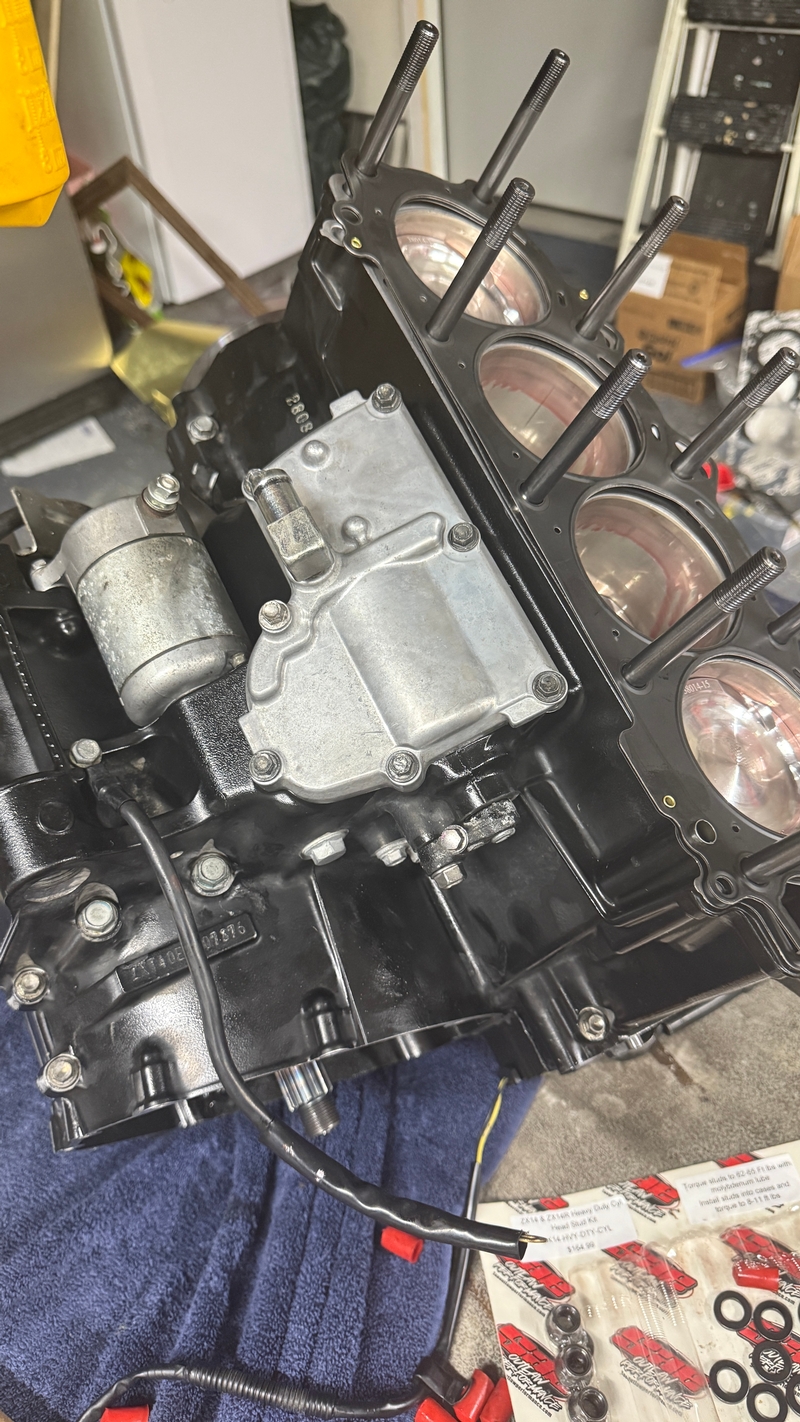
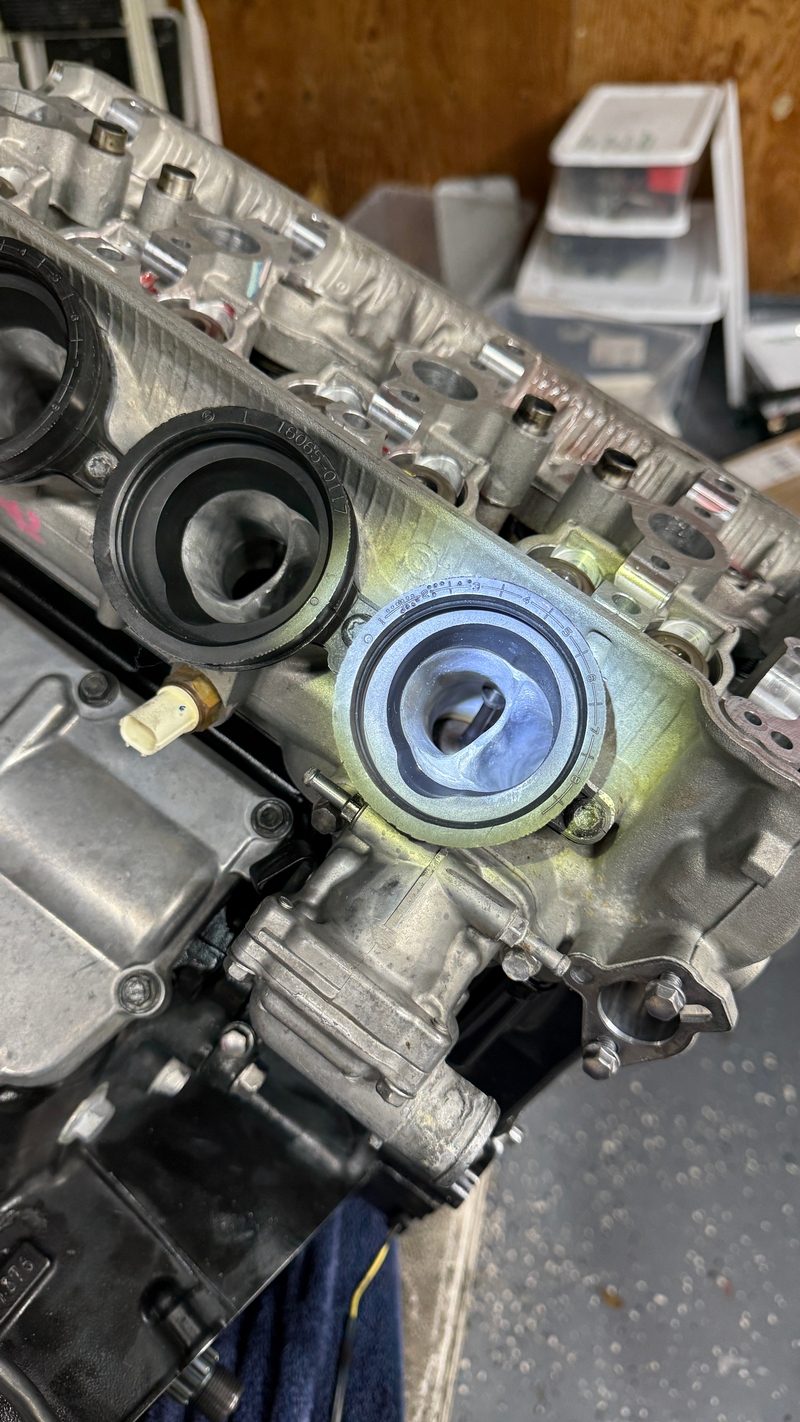
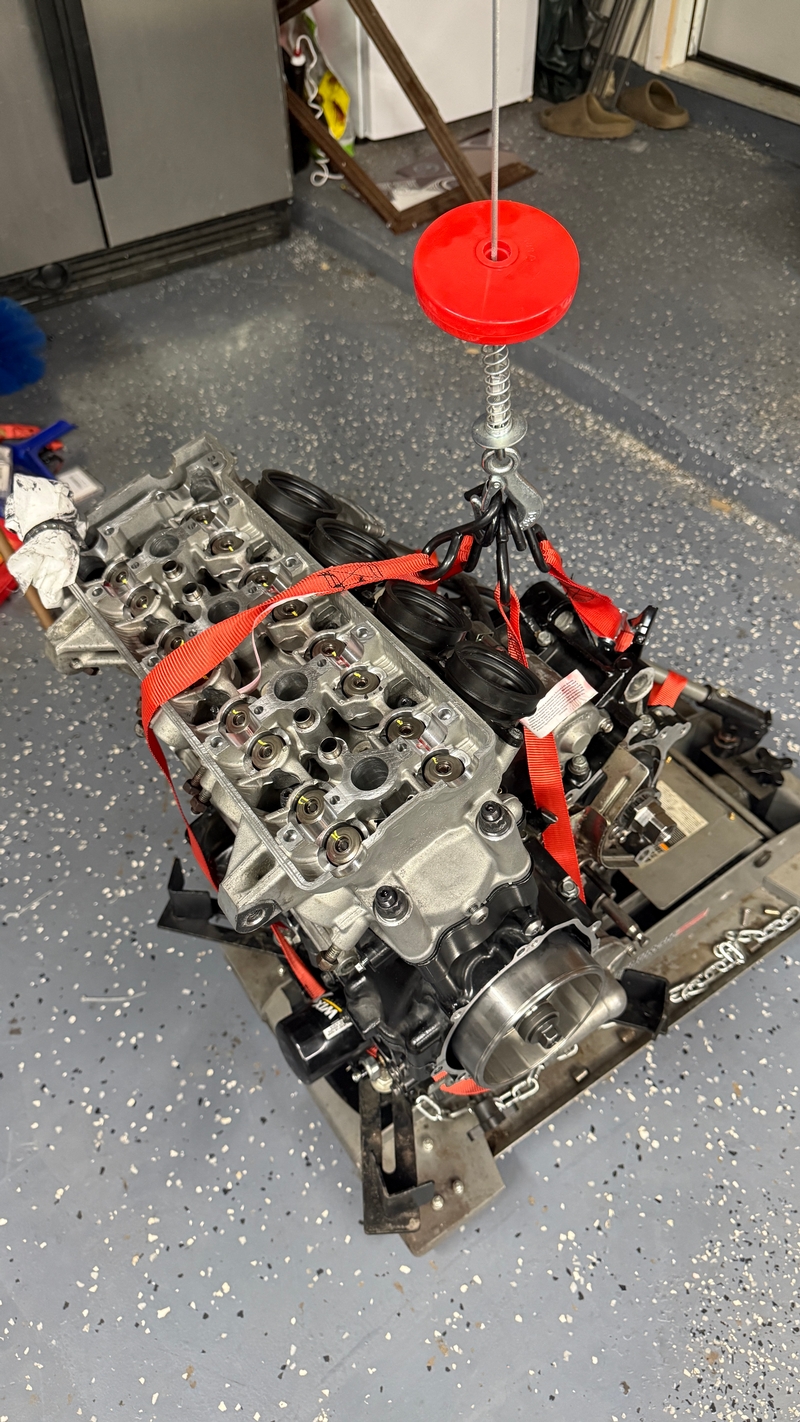
First set of photos from many more coming. Just shows you what you would be digging into if you were to tear your engine down and build it the right way. This is done in preparation of an RCC Stage 2 Ultimate kit.

2012 ZX-14R
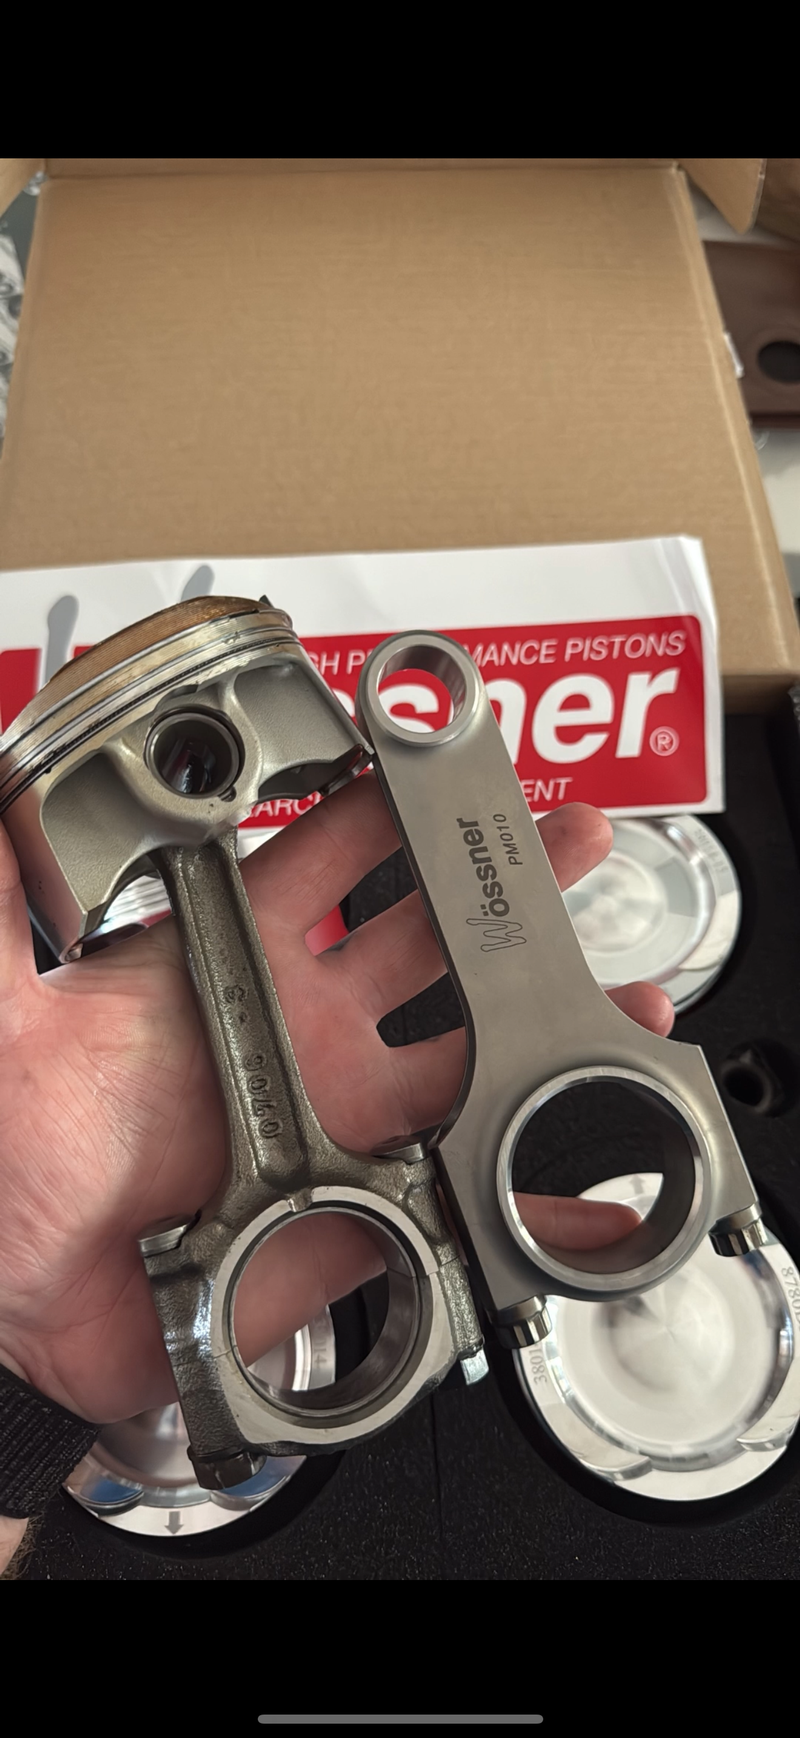
Wossner Low Comp Pistons
Wossner 3/8” Performance Connecting Rods
SAE Outlaw Oil Pump kit
SAE Outlaw Head Stud kit
SAE Outlaw Clutch Mod and full Hardware Kit
TRAC-KING Clutches and Steels
MTC 2 Stage Lockup
Brocks EHD Clutch Springs (3 used)
Carpenter Valve Springs
Rob Bush Viton Valve Seals
Various other upgrades too long to dig into


Backstory:
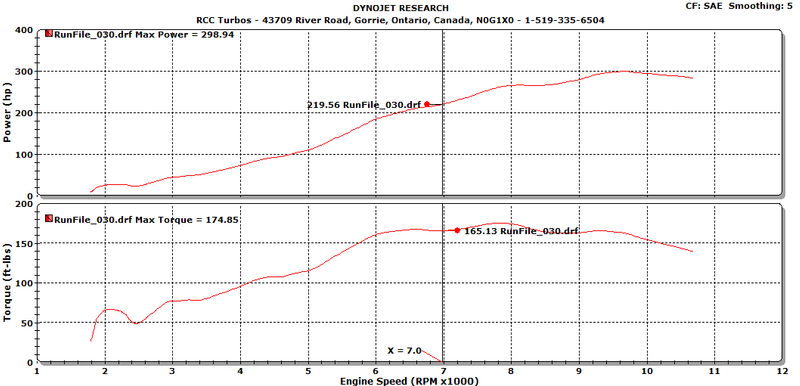
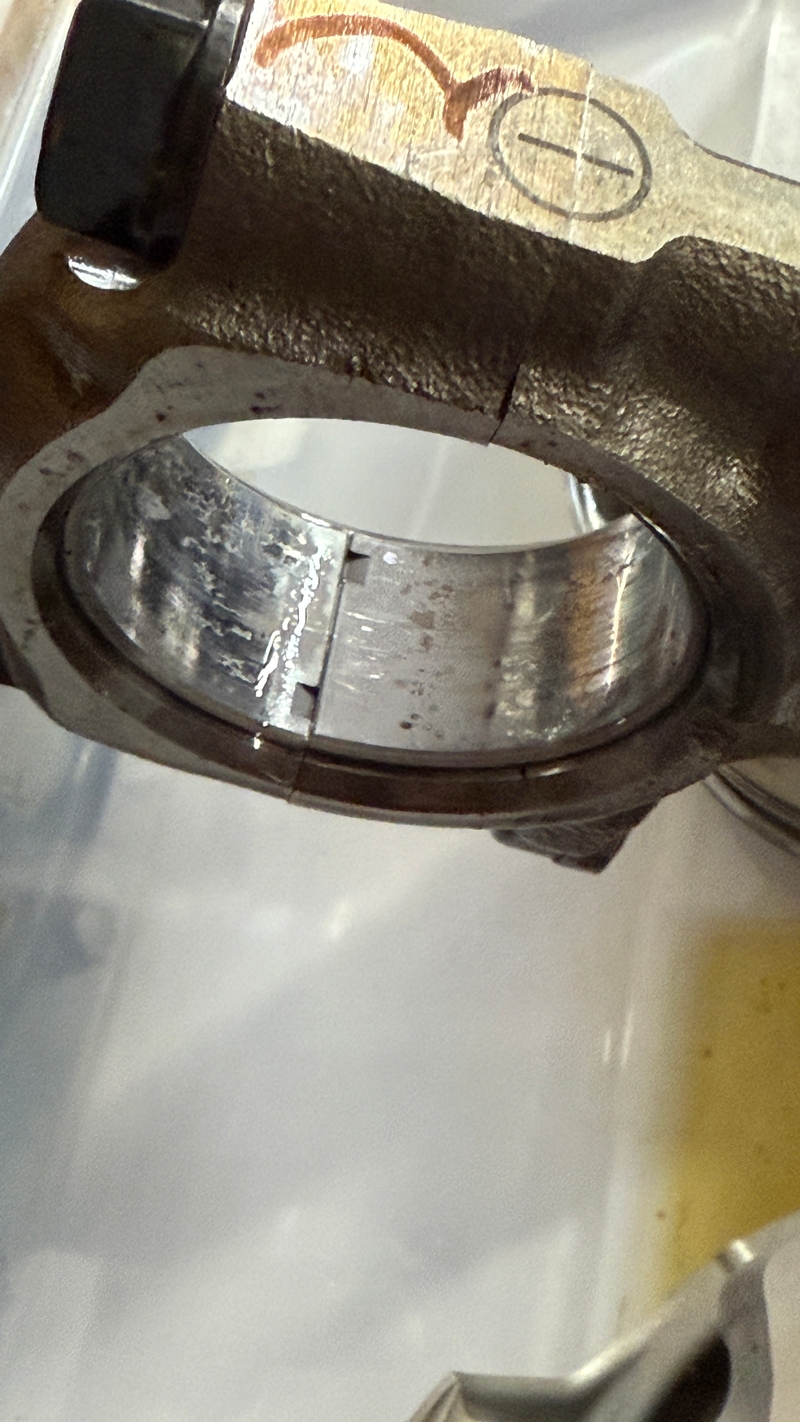
Bike is on it’s second engine. First died in a nitrous recreation of the Big Bang. New motor is of unknown mileage (allegedly 7k). Ridden for another 6k with new engine. The bike is extremely low. Had a cut oil pan and everything but hit something on the highway at speed. I couldn’t look at the dash to notice the low oil pressure light had come on as all of my oil drained itself on the highway. I drove for 30 seconds to a minute before shutting off. I made the repairs needed and it started right up without a fuss or noise. About 2,000 miles pass and I am ready for a turbo kit since I sold my project car (1975 Corvette) and had the time and funds to do it. If the bearings on the bike looked pretty I was just going to replace the pistons and call it a day. The bearings looked terrible. Worst Conrod bearings I have ever seen. Crank bearings were reasonably good though, considering they were starved. What started with a hopeful small upgrade turned into needing the full treatment. I guess it’s a real race bike now. The engine and turbo kit allegedly support 380-400 wheel hp on pump gas. But I need to call Richard to see what exactly that entails. Ultimately this bike will probably be more than I ever need. Only upgrades I can see wanting in the future is a MAXXECU so I can control boost, injectors, and traction control all in one place.


Please excuse the dirty garage. It is a shared space with another motorcycle enthusiast who happens to forget about cleaning up, every time.

Starting Line:


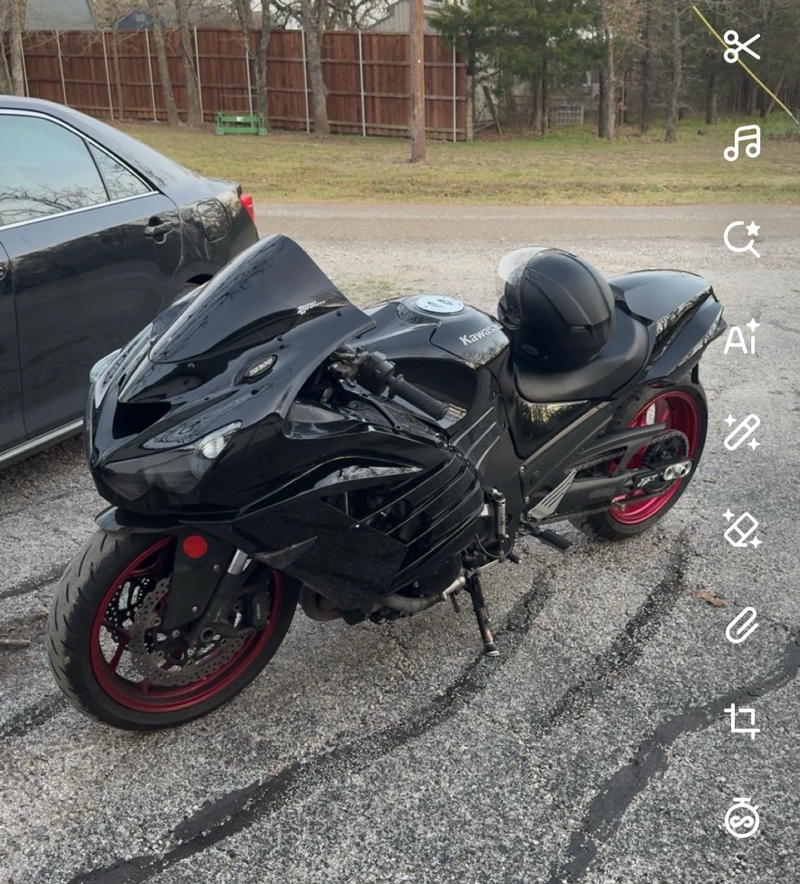
* Last updated by: danmin on 4/16/2025 @ 10:43 PM *

Link | Top | Bottom

danmin


danmin's Gravatar

Location: Granbury, Texas

Joined: 03/19/25

Posts: 30

RE: Engine Build + RCC Ultimate Build Gallery
04/16/25 8:56 PM

March 30th, 2025


* Last updated by: danmin on 4/16/2025 @ 9:33 PM *

Link | Top | Bottom

danmin


danmin's Gravatar

Location: Granbury, Texas

Joined: 03/19/25

Posts: 30

RE: Engine Build + RCC Ultimate Build Gallery
04/16/25 8:56 PM

March 31st, 2025


* Last updated by: danmin on 4/16/2025 @ 8:56 PM *

Link | Top | Bottom

danmin


danmin's Gravatar

Location: Granbury, Texas

Joined: 03/19/25

Posts: 30

RE: Engine Build + RCC Ultimate Build Gallery
04/16/25 8:58 PM

April 8th, 2025
Receipt and comparison of Wossner Rods and Pistons


Link | Top | Bottom

danmin


danmin's Gravatar

Location: Granbury, Texas

Joined: 03/19/25

Posts: 30

RE: Engine Build + RCC Ultimate Build Gallery
04/16/25 9:00 PM

April 10th, 2025

Transmission Dog Inspection and Triple-Checking measurement with cheap equipment.

NOTE: MOLY LUBE ON TRANSMISSION


* Last updated by: danmin on 4/16/2025 @ 9:01 PM *

Link | Top | Bottom

danmin


danmin's Gravatar

Location: Granbury, Texas

Joined: 03/19/25

Posts: 30

RE: Engine Build + RCC Ultimate Build Gallery
04/16/25 9:10 PM

Aril 12th, 2025

DIY Hot Tanked ALLLL parts. Made everything so clean and easy to work with. Zero oil or grit anywhere. Inside or out. Going to do that for all maintenance and whatnot I do from here on. $20 worth of equipment. Just add soap and water.

Dress rehearsal. Checking clearances. Weighing and balancing Rods. Pistons and hardware were all perfectly balanced.
Second picture is doing piston rings. Ignore my OSHA-Approved footwear.


* Last updated by: danmin on 4/16/2025 @ 9:11 PM *

Link | Top | Bottom

danmin


danmin's Gravatar

Location: Granbury, Texas

Joined: 03/19/25

Posts: 30

RE: Engine Build + RCC Ultimate Build Gallery
04/16/25 9:17 PM

April 15th, 2025

Received my 5th order of bearings from Rob Bush. Not kidding. Bought one size of each kind of bearing to make sure tolerances were where I wanted them. Then I got the colors mixed up in my head… I really gotta start writing stuff down… Spent more on bearings than Rods or Pistons… Cha-Ching!
Installed Connecting Rod Bearings. Installed Case Bearings.


* Last updated by: danmin on 4/16/2025 @ 10:44 PM *

Link | Top | Bottom

danmin


danmin's Gravatar

Location: Granbury, Texas

Joined: 03/19/25

Posts: 30

RE: Engine Build + RCC Ultimate Build Gallery
04/16/25 9:21 PM

April 16th, 2025

Got the rest of the case bearings needed. Every tolerance is now perfect. Assembly day!


PART 1:

Used random studs from Amazon.com to help guide case perfectly together after adding silicone and letting get tacky. The Dowels for the cases did NOT want to play along……


* Last updated by: danmin on 4/16/2025 @ 9:22 PM *

Link | Top | Bottom

danmin


danmin's Gravatar

Location: Granbury, Texas

Joined: 03/19/25

Posts: 30

RE: Engine Build + RCC Ultimate Build Gallery
04/16/25 9:25 PM

PART 2:
Installed all oiling parts. Installed Head Studs. Added Head Gasket. I am still loving how clean all the pieces are. Worth the time and effort.

Link | Top | Bottom

danmin


danmin's Gravatar

Location: Granbury, Texas

Joined: 03/19/25

Posts: 30

RE: Engine Build + RCC Ultimate Build Gallery
04/16/25 9:28 PM

PART 3:
Head on engine. Before adding Stud nuts.

Link | Top | Bottom

danmin


danmin's Gravatar

Location: Granbury, Texas

Joined: 03/19/25

Posts: 30

RE: Engine Build + RCC Ultimate Build Gallery
04/16/25 10:30 PM

PART 4:

Engine on Transmission Jack with block of wood underneath supporting engine. Strapped and hooked for safety while I do the last couple things for the engine assembly. CR10EK Spark Plugs arrived. Just need to find my gapping coin so I can gap and install. Old plugs in the picture for comparison. Pretty clean for how many miles they had on them.


* Last updated by: danmin on 4/16/2025 @ 10:31 PM *

Link | Top | Bottom

danmin


danmin's Gravatar

Location: Granbury, Texas

Joined: 03/19/25

Posts: 30

RE: Engine Build + RCC Ultimate Build Gallery
04/16/25 10:55 PM

Just gotta throw the cams on with the new shims and bolt stuff together.

Gonna be a long wait for the RCC turbo kit. Richard said the kit won’t be ready “realistically” for another 3 weeks from April 2nd. Making April 23rd the rough estimate of completion. Then another week to ship. I should have 2 weeks of free time before his kit gets here. Bummer. Maybe longer if he doesn’t get it out around his estimated time.


* Last updated by: danmin on 4/16/2025 @ 10:56 PM *

Link | Top | Bottom

Rook


Rook's Gravatar

Joined: 03/28/09

Posts: 21033

RE: Engine Build + RCC Ultimate Build Gallery
04/17/25 7:11 AM

WOW danmin, I'm doing everything you do but not until I get to ride the bike for at least one summer with turbo on stock engine. What you have done would take me the better part of a year. I won't be stating the engine build project this winter. I'd be more ambitious if it were an older engine. I'm expecting to have the turbo kit completely installed by the the end of winter, that's how slow I am. LOL three weeks will be fine for me. I need to ride the bike a little before it goes up for turbo. I'm thinking of buying a lift for it. I know someone who has a used one he's wanting to sell.


* Last updated by: Rook on 4/17/2025 @ 7:13 AM *


08 MIDNIGHT SAPPHIRE BLUE ZX-14 Now Deceased, will be resurected 2024 ZX-14R bran friggin NEW!

Link | Top | Bottom

danmin


danmin's Gravatar

Location: Granbury, Texas

Joined: 03/19/25

Posts: 30

RE: Engine Build + RCC Ultimate Build Gallery
04/17/25 9:39 AM

Heck. The upgrades required to run the turbo on a stock engine would require you to tear the engine down almost to the point of putting rods and pistons in. At that point there’s a strong argument to just do it since you’re never gonna want to tear the engine apart again. LOL. It looks far more intense than it really is. This has been a breeze compared to working on some of the classics I’ve had to deal with. The Service Manual is free online and extremely informative. Also there are a few videos of engine assembly.

I’d strongly recommend against running the turbo on the stock engine for a season first. It’s about the same level of difficulty and number of steps to configure the stock engine for the turbo (degree cams, install adjustable sprockets, valve springs, head studs, oil mod, etc) versus building the engine for the power (measure and plastigauge connecting rods as your mains are probably new enough to be left alone, gap piston rings, valve springs, head studs, etc)

Rook, when it comes time for you to do this stuff shoot me a message. I ordered a bunch of tools and extra stuff that might be of use to you. Such as a headgasket, Valve Spring Compressor, etc all available at a discount or as a loaner since I can’t return them.


* Last updated by: danmin on 4/17/2025 @ 10:13 AM *

Link | Top | Bottom

Rook


Rook's Gravatar

Joined: 03/28/09

Posts: 21033

RE&#x3a&#x3b; Engine Build &#x2b&#x3b; RCC Ultimate Build Gallery
04/17/25 4:26 PM

I'm going to need to press Richard on the issue of required engine building. It was just email but what I got was:

' Other than secondary butterfly removal, any RCC turbo kit can run on a completely stock engine with the 4 to 6 psi waste gate spring. A thicker head gasket, high performance head studs and valve springs and mods to improve oiling are the first engine build steps for higher boost.'

If I need to do engine building before I run this turbo even on low boost, I'll do it. I'm not risking destroying a brand new engine just to get 20-30 more hp while I ride the bike for a season. I'd just buy a used motor and put it in the bike before I blow up my brand new one.

Might be good to have a second motor. I always planned to fit a Gen2 motor in my Gen1.

So danmin, you think I need any engine upgrades if I'm just using the 4 to 6 lb waste gate spring? I could live with low boost for a season and become familiar with the turbo before tearing into the engine.

The issue for me is the bike is brand new, barely ridden with 300 miles on it. F--kin A, it just seems unnatural to me to change something so drastically I've barely used! I'd much rather go one step at a time.


* Last updated by: Rook on 4/17/2025 @ 4:34 PM *


08 MIDNIGHT SAPPHIRE BLUE ZX-14 Now Deceased, will be resurected 2024 ZX-14R bran friggin NEW!

Link | Top | Bottom

danmin


danmin's Gravatar

Location: Granbury, Texas

Joined: 03/19/25

Posts: 30

RE: Engine Build + RCC Ultimate Build Gallery
04/17/25 5:22 PM

Someone on Facebook just told me they make 270hp on a totally stock engine (unopened in any way) but that sounds like asking for trouble…. I’m no engine wizard but I know the largest issue with the stock engine is compression ratio and fuel. If you’re going to run E85, you can probably get away with a stock engine. But if you’re sticking to Pump 93- you battle detonation. The thicker head gasket is supposed to help with that. The thicker head gasket requires adjustable Cam Sprockets or for you to check piston-valve clearance.

It’s a matter of “could” and “should”.

I was basically required to go “all-out”. I see your predicament having a newborn engine and needing to put it under the scalpel. My take- I love to tinker. Truly, I do. But I’d rather build it once and be happy with it. The alternative being- me constantly worried about damaging the stock engine. As well as having to tear the bike down more than once and the expense of multiple tunes.

I’m gonna have my bike tuned to the max power I want it to ever make on pump gas- then use a manual boost controller to turn it up and down as a I please. Thanks to the Microtech injecting fuel based on the manifold air pressure. Just gotta turn the little knob and the boost pressure will be whatever the wastegate is, all the way up to twice what the wastegate is.

Buy once, cry once.

Another note I would add is: Ask the big engine builders and racers what they think. Polar opposite opinions from them. I have heard that stock connecting rods will last until 400hp and others have said they won’t last above 240hp. Both being experience-driven opinions. Anything can make 1000hp. For a fraction of a second. Then the motor is toast. I would think you’d run into detonation on a totally stock bike. I am 100% not an expert however. Just math tells you this. Research “Effective Compression Ratio”. Couple charts online show you what your ratio is based on boost and current compression ratio. 4 PSI on a 12.3:1 engine lands close to 16:1 or 15.5:1 with pressure.


* Last updated by: danmin on 4/18/2025 @ 1:45 AM *

Link | Top | Bottom

danmin


danmin's Gravatar

Location: Granbury, Texas

Joined: 03/19/25

Posts: 30

RE&#x3a&#x3b; Engine Build &#x2b&#x3b; RCC Ultimate Build Gallery
04/18/25 12:55 AM

April 17th, 2025

Valve Adjustment, Shim Install, Bucket Install, Cam Install, Tensioner Install.

Either I’m an idiot or I’m an idiot because it took me 4-5 hours to get the valves adjusted right and the cams installed. Installed the cams on the wrong side once and noticed after everything was bolted down (no damage). Took me about 25 tries to get the cams lined up. Got them lined up perfectly. Then I realized I didn’t have the tensioners in. Removed everything. Installed tensioners. Everything lined up finally, then it was time to put feeler gauges under the cam lobes…. Had to adjust them once more to get to the end of the spec for longevity. Then the tensioner ring wouldn’t lock the tensioner for install so I had to disassemble it and clean it. Still wouldn’t lock unless I pushed on the ring and held it into the groove. Which would hold it for maybe 5 seconds. Just long enough to stuff it in the hole and use an impact to get the bolts all the way in. I hear all the engine builders say they replace the timing chain every time they open the motor because the chain kinks. But that’s gonna happen on a brand new chain if the tensioner is hard enough on it. But regardless. Still replaced it. I’d say ~12k total engine miles of racing it and banging off of the limiter was probably enough to stretch the chain some. Old tensioners looked fine so I left those.

Final Valve Clearance Specs:
Range- IN: 15-20
Range- EX: 22-27
#1 (Closest to timing chain) - IN: 16 EX: 27
#2- IN: 19 EX: 26
#3- IN: 18 EX: 27
#4- IN: 19 EX: 27
#5- IN: 19 EX: 26
#6- IN: 19 EX: 27
#7- IN: 17 EX: 27
#8- IN: 19 EX: 27


* Last updated by: danmin on 4/18/2025 @ 1:17 AM *

Link | Top | Bottom

danmin


danmin's Gravatar

Location: Granbury, Texas

Joined: 03/19/25

Posts: 30

RE&#x3a&#x3b; Engine Build &#x2b&#x3b; RCC Ultimate Build Gallery
04/18/25 1:09 AM

April 18th, 2025

Wanted to do something quick and easy so I scrubbed the valve cover (forgot to hot tank it), hit it with a torch to get it hot and totally dry and degreased, then shot some high temperature gloss clear on the valve cover. Makes the paint pop. I really like it. Probably won’t be noticeable once assembled but I’ll know it’s there at least. The clear coat came out looking like water.


* Last updated by: danmin on 4/18/2025 @ 1:10 AM *

Link | Top | Bottom

Rook


Rook's Gravatar

Joined: 03/28/09

Posts: 21033

RE: Engine Build + RCC Ultimate Build Gallery
04/18/25 6:47 AM

Thank you for the input on the need for engine building. I'm going to need to do some research. I might just buy a used engine and build it while I ride the bike on an aftermarket exhaust. Then new engine comes out and old engine with turbo goes in. I really don't know....

Then the tensioner ring wouldn’t lock the tensioner for install so I had to disassemble it and clean it. Still wouldn’t lock unless I pushed on the ring and held it into the groove. Which would hold it for maybe 5 seconds. Just long enough to stuff it in the hole and use an impact to get the bolts all the way in.

Why not an APE manual tensioner? That seems like a must for turbo.

Wanted to do something quick and easy so I scrubbed the valve cover (forgot to hot tank it), hit it with a torch to get it hot and totally dry and degreased, then shot some high temperature gloss clear on the valve cover. Makes the paint pop. I really like it. Probably won’t be noticeable once assembled but I’ll know it’s there at least. The clear coat came out looking like water.

I painted the valve cover on my Gen1 orange. Nope, you can't see it but it sure looks cool when you take the fairings off. I thought about doing the whole engine case orange someday. That, you would see through the side vents. An orange oil pan would be visible too. The VHT Flame Proof paint I used held up to the heat just fine. It has a dead matte finish but I used some Flame Proof clear coat and that gave it a low gloss.


08 MIDNIGHT SAPPHIRE BLUE ZX-14 Now Deceased, will be resurected 2024 ZX-14R bran friggin NEW!

Link | Top | Bottom

danmin


danmin's Gravatar

Location: Granbury, Texas

Joined: 03/19/25

Posts: 30

RE: Engine Build + RCC Ultimate Build Gallery
04/18/25 11:08 AM

The service interval of the manual tensioner isn't agreeable with my riding style. I bought this bike in August, 2024 as a project. I fixed it up and rode it a few days a week for 2 months before everything got too cold. I put on all 7k miles in those 2 months. I live 30-35 miles one way from the nearest big city, where I go anytime I leave the house. I put at least 100 miles on the bike if it leaves the house. If accessing the tensioner wasn't a nightmare I would consider the manual one.

The way the tensioner works on these is by using oil pressure in combination with springs. I don't know the exact extent of the oil pressure's function besides increasing or decreasing tension some, and to what degree. But I do know that I will be running close to 2X the factory oil pressure with the oiling mods I have done. I think that will more than suffice for chain tension. Even at rest- the chain tension seems remarkably high if you set the tensioner and try wiggling the chain anywhere once you pull your engine.

Carpenter used to make a zx12/zx14 hybrid chain tensioner. But they no longer offer that on anything they don't also fully build in-house. That one runs off of spring pressure alone.

I really, really, really hate dealing with these fairings. especially because I have aftermarket ones. They are fragile, don't fit great, have crappy hardware, and take 30 minutes to take off. If the chain gets really noisy after a month of riding, I'll convert. Otherwise I will use the chain tensioner it came with.


* Last updated by: danmin on 4/21/2025 @ 7:23 PM *

Link | Top | Bottom

Rook


Rook's Gravatar

Joined: 03/28/09

Posts: 21033

RE: Engine Build + RCC Ultimate Build Gallery
04/18/25 10:23 PM

The service interval of the manual tensioner isn't agreeable with my riding style.

I installed a APE tensioner to my Gen1 (same Cam chain tensioner as Gen2, I'm sure). I ran that tensioner for eleven years, (probably 25k miles) and never needed to adjust it. Of course, that was a stock engine. The concern is A) you don't know if the self advancing mechanism of the OEM tensioner is 99% ready to pop forward a notch and hasn't done so yet and B) the oil pressure drops when you roll off the throttle. It's such an easy mod and you know your cam chain is always at the right tension. I'd rather take some fairings off and adjust the CCT if turbo causes it to go out of adjustment instead of hope the OEM tensioner works as it should. ...just a thought from an underling.


08 MIDNIGHT SAPPHIRE BLUE ZX-14 Now Deceased, will be resurected 2024 ZX-14R bran friggin NEW!

Link | Top | Bottom

Rook


Rook's Gravatar

Joined: 03/28/09

Posts: 21033

RE: Engine Build + RCC Ultimate Build Gallery
04/18/25 10:28 PM

I don't recall ever hearing of a stock ZX-14 jumping time. You add 60, 80 a hundred extra hp though...... everyone uses an adjustable CCT. Brock even did with a stock ZX-14. If you're going to run up to redline and roll off at top speed, easy insurance in my view. Never have I heard the stock CCT is safer than an APE.


08 MIDNIGHT SAPPHIRE BLUE ZX-14 Now Deceased, will be resurected 2024 ZX-14R bran friggin NEW!

Link | Top | Bottom

Rook


Rook's Gravatar

Joined: 03/28/09

Posts: 21033

RE: Engine Build + RCC Ultimate Build Gallery
04/18/25 10:31 PM

My APE cost me about 60 bucks back in 2011. The updated APE tensioner is lighter in weight. The old design was heavier than stock due to that needlessly long set screw.


08 MIDNIGHT SAPPHIRE BLUE ZX-14 Now Deceased, will be resurected 2024 ZX-14R bran friggin NEW!

Link | Top | Bottom

danmin


danmin's Gravatar

Location: Granbury, Texas

Joined: 03/19/25

Posts: 30

RE&#x3a&#x3b; Engine Build &#x2b&#x3b; RCC Ultimate Build Gallery
04/19/25 1:34 AM

I’ll chew on the idea. Seems a lot simpler than setting and resetting the tensioner during engine assembly as well. Not opposed. Just getting a little tired of the nickel and dime-ing of the project. $XXXXX for the turbo kit. $XXXX in engine parts. Got rid of my air shifter and bought a quickshifter instead, $XXX. Bought new fairings from Monster $XXX. Probably gonna have someone come and weld the frame so it doesn’t leak $XXX. Gauges and mounting solution $XXX. Clutches and steels $XXX. MTC Lockup $XXX. Spark plugs $XX. Tuner quote was $XXXX. So on and so on. I wanted to get this done before I left the country but I need to let a few paychecks hit so I can recover. I might’ve been too eager for this project. I’m starting to think I’ll just add the manual tensioner later on.

And I’ve got a whisper in the back of my head that I didn’t triple-check a clearance and the engine will explode on the first start. This is turning into a mentally and emotionally heavy project. I’m sure I’ll appreciate it all once it’s together and running.


* Last updated by: danmin on 4/21/2025 @ 2:38 PM *

Link | Top | Bottom

Fordtech58


Joined: 12/10/16

Posts: 136

RE: Engine Build + RCC Ultimate Build Gallery
04/19/25 8:15 AM

I'll add my 2 cents from actual experience.
Rook, you can add the stage 1 kit to a bone stock engine on pump gas with the 4lb. spring ONLY!, get itchy for more power, 6lb. spring can equal the BIG BANG theory. Boost is like any other addiction once you're hooked too much is never enough...
Danmin, I've been making 300hp+ on stock rods and pistons with 92 pump boosted to 101 with Boostane Professional that I got referred to by Rick Romans a long time boost Guru and cohort of Richard Peppler possibly involved with the first Gen2 build but I don't have that as fact. My stage 1 plus build dynoed by Richard made 249hp=4lb. 276hp=6lb. and 299hp=7.5lb. springs on just pump 93. The bike went on the dyno with 1 mile and came off with 10 miles after being heat cycled twice before any pulls. I'm 215 runs in, 416 miles on the bike. Start of season maintenance just preformed compression cyl. 1-132, 2=134, 3=133, 4=130. All cylinders leaked down 2% @ 100psi. I personally had the stock tensioner fail and chased the noise for longer than I care to think but nothing catastrophic happened in my ignorance. I put the APE tensioner on it and haven't touched it since. I know that won't compare to your miles but virtually my throttle has 2 positions 2-5% or 100% WFO.
Just my actual experience and opinions, not meant to offend anyone...


* Last updated by: Fordtech58 on 4/19/2025 @ 8:18 AM *

Link | Top | Bottom


Welcome to zx14ninjaform.com!
 
New Topic Reply
Next Page

Page: 1 2

Previous Page

New Post

Please login to post a response.