

MicroTech ECU to RCC Turbo tracking:
 |
 |
 |
 |
 |
 |
Welcome to zx14ninjaform.com!
You are not logged in.
Created on: 04/16/25 08:54 PM
Replies: 273
danmin
Location: Granbury, Texas
Joined: 03/19/25
Posts: 202
Rook

Joined: 03/28/09
Posts: 21271
RE: Engine Build + RCC Ultimate Build Gallery
07/18/25 4:40 PM
MicroTech ECU to RCC Turbo tracking
Good, so you're getting a new one!
I'm still not exactly clear what the purpose of dyno tuning is. If you're relying on the Microtech to make fueling adjustments, why dyno tune? ...or are the dyno runs just to make sure the Microtech is keeping a safe AFR...or are you letting the Microtech do its thing with the aftermarket injectors and optimizing that by dyno tuning the stock injectors? You run both the stock injectors and the aftermarket ones in the air box, right?
* Last updated by: Rook on 7/18/2025 @ 4:42 PM *
08 MIDNIGHT SAPPHIRE BLUE ZX-14 Now Deceased, will be resurected
2024 ZX-14R bran friggin NEW!
danmin
Location: Granbury, Texas
Joined: 03/19/25
Posts: 202
RE: Engine Build + RCC Ultimate Build Gallery
07/18/25 5:28 PM
Rook: I'm still not exactly clear what the purpose of dyno tuning is. If you're relying on the Microtech to make fueling adjustments, why dyno tune?
MicroTech is configured with a general fueling profile for turbo motorcycles that RCC has loaded onto the computer. The dyno tuner will slightly adjust the fuel map for the MicroTech according to the AFR of the bike under boost. The MicroTech sees 2 things. Manifold Pressure and RPMs. No AFR that it tracks. Example of table: 10 PSI x 10,000RPM = XX in the fueling table it uses.
Stock ECU (how Richard from RCC explained it to me) runs the bike like normal. It provides the fueling that would be expected with zero boost pressure.
What needs to be adjusted: Tip-in fueling and decel fueling will need to be adjusted to account for the sudden increase and spikes of boost pressure when opening or closing the throttle blades. Also need to adjust the Stock fueling at cruising RPMs. The cruising RPMs will likely be under a little boost so a smooth transition from on and off boost would need to be created so you arent getting any kind of jutter or poor running conditions while daily riding. Timing in the Stock ECU would likely be pulled a little on the top end to battle detonation as well as control heat. You can try to control that with the microtech, but it doesnt see throttle position.
Microtech: only controls 4 injectors in the airbox and sees RPM + MAP.
Stock ECU: sees everything except MAP (I believe stock MAP sensor is frozen to ambient atmosphere pressure with a special valve RCC has you install on the sensor).
Dyno Tune will replicate all riding scenarios without risk of police or terrain causing inconsistencies. Also Dyno graphs to show power changes due to fueling and small (maybe missed normally) things like results of pulling timing. As opposed to just self-tuning with an AFR gauge or data logger. Not to mention the expertise of tuning bikes with all kinds of different builds or the exact same build, 40 hours of the week.
Rook
Joined: 03/28/09
Posts: 21271
RE: Engine Build + RCC Ultimate Build Gallery
07/18/25 9:27 PM
Dyno Tune will replicate all riding scenarios without risk of police or terrain causing inconsistencies.
That might have been a bit subtle for most to catch but I get it. LOL You tune on the road, the police are the biggest risk. I'd never do it again. The runs for smaller throttle percentages will cover the better part of a mile and the bike will still be doing triple digits before it reaches maximum speed/throttle position. Basically, you're doing what looks to most folks like ludicrous speed (120 mph) over a very long stretch of road for a pretty long span of time. Perfect recipe for a traffic stop and you might well be going to jail. Terrain changes must include wild animals in the road!  ...not to mention the not so good things that can happen over 160 mph with chassis when your objective is to tune rather than to ride. My method was to let the throttle spring back to zero at the conclusion of the run. You can use an ON/OFF switch to shut Autotune down so it can't overwrite any trims with backward throttle or decel through the rpm zone you just risked your driving privileges to create. I never had the switch, my switch was letting the throttle snap to zero. I don't recommend it. I had the front suspension dive twice in rapid succession. The steering stabilizer, maybe the lower rake of the 14 kept the steering perfectly neutral but it's not something anyone wants to count on run after run. It's sure nothing I'd die for or even go to jail for. Pick your times and ride the bike the way it was meant to be ridden. Self tuning, good for legal speeds. Self tuning for high speed, do it on a track and learn to do it safely. Otherwise, dyno tune and know you're pretty much covered for any of your more exotic excursions into high speed dalliance.
This is a good thread Dan. Must say, one of the best in a long, long while. Soldier on my brutha!
08 MIDNIGHT SAPPHIRE BLUE ZX-14 Now Deceased, will be resurected
2024 ZX-14R bran friggin NEW!
Rook
Joined: 03/28/09
Posts: 21271
RE: Engine Build + RCC Ultimate Build Gallery
07/18/25 10:11 PM
I have a reasonable pile of money saved in a short period of time and I don't need to do anything with it. I'm buying a used bike and turboing it. Maybe I'll use my Gen2 Hayabusa. I'm going to be completely honest and say the busa really has the cred for the best top speed monster but it appears the 14R responds so well to turbo even for daily riding, it might be the most logical choice.
You already mentioned how much easier it is to do the engine work on a Hayabusa. All I care about is which one responds to turbo best over the entire rev range and from what I heard, it's the 14R. ...not by a lot but if you ride the street, those low rpms matter and then you have the extra hundred ccs to pull you through the top end. Dan, I love the 14 but the Hayabusa was a better bike back then (and I still loved my 14 the most anyway). Suzuki made better from just a little smaller and then they threw in the towel with their Gen3.
From my viewpoint, if you can do over 200 mph, it doesn't matter what bike you have. If you can do 218 or 220, that's just splitting hairs I'm not that interested in. Great respect to any who build these beasts no matter which platform they choose.
08 MIDNIGHT SAPPHIRE BLUE ZX-14 Now Deceased, will be resurected
2024 ZX-14R bran friggin NEW!
danmin
Location: Granbury, Texas
Joined: 03/19/25
Posts: 202
RE: Engine Build + RCC Ultimate Build Gallery
07/20/25 9:56 AM
My tuner has some dyno graphs from turbo busas and 14s. the torque curve is what it sounds like you're looking for. Once I'm back out there I'll ask to see all his sheets and throw out a good comparison of torque differences based on the engine size and boost. So far the 14R makes quite a bit more torque than the Gen 1. Turbo only adds onto that.
danmin
Location: Granbury, Texas
Joined: 03/19/25
Posts: 202
RE: Engine Build + RCC Ultimate Build Gallery
07/20/25 10:07 AM
I think for anyone looking to turbo the 14- dig around to see which velocity stacks seem to seal the airbox well. and don't deal with the silicone stacks. The minor boost leak you get (maybe you won't have any boost leaks at all either) can be handled by cranking up the boost a hair more. Besides those stupid stacks the whole process isn't half bad. With a Busa you can take stuff apart without dropping the motor, which is nice, but if you're gonna shoot for high hp, you're better off pulling everything apart anyways. if you're not shooting for the moon- you can still swivel the 14 engine down by the lowest motor mount bolt and pull the head for studs and a gasket. then you can swap injectors or add the secondary rail. It's not a nightmare if you don't use the stupid silicone stacks. if you are having a shop do it- make them deal with the stacks.
Busa wins in the maintenance (and rear bodywork) category all day. The power battle has a clear winner with the long stroke of the 14R. It's a torque machine stock. Couple PSI coming in at about 5k RPM and you can pull trailers with it. If I ever get rich enough for the AGM Full 3/4 Upper fairing, maintenance wouldn't be half bad on the 14. It's the layers and layers of fairings that always get me
Rook
Joined: 03/28/09
Posts: 21271
RE: Engine Build + RCC Ultimate Build Gallery
07/20/25 8:36 PM
If I ever get rich enough for the AGM Full 3/4 Upper fairing, maintenance wouldn't be half bad on the 14. It's the layers and layers of fairings that always get me
I haven't removed all fairings from my Gen2 yet but the Gen1 was quite easy. The Gen2 Hayabusa is a lot more complicated and from what I've seen so far, the Gen2 14R is almost on par. I don't think it will be as complicated as the busa though. I can't speak to the fairing removal on the Gen3 Hayabusa but something tells me it didn't get easier. The bright side is you need to remove fairings pretty often and you get good at it no matter what the bike is. I broke a side cover and the battery box cover on my 14R so far. Replacing broken fairings is the price of learning. I have to go back to the Gen1 ZX-14 though, I never broke any of those fairings. They're very simple and very flat even if there's a good number to take off.
08 MIDNIGHT SAPPHIRE BLUE ZX-14 Now Deceased, will be resurected
2024 ZX-14R bran friggin NEW!
Rook
Joined: 03/28/09
Posts: 21271
RE: Engine Build + RCC Ultimate Build Gallery
07/20/25 9:10 PM
My tuner has some dyno graphs from turbo busas and 14s. the torque curve is what it sounds like you're looking for. Once I'm back out there I'll ask to see all his sheets and throw out a good comparison of torque differences based on the engine size and boost. So far the 14R makes quite a bit more torque than the Gen 1. Turbo only adds onto that.
The Gen2 Hayabusa has more torque than the Gen1 ZX-14. That was the report back in 08 but if you look now, there's some info that seems to indicate otherwise. From personal experience, the Gen2 busa goes topside noticeably easier that the Gen1 ZX-14 and I think we all saw that in the published photos back in 2008. Back in 2008, the stats favored the Hayabusa with 2 or three ft lb more torque. Two or three hp means nothing but 2 or three torque on a bike is something anyone will notice. Well, you go to the Gen2 14R and that ends the discussion. I haven't yet yanked the throttle open in first gear on my 14R. It has 500 miles on it. About time to change the oil and do that! I'm predicting it will loft the front tire at 7000 rpm. My gen1 did it at about 9,000 rpm, 55-60 mph. The Gen2 Hayabusa, ....probably about 8000 rpm and not necessarily quite WOT.
08 MIDNIGHT SAPPHIRE BLUE ZX-14 Now Deceased, will be resurected
2024 ZX-14R bran friggin NEW!
danmin
Location: Granbury, Texas
Joined: 03/19/25
Posts: 202
RE: Engine Build + RCC Ultimate Build Gallery
07/21/25 11:25 AM
If you're chasing wheelies- turn KTRC all the way off first. Gen 2 has a built-in wheelie control tied in with the traction control.
I haven't messed with any busas myself. They look easier. But that could be completely wrong.
I always understood it like this:
Large bore = high horsepower. fits larger valves, wider combustion chambers (more surface area in the cylinder for wear and heat, high-revving short stroke to complement it.. or else piston speed gets too high and you break stuff.
Large stroke = high torque. Smaller valves, deeper combustion chambers, higher efficiency and higher dynamic compression ratio. Power at low RPMs. Cant rev too high or things will break.
Bike: Bore x Stroke = CC
Gen 1 ZX14: 84.0 mm x 61.0 mm = 1352cc
Gen 1 Busa: 81.0 mm x 63.0 mm = 1298cc
Gen 2 ZX14: 84.0 mm × 65.0 mm = 1441cc
Gen 2 Busa: 81.0 mm × 65.0 mm = 1340cc
Gen 3 Busa: same as Gen 2
Gen 1 lineup (2005 vs 2005): .png)
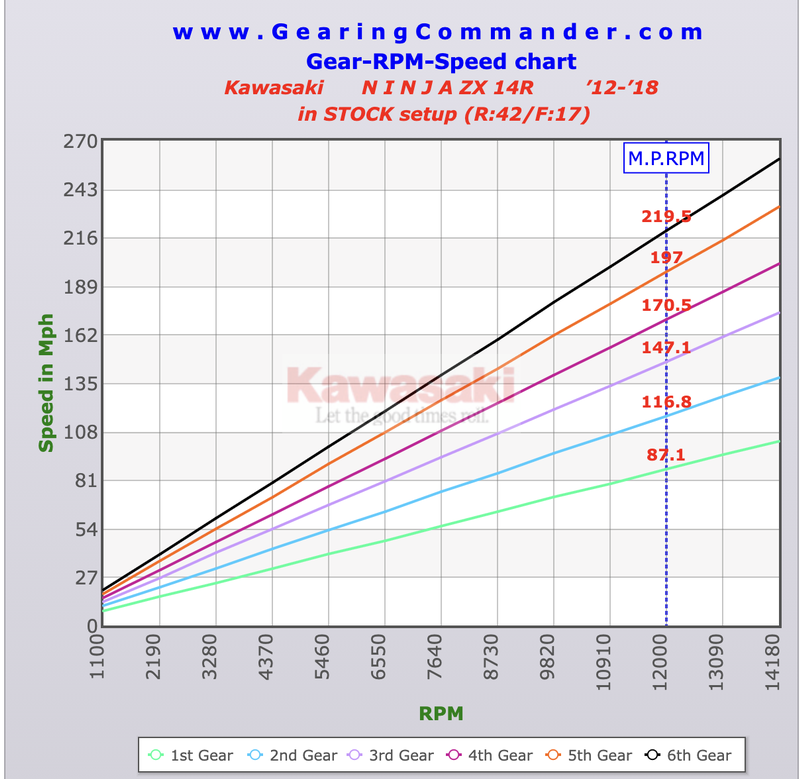
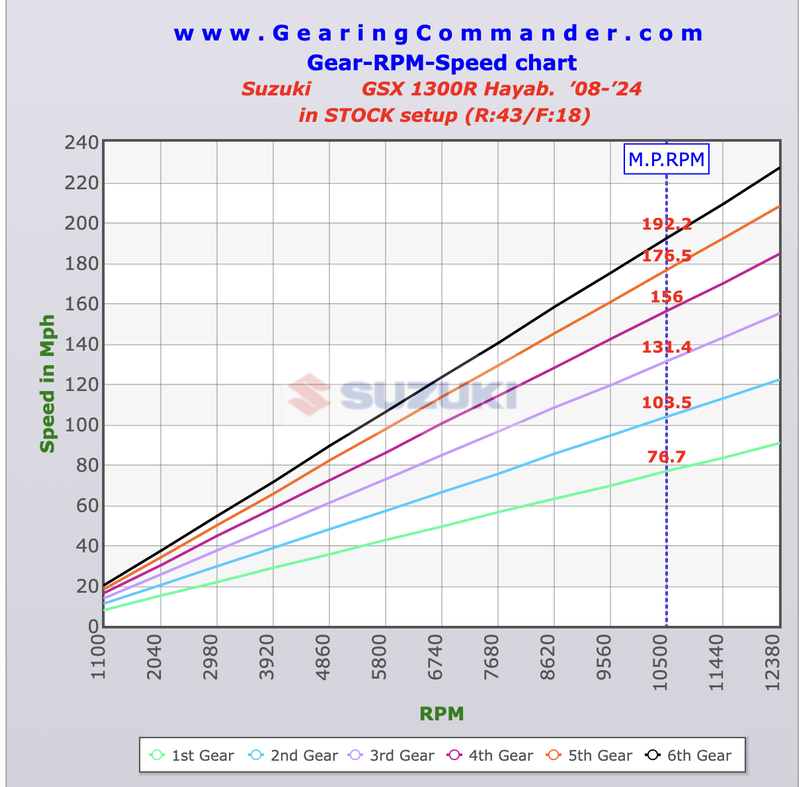
Gen 2 lineup (2012 vs 2012): 
Seeing how close the lines hug on the HP in the midrange is a tell about priorities. Top end versus low and midrange power. Also the Gen 2 busa looks like it has a flat torque curve from idle to 6-7k RPM. After 8K RPM the busa doesn't make more power. Just maintains it. Probably something that can be improved with a full exhaust and intake.
Took bad there isnt an apples to apples comparison of turbo builds. Same upgraded components from the same brand, same boost, same fuel, etc. Oh well. Base numbers are a good tell.
* Last updated by: danmin on 7/21/2025 @ 11:31 AM *
Rook
Joined: 03/28/09
Posts: 21271
RE: Engine Build + RCC Ultimate Build Gallery
07/22/25 6:53 AM
It was a long time ago but someone was telling me there's something about the Gen2 Hayabusa's gearing that might make it feel more torquey than the Gen1 ZX-14. It was never explained to me but it had to do with the gearing of the transmission, not the sprocket gearing.
If you're chasing wheelies- turn KTRC all the way off first. Gen 2 has a built-in wheelie control tied in with the traction control.
I'm sure I'll try it in all modes just to see what happens. The front sure felt light when I sat up straight and opened the throttle hard on my last ride. It probably was in TC level 1. I haven't tried an actual wheelie yet though. LOL I used t do them often on my Gen1...not very high but there were a couple that scared me coming over a hump in the road. ...and then that quickshifter one, that could have been a disaster.
08 MIDNIGHT SAPPHIRE BLUE ZX-14 Now Deceased, will be resurected
2024 ZX-14R bran friggin NEW!
danmin
Location: Granbury, Texas
Joined: 03/19/25
Posts: 202
Fordtech58
Joined: 12/10/16
Posts: 152
RE: Engine Build + RCC Ultimate Build Gallery
07/23/25 2:06 PM
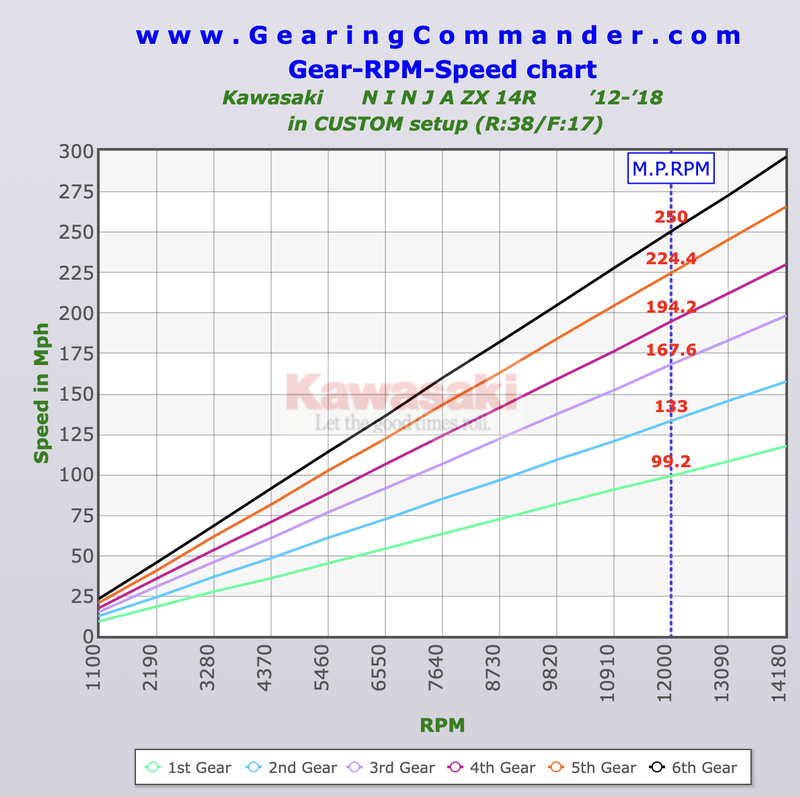
Those charts would be better if it were apples to apples. They've got the Zx14r at 12,000 rpm and the Busa at 10,500 rpm. It would be pretty hard pressed to get the 14 to pull 12,000 rpm in 6th gear. You've also got to calculate frontal area, drag coefficient, rider size and tuck to what rpm it will pull. I've made 8 LSR passes at Loring Maine 1.5 mile and it's a whole different animal. I do plan on running the Texas Mile in October with my Gen 1 Turbo Busa this fall.
danmin
Location: Granbury, Texas
Joined: 03/19/25
Posts: 202
RE: Engine Build + RCC Ultimate Build Gallery
07/23/25 7:58 PM
Update on the MicroTech situation-
From Richard @ RCC Turbos:
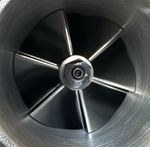
I have received your ecu, it shows signs of water damage and corrosion? See attached pics. I will replace it but the ecu is not water proof. I will have to remove your file from this ecu and flash it into the new one then you just have to plug it in.
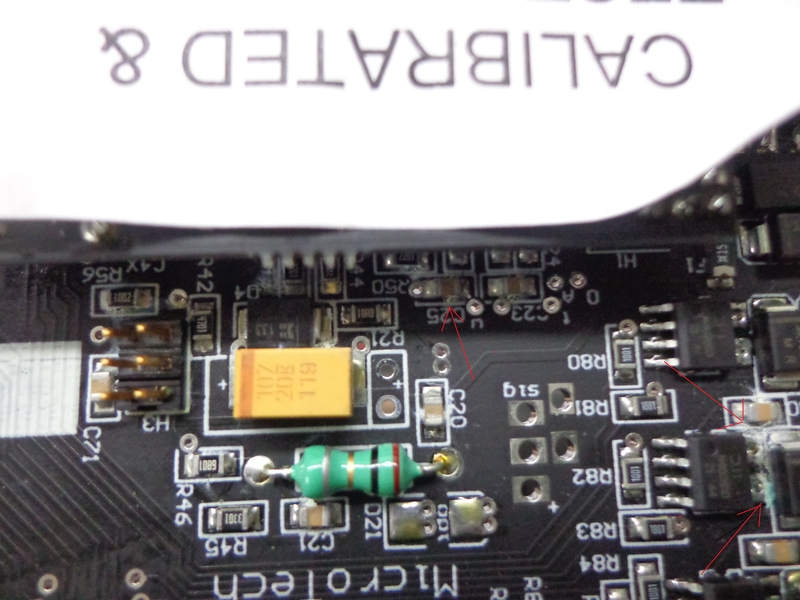
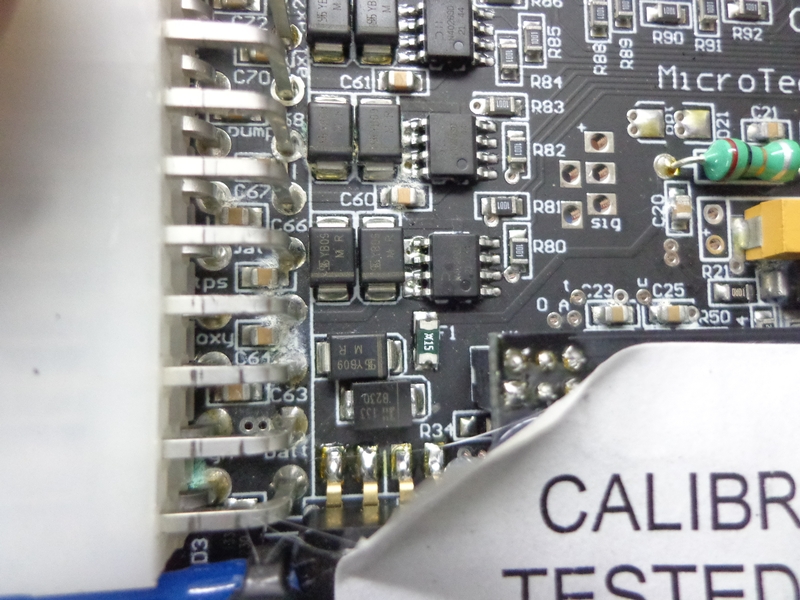
The bike has remained in my garage or covered on a trailer on the way to the tuner. I did wash the bike twice but not rough. Just a hose and some soap and one of those mitts you wear to agitate the soap on the bike. Didn't soak the thing. Maybe that alone was enough. I need to look into some way to seal the device from the environment or else this will happen again if I'm ever caught in a rainstorm... My buddy's turbo zx14 with a microtech hasn't ever quit on him. I'll assume maybe a faulty seal on the unit? who knows
danmin
Location: Granbury, Texas
Joined: 03/19/25
Posts: 202
RE: Engine Build + RCC Ultimate Build Gallery
07/23/25 9:37 PM
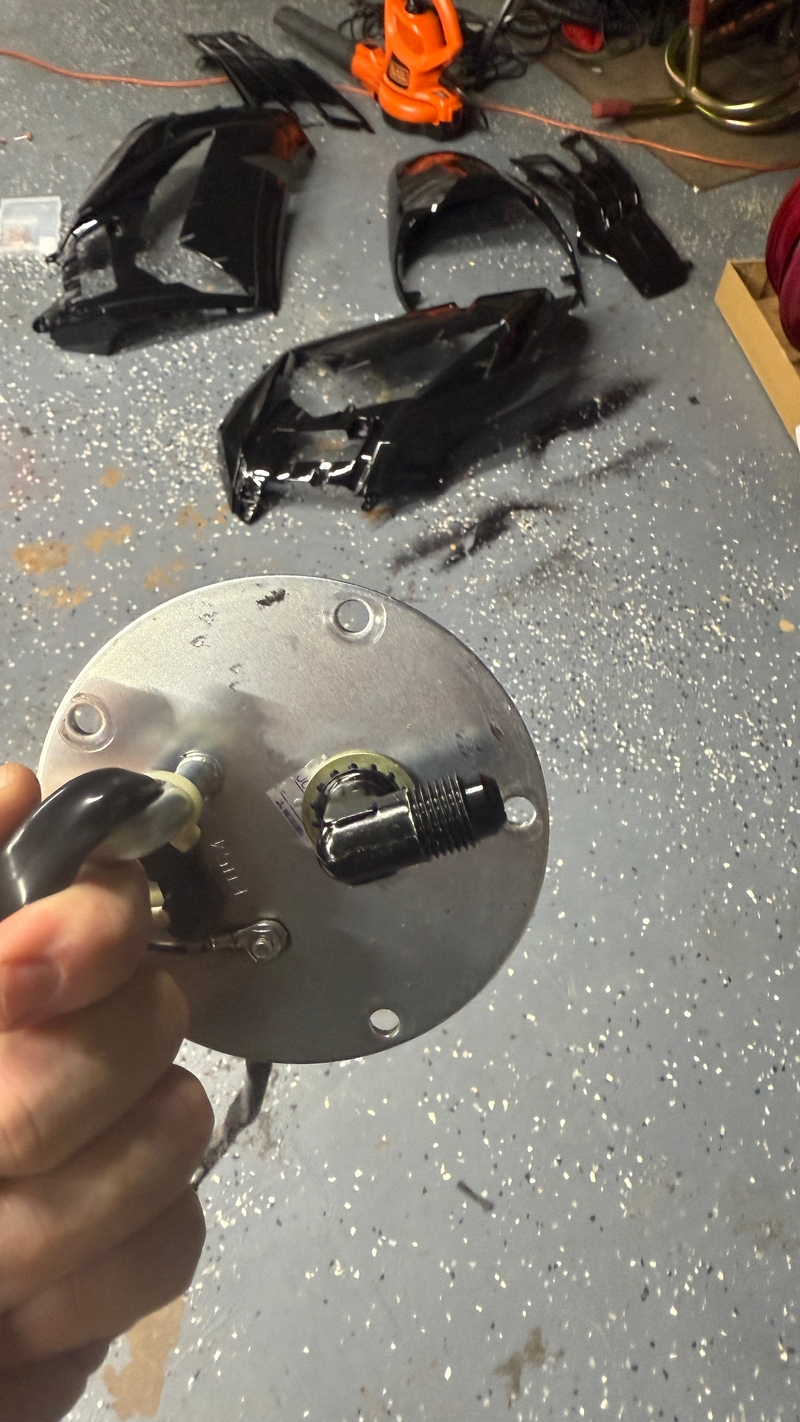
I obtained another stock fuel pump. Gutted it and getting ready to sand it down and drill a hole. this time I'll make sure it's not 1/16ths (or maybe it was 1/8) too large like I did last time. Ruined the whole thing. My Rob Bush block off plate won't show the fuel level due to the low fuel sensor integrated in the unit and it won't stop leaking........ annoying. Not happy with the fittings provided with the plate
New small updates-
I broke my ebay LED tail light. My shorts pocket caught on it and snapped the corner off. exposing the board of LED lights. Junk. Ordered an OEM replacement. I'll end up wrapping it in black vinyl and cutting a rectangle or something into the vinyl wrap to make the rear light less ugly. Haven't figured out the specifics of that.
My clutch master cylinder is toast. I bought a fancy rebuild kit and put it all back together as instructed... shoots brake fluid out of the lever. Doh. Not even sure how I managed that one. Decided to shell out extra cash for a brand new OEM take off from a 2024 model. Maybe $200-$250 out the door total for it but the last one started bleeding pressure faster. Started once a month, then once a week, then daily, until it just never held pressure anytime you pulled it all the way in.
Ordered a special NOS OEM windshield. I want a clear one and not a totally opaque black one. 2012 models didn't have a cover over the gauges and the bracket in front of them. So a regular clear one wouldn't work. weird. had to get one with the front portion tinted and the rear 3/4 clear. Every other year model had a plastic cover behind the gauges to cover up wiring and stuff. Not 2012. $60 for a new one some guy 3D prints. No thanks. Too much risk of something not fitting right or who knows. I'll just stick to oem style.
Laid out all the new fairings, cleaned with an Alcohol pad, and ceramic coated them. I used Nano Bond off of Amazon. If you haven't ever done it or heard of it before I'd recommend. Rook- your OEM fairings are so fresh and new I'd be surprised if you didn't look into adding this. Easy peasy. makes the paint pop. water runs right off for about a year. $30 and a few hours. not a bad deal. I also coated the wheels, frame, swingarm. But not the gas tank. Tank needs a hand polish. it's bad. only a year or two before I need to find a new one. this one has some concerning rust sports forming where paint has chipped off.
My LED headlights didn't fit with the intercooler installed... bummer. ordered some SeaLight S2S model 6500K LED lights. HOLY COW. clean and crisp pure white. $30 shipped. I've got all my front lights LED/HID white. These ones are super low profile. Smaller than halogens in every way.
I have 100 feet of thermal reflective tape. I'm going to lay it out under the gas tank. and wrap the frame a little bit. Eventually going to do some hose wraps with DEI stuff.
Gotta shorten the turbo drain hose. It's long and low.
I have a full week off of work this upcoming week, then I fly out to Utah to the Bonneville Salt Flats. Gonna race a 1950 Ford Business Coupe on the salt and see if we cant get into the record book. I get so antsy without work that I'm sure I'll get into trouble and start tinkering on the bike more. I'll update when I can.
* Last updated by: danmin on 7/23/2025 @ 10:38 PM *
Rook
Joined: 03/28/09
Posts: 21271
RE: Engine Build + RCC Ultimate Build Gallery
07/24/25 6:25 AM
I used Nano Bond off of Amazon. If you haven't ever done it or heard of it before I'd recommend. Rook- your OEM fairings are so fresh and new I'd be surprised if you didn't look into adding this.
I'll have to read up on that stuff. I've only use Turtle Wax Ice Paste polish in the past and just once a year. Then soap and water baths with Bike Spirits wipe downs in between.
Hopefully that was a bad unit you got. I assume it was installed under the seat? It should stay pretty dry under there even after a wash. I used to remove the seat after the bike got wet because the foam pad on the gas tank would get wet and cause rust. There's not too many places on a bike that are completely safe from water.
08 MIDNIGHT SAPPHIRE BLUE ZX-14 Now Deceased, will be resurected
2024 ZX-14R bran friggin NEW!
danmin
Location: Granbury, Texas
Joined: 03/19/25
Posts: 202
RE: Engine Build + RCC Ultimate Build Gallery
07/24/25 10:11 AM
I think the consensus is it was a faulty unit with a bad seal or prior damage or something. It lives under the seat where my old air compressor used to live. I have a tiger tail so I have extra room in some spots versus OEM. I think the OEM tool bag goes where I have it. Richard just threw a new ECU in the mail. Estimated to get back to my place July 30th. Day before I fly out, bummer. I'll set up a dyno day August 12th-14th, hopefully its the last attempt to get dyno'd.... The drive out there is long and early. Also happens to be the hottest time of year, Ha.
danmin
Location: Granbury, Texas
Joined: 03/19/25
Posts: 202
RE: Engine Build + RCC Ultimate Build Gallery
07/25/25 12:35 AM
July 25th, 2025
-Installed the new clutch master cylinder and bled brakes. Going to bleed again before dyno day in case air bubbles work their way out
-Gutted, sanded flat for the new metal nozzle, drilled 9/16th out, dremel-ed the hole clean, wrapped the threads in a little gasoline-proof thread sealer and a layer of red Loctite. Tightened it to what felt very snug.
Waiting on mirror delete plates and windshield to arrive before I move onto setting up any of the fairings. I don't have a reason to not install the new fuel plate. it's just going to be messy since it's completely full of gas

Rook
Joined: 03/28/09
Posts: 21271
danmin
Location: Granbury, Texas
Joined: 03/19/25
Posts: 202
RE: Engine Build + RCC Ultimate Build Gallery
07/25/25 7:15 AM
Went with the aftermarket plate because I messed up the original fuel pump by drilling a hole slightly too large for the fitting to go through. It would be hard to explain without showing the fitting. The fitting has an O-ring and washer on it that does on the outside of the tank. it seals gasoline from leaking out due to gravity. Too large of a hole and the o-ring can't seal anything. So I bought the aftermarket plate. Aftermarket plate works, but is leaky from where the fittings I have meet the plate. I keep tightening them up and they keep loosening. Also the aftermarket fuel plate doesn't allow fuel level the be shown for some reason. The stock pump hopefully does...
Stock fuel pump replacement: $100-300.
Aftermarket fuel plate: $50
Made sense to try the fuel plate. Hopefully the stock pump works... Otherwise I'll retry the aftermarket plate
* Last updated by: danmin on 7/25/2025 @ 7:41 AM *
danmin
Location: Granbury, Texas
Joined: 03/19/25
Posts: 202
RE: Engine Build + RCC Ultimate Build Gallery
07/26/25 7:11 PM
Update: fuel level DOES show with the 1k Ohm resistor I installed. But the low fuel level warning doesn't show at all.
I just drained my gas tank so I can try out the stock pump. I'll probably install it tomorrow. That way the gasoline evaporates out of the tank some more. Once the gas tank is out I'm going to clay bar it and do some polishing to the tank. Might rework the fuel line routing as well. Mirror block off plates arrived today. Some ENay ones. Brock's-style for $40. Not too bad. Also a big order of metal bolts and rubber washers came in. Fairings are pretty much ready to install. Just a matter of time before the next dyno day. Going to install the windshield and things soon.
My clutch won't disengage. I need help identifying what's going on.
Symptoms:
- when I pull the clutch in, the bike won't move when not running and in gear
- "creaking" noise occasionally from slave cylinder
- clutch pull is light. I thought it was just my master cylinder giving out. maybe it is the slave cylinder too, but I rebuilt that already and it's not leaking fluid.. Hmmm
I'm going to try and bleed it more tomorrow. Manual says to pump lever until resistance is felt then to "quickly open and close the bleeder nipple" so that the bubbles come out, if any.
* Last updated by: danmin on 7/26/2025 @ 11:09 PM *
Rook
Joined: 03/28/09
Posts: 21271
RE: Engine Build + RCC Ultimate Build Gallery
07/27/25 10:08 AM
Mirror block off plates arrived today. Some ENay ones. Brock's-style for $40. Not too bad.
Yep, those little trinkets have gone up in price. I have more money now but with inflation, I wonder how much more? What i make now would have made me very happy back in the early 2000s. Now it's just what you need to survive. I'd say the cost of living has doubled since 1990.
My clutch won't disengage. I need help identifying what's going on.
Symptoms:
- when I pull the clutch in, the bike won't move when not running and in gear
- "creaking" noise occasionally from slave cylinder
- clutch pull is light. I thought it was just my master cylinder giving out. maybe it is the slave cylinder too, but I rebuilt that already and it's not leaking fluid.. Hmmm
The motion of the engine running helps the plates separate but obviously, the clutch should be able to do that on its own. Yes, there's a problem with the force being applied to the clutch pack. One thing I remember being a problem is the plastic washer under the clutch slave. That will crack from over tightening and it doesn't take much. You would probably get some fluid leaking if that were the culprit.
08 MIDNIGHT SAPPHIRE BLUE ZX-14 Now Deceased, will be resurected
2024 ZX-14R bran friggin NEW!
danmin
Location: Granbury, Texas
Joined: 03/19/25
Posts: 202
RE: Engine Build + RCC Ultimate Build Gallery
07/29/25 12:42 PM
I'd say the cost of living has doubled since 1990.I think your estimate is pretty close to reality. I think its 2.5x cost of living from about then to now. Once I saw the stock market couldn't beat inflation after covid, and wont for a while, I cashed out my 401k since its only worth less if I don't spend it. Weird time to be alive.
I agree with your logic with the spinning engine. I let the lines sit a little and bled what I think were the last of the air bubbles. One big and a few tiny bubbles. Feels a little better. I pulled the clutch cover after that to make sure the plunger was moving. yes it was, and quite a lot. I checked and the creaking noise was from the shaft rubbing on the slave cylinder piston. I think you're supposed to put some anti-seize on it, Might add that today. And there was some funny vibration coming from the slave cylinder as well, I believe is the internal spring spinning maybe. Who knows. Also not sure if the brand new clutch plates are so grippy that they still bite the metal disc a little. Lots of potential reasons for what I experienced. I will let it sit for another week before I bleed it again, since I am leaving town for Bonneville Speedweek. Assuming the next dyno day goes okay I will drive it for a couple hundred miles before worrying about the clutch anymore.
Side note- bled a little more oil after it sat for a while. Oil looked clean. I think the metal shavings from various failures and 'customizations' cleaned out. For anyone thinking I am too agressive with the filter changes- I cut my last filter open and it was almost full of little metal shavings from either- drilling out 2-stage lockup mount holes, hitting the upper balancer bearing with a dremel, the rod bearing nut smashing the oem clutch basket, and minor break-in flakes. I cant express how much aluminum there was from the clutch basket. It was quite a lot. Connecting rod looked flawless though.
I installed the new fuel pump plate (stock pump customized).
For anyone who is using an aftermaket plate, you need to add a 1k ohm resistor to the yellow and black (I will double check) wires and it fools the stock "low level sensor" into thinking there is gas in the tank. Downside is that once your fuel gauge is empty- it doesnt' flash to warn you. So I guess don't be stupid and let the bike run out of gas under boost.
Also planning on getting a different catch can since I don't think mine is quite optimized for space or flow. We'll see what I can conjure up.
* Last updated by: danmin on 7/29/2025 @ 12:47 PM *
Rook
Joined: 03/28/09
Posts: 21271
RE: Engine Build + RCC Ultimate Build Gallery
07/30/25 7:41 AM
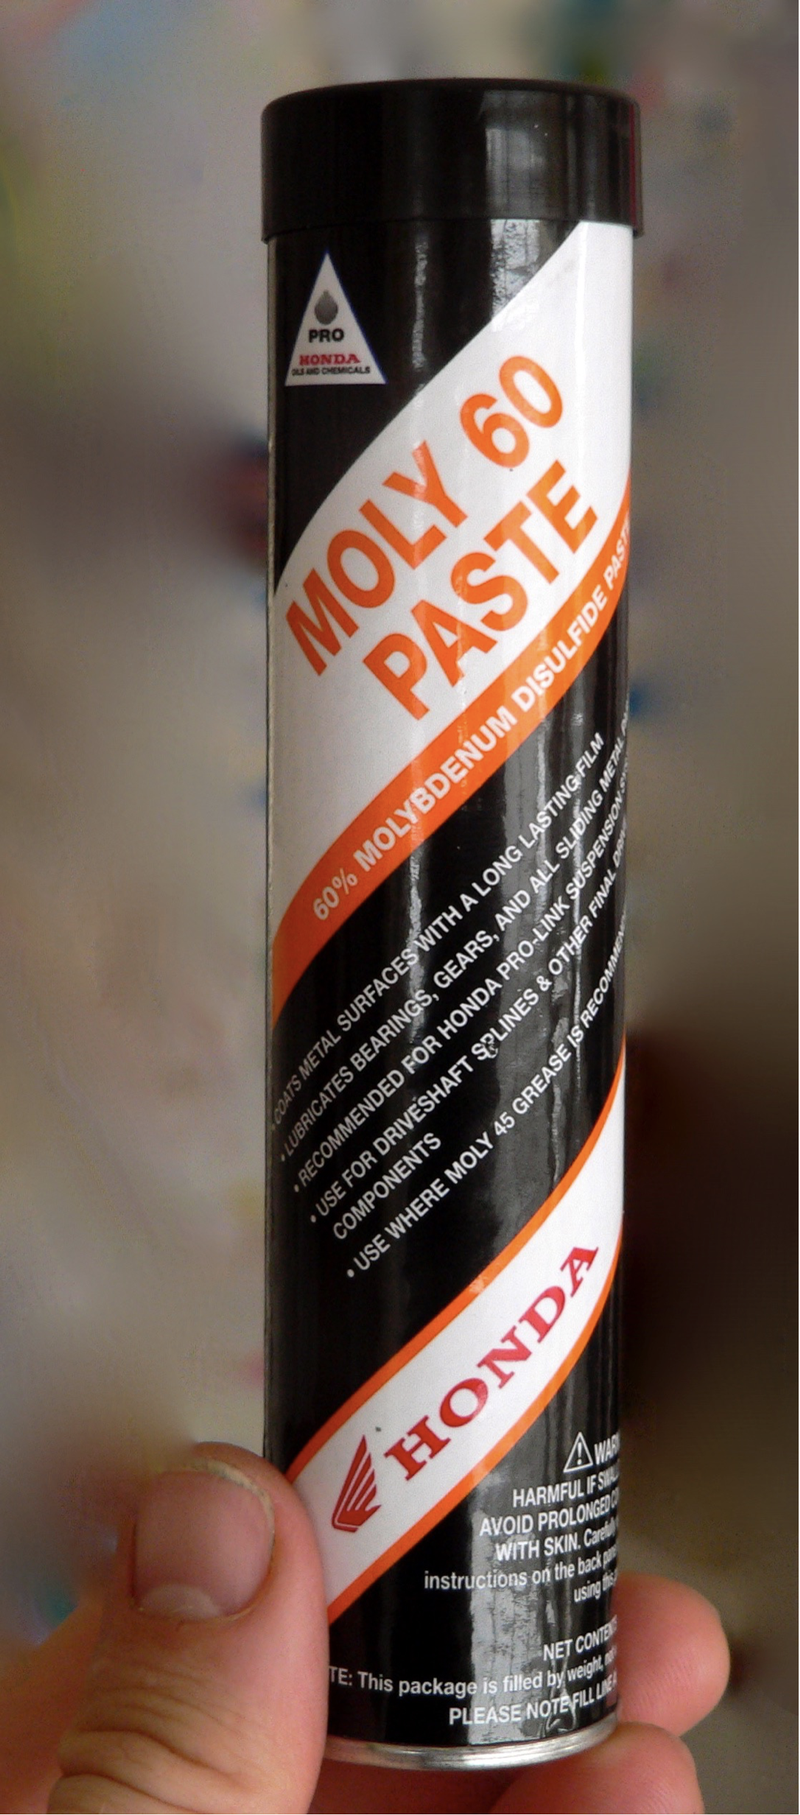
I checked and the creaking noise was from the shaft rubbing on the slave cylinder piston. I think you're supposed to put some anti-seize on it, Might add that today.
I believe it's molybdenum disulfide grease that is best to use on the pushrod and the tip. That's what I used. The real stuff is called Moly 60 Paste, it a Honda product. It's real expensive but a tube will last most a lifetime or close to it.
If the tip of the pushrod is scraping over the piston that sounds like the twp parts are not absolutely parallel. The slave isn't seated properly (I'd check that plastic spacer) or the pushrod is bent. Either of those might prevent the pushrod from making its full travel and that might not allow the plates to separate as they should when you pull the clutch lever. ...but you said it's moving quite a bit. From my recollection, you'd have to have the clutch cover on to actually see the clutch pack work...so maybe "quite a lot" isn't quite enough? Just some thoughts. You'll get it figured out.
08 MIDNIGHT SAPPHIRE BLUE ZX-14 Now Deceased, will be resurected
2024 ZX-14R bran friggin NEW!
danmin
Location: Granbury, Texas
Joined: 03/19/25
Posts: 202
RE: Engine Build + RCC Ultimate Build Gallery
07/30/25 12:19 PM
I've got the same stuff from LiquiMoly or Permatex or Amsoil. One of those brands. I supposed there's a chance the rod is bent. Next oil change I might inspect it. I'm scared of hurting the oil seal it has though. Might order a new one as a safety measure.
I was looking at getting a new slave cylinder and front sprocket cover from K-Factory (some japanese company) after a couple paychecks land on my account. I am thinking a new slave, new cover, and new rod will alleviate any potential for something bent or misaligned.
Just got the new microtech and a couple other things in the mail-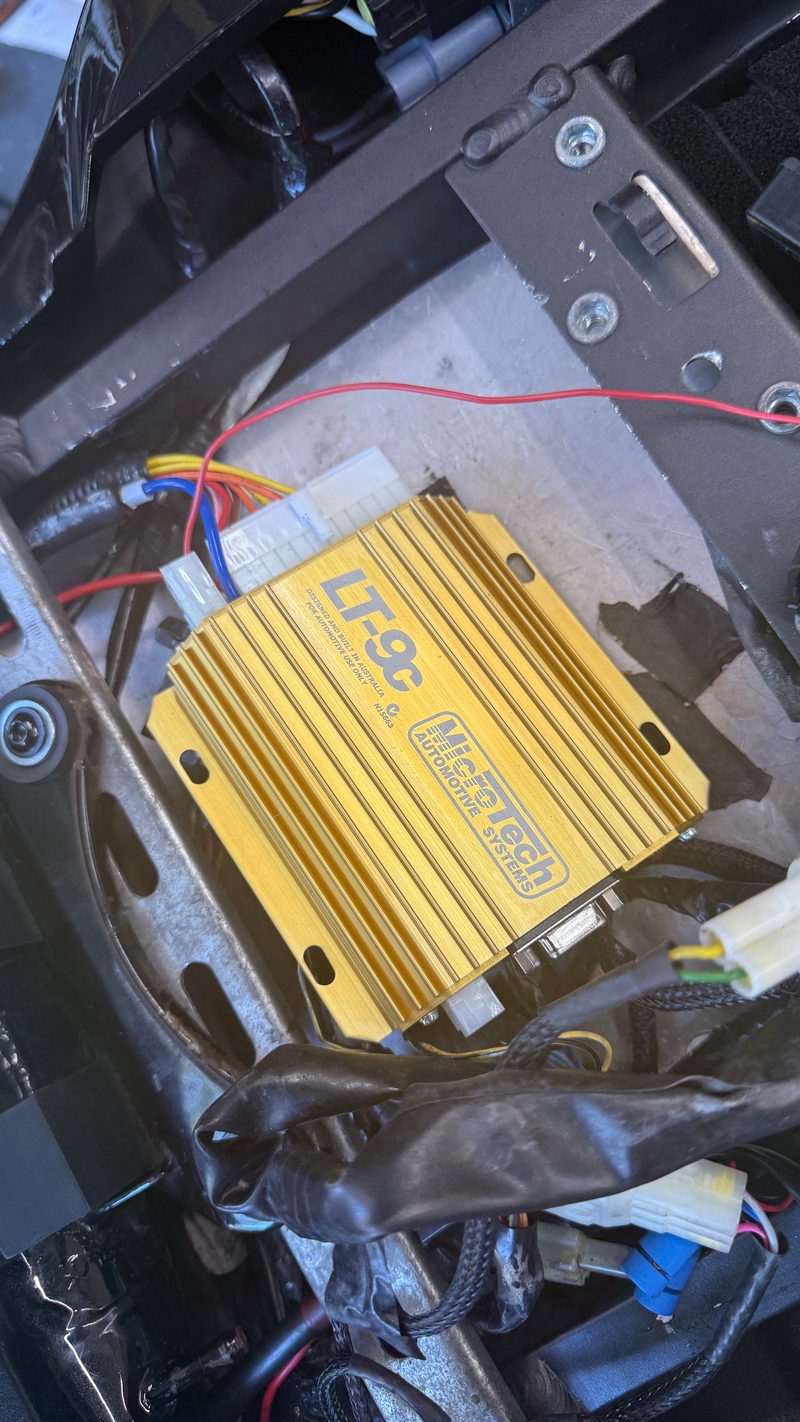
Welcome to zx14ninjaform.com!
New Post
Please login to post a response.