Move Close
Welcome to zx14ninjaform.com!

You are not logged in.
New Topic Reply
Next Page

Page: 1 2 3 4 5 6 7 8 9 10 11

Previous Page

Thread: Engine Build + RCC Ultimate Build Gallery

Created on: 04/16/25 08:54 PM

Replies: 273

danmin


danmin's Gravatar

Location: Granbury, Texas

Joined: 03/19/25

Posts: 202

RE: Engine Build + RCC Ultimate Build Gallery
06/09/25 3:32 PM

June 9th, 2025

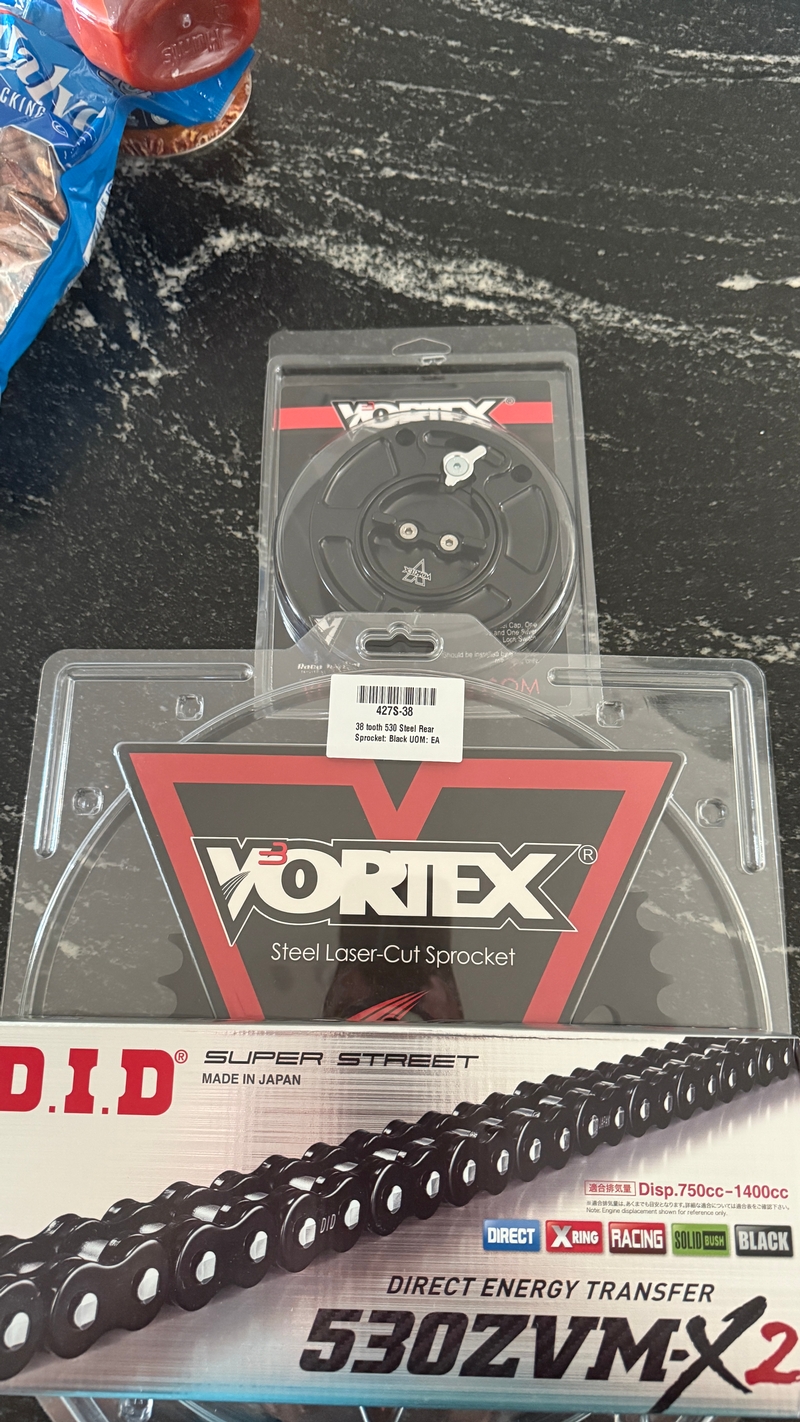
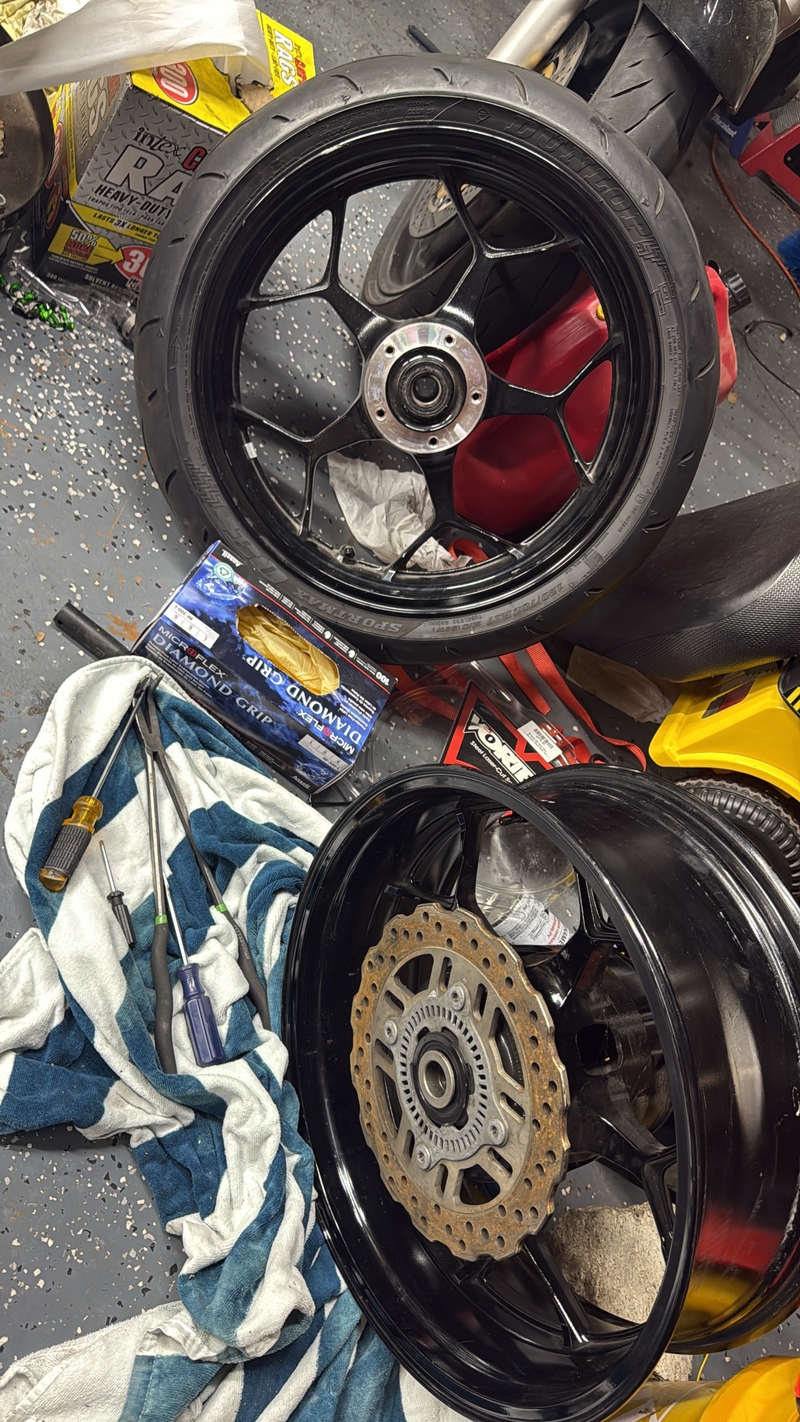
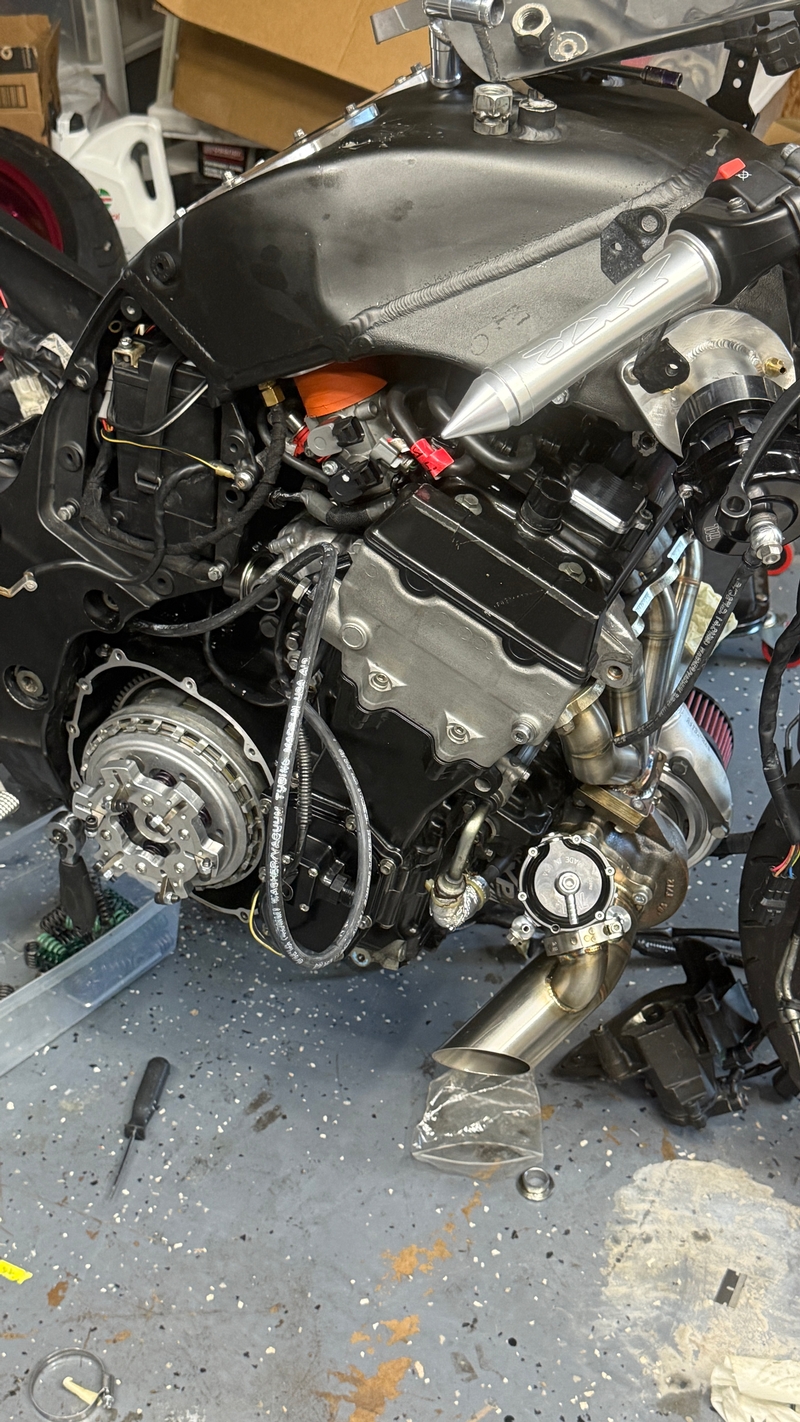
New chain and sprockets came in. 17 front. 38 rear. 530 pitch. Did some digging on which chain would hold the most power reliably. Found the chain in black. Thought that was cool since the bike is black and I don’t think I’ve ever seen someone use a black chain. I have also never seen someone shell out $400 for just a chain…… The last owner had some kind of chinese fuel cap that loved to not ventilate properly and let water into the gas tank. Bit the bullet and got the $200 vortex one. I already had vortex sprockets but they had about 10k or so on them and I wanted to change the gearing anyhow as suggested by some other turbo guys. Old sprockets had some wear. Interestingly the interior teeth of the front sprocket had a couple thou’ of play on the output shaft. New one didn’t have that same play. I was a little surprised to see wear there since overall the current chain and sprockets looked pretty decent


Link | Top | Bottom

danmin


danmin's Gravatar

Location: Granbury, Texas

Joined: 03/19/25

Posts: 202

RE: Engine Build + RCC Ultimate Build Gallery
06/09/25 6:00 PM

Ordered the wrong clutches and steels… notice the words at the end of the label. what a bummer. ordered the right one just now. can’t return these since the packaging is trashed and everything has been soaking in oil. if y’all know anyone looking for clutches i will gladly sell them some.


Link | Top | Bottom

danmin


danmin's Gravatar

Location: Granbury, Texas

Joined: 03/19/25

Posts: 202

RE: Engine Build + RCC Ultimate Build Gallery
06/10/25 12:39 PM

June 10th, 2025

Schnitz was out of clutches. 2 week backorder. MTC picked up my call and had some in stock. They said theirs had chrome-plated steels and differently designed friction discs for hold more power. Maybe it is just snake oil. Maybe not. Either way it's ordered and shipping soon. About the same price as Trac-King setup.

Brutal is sending me a new Silicone intake tube. $10 each with $10 shipping. Guess I wait another week for parts. Going to put the stator in today. Maybe a couple odds and ends. We'll see what else arrives in the mail today.

Link | Top | Bottom

Rook


Rook's Gravatar

Joined: 03/28/09

Posts: 21267

RE: Engine Build + RCC Ultimate Build Gallery
06/10/25 3:54 PM

Brutal is sending me a new Silicone intake tube. $10 each with $10 shipping.

...so the intake tubes were not a part of the turbo kit, they're a part of the aftermarket velocity stacks. I thought so. I seem to remember Romans or someone mentioning the same problem you had but that was years ago. Probably not the same brand of velocity stacks but the same idea with silicone tubes. I can almost swear the photo I saw years back had the same color tubes you have.

Thanks for the update and for your unwavering persistence.


08 MIDNIGHT SAPPHIRE BLUE ZX-14 Now Deceased, will be resurected 2024 ZX-14R bran friggin NEW!

Link | Top | Bottom

danmin


danmin's Gravatar

Location: Granbury, Texas

Joined: 03/19/25

Posts: 202

RE&#x3a&#x3b; Engine Build &#x2b&#x3b; RCC Ultimate Build Gallery
06/10/25 5:42 PM

Oh yeah, sorry if I didn't answer your question. They are not a part of the turbo kit. Here is the link to purchase them: LINK. These are a lot more involved to install than the stock ones. But they seal up the Airbox a whole lot more. Stock ones are supposed to leak pretty good around 10 PSI. Which is less than what my eventual target boost will be. 10 PSI on a low comp build is supposed to net about ~300hp (From what I have seen on various forums)

Somebody suggested to loosen the throttle bodies, with the engine dropped, then angle the throttle bodies so they don't bend and pinch the silicone hoses, making adjustments as the engine is raised and installed. We'll see how it goes...

For clarity of what does and doesn't come in the kits--
RCC Stage 1 turbo kit contents:
-Turbo and manifold
-Turbo oil Lines and fittings
-Turbo oil scavenging pump
-External Wastegate
-Boost reference lines
-Fuel lines and fittings
-Fuel pressure regulator (boost pressure referenced?)
-Airbox sealing fittings and large plates
-Oil cooler delete kit
-Crankcase ventilation system
-PAIR Valve delete plates
Stage 2 kit:
-Fuel rail
-MircoTech ECU
-Different airbox sealing fittings
-Different fuel lines
-Different boost reference lines
Ultimate kit:
-Intercooler
-Heat exchanger
-Electric coolant pump
-Brackets to mount intercooler
-Coolant lines

You've got to buy an assortment of drill bits and taps for the install. Everything else is optional. One or two things might be missing from the list.


* Last updated by: danmin on 6/10/2025 @ 5:46 PM *

Link | Top | Bottom

danmin


danmin's Gravatar

Location: Granbury, Texas

Joined: 03/19/25

Posts: 202

RE&#x3a&#x3b; Engine Build &#x2b&#x3b; RCC Ultimate Build Gallery
06/12/25 11:32 PM

June 12th, 2025

Installed:
-new Evil +4" Swing Arm
-new catch can
-new stator
-new fuel cap

Bought black wheels with ceramic wheel bearings in them. Got the brakes and stuff swapped over. Now I just need to get the tires swapped over.

Did some test routing of fuel lines and boost reference lines. Everything is looking good. I can start it up once I get the silicone intake tube and get the clutch fibers + steels in the mail and installed. Clutches arrived tomorrow. Silicone hose doesn't have tracking.


* Last updated by: danmin on 6/12/2025 @ 11:35 PM *

Link | Top | Bottom

danmin


danmin's Gravatar

Location: Granbury, Texas

Joined: 03/19/25

Posts: 202

RE&#x3a&#x3b; Engine Build &#x2b&#x3b; RCC Ultimate Build Gallery
06/16/25 9:17 PM

June 16th, 2025

-MTC Clutch Pack Installed
-MTC 2-Stage clutch Installed
-Stupid Silicone Intake Tubes Installed
-Most Electrical Connectors Plugged together

Tomorrow I'm going to install the oil lines to the turbo. In 2 days I should get the bolts I need for the MTC lockup. The stock ones were too short. Only bit into 1 line of the threads on the clutch hub. Ordered M6x20mm 12.9 Grade bolts to replace the Stock Nissin 10.9 M6x10 bolts.

I think once the oil lines are installed, Idle air control Valve, Gas tank pump plate, Clutch Bolts, and covers installed I can give it it's first start.

I need to find a replacement bolt for the wastegate cover. The "To Do" List is still pretty long. But this is beginning to form a real motorcycle again.

2-Stage Lockup does NOT clear my stock or aftermarket clutch cover... So I ordered a Voodoo Quick Access Cover since the spacers were sold out at MTC and Voodoo's price was right. I also needed to sub the stock clutch spring bolts for M6-1x25mm steel bolts so that the 2-stage is secured to the clutch plate by more than one single line of thread keeping it in place. I don't recall if the stock clutch hardware is drilled and tapped as deep as the SAE Titanium hardware, but in this situation it bites into the hardware a solid 10mm. Yeah it added a lot of weight... but I would take weight over losing a bolt while the bike is running and potentially losing the 2-stage and pressure plate while riding.


* Last updated by: danmin on 6/19/2025 @ 11:35 AM *

Link | Top | Bottom

rspauldi


Joined: 10/08/11

Posts: 81

RE: Engine Build + RCC Ultimate Build Gallery
06/16/25 9:43 PM

Hey Dan, it appears you’re not happy with the silicone intake tubes. I am looking for a product that won’t boost leak. So, if not happy with these tubes would you recommend something different?

Link | Top | Bottom

danmin


danmin's Gravatar

Location: Granbury, Texas

Joined: 03/19/25

Posts: 202

RE: Engine Build + RCC Ultimate Build Gallery
06/16/25 9:53 PM

They are a good product. Just hard to use with the Stage 2 RCC Injector rail. They are also hard to install overall. Took me a lot of attempts to get them in. I still have to add the Hose Clamps to each one too. I'm going to wait to start the engine before I worry about that though. Good idea- very hard install. 100% needed for higher boost bikes

Link | Top | Bottom

rspauldi


Joined: 10/08/11

Posts: 81

RE: Engine Build + RCC Ultimate Build Gallery
06/16/25 9:57 PM

Another question, that dog gone heat “mat” that covers the top of the motor is really pissing me off. Are there side effects from removing this piece of crap? Might warm the fuel and leg/ball junction but anything else? It’s definitely on the delete list, always in the way!!

Link | Top | Bottom

rspauldi


Joined: 10/08/11

Posts: 81

RE: Engine Build + RCC Ultimate Build Gallery
06/16/25 10:02 PM

Alright, boost leaks are a waste.. kind of like spilling your cold snack out of the side of your mouth. Guess I better order knowing they’re a PITA. Hey, wait, I have a stock fuel rail.. maybe PITA relief?

Link | Top | Bottom

danmin


danmin's Gravatar

Location: Granbury, Texas

Joined: 03/19/25

Posts: 202

RE: Engine Build + RCC Ultimate Build Gallery
06/16/25 10:21 PM

My bike has ZERO shields or fairing supports. Just the fairings that are painted and immediately visible from outside the bike. No supporting structure. No rain shields. Nada. Don't need that stuff unless you plan on parking the bike and driving the bike in the rain constantly. Still gonna be a headache to get them in. Some people report zero issues. others, like myself, bang our heads on the walls for a while.


* Last updated by: danmin on 6/16/2025 @ 10:21 PM *

Link | Top | Bottom

Rook


Rook's Gravatar

Joined: 03/28/09

Posts: 21267

RE: Engine Build + RCC Ultimate Build Gallery
06/17/25 4:22 PM

that dog gone heat “mat” that covers the top of the motor is really pissing me off. Are there side effects from removing this piece of crap?

I removed the rubber heat shields from both the air box and the engine on my Gen1. I also removed all the foam pads including those near the top of the engine. I removed the plastic shield at the top front of the valve cover. I removed all the water hose brackets and the big spring on the main hose at the LH side. I didn't have turbo on that bike. I never noticed a change in engine temp over and above the improvement from the full exhaust I had on the bike. I noticed no deleterious effects on fairings or heat I felt off the bike when riding. It eliminated a lot of junk that was in the way and reduced the weight of the bike some.

The only heat shields I left in the bike were the reflective pads at the inside of the grills. I don't know if there's much point in removing those, they are situated right at the top of the engine....then again, that dang rubber blanket drapes right over the top of the engine and I saw no signs of heat damage to it. ...hate to need to replace another grill fairing though so maybe leave those pads in? Three hundred bucks for one of those grills.

if you're reading danmin, you have those reflective pads still on the inside of your grill panels?


08 MIDNIGHT SAPPHIRE BLUE ZX-14 Now Deceased, will be resurected 2024 ZX-14R bran friggin NEW!

Link | Top | Bottom

danmin


danmin's Gravatar

Location: Granbury, Texas

Joined: 03/19/25

Posts: 202

RE: Engine Build + RCC Ultimate Build Gallery
06/17/25 5:50 PM

I don't have the reflective pads in my fairings. I tried to install them on some cheap amazon fairings and they fell right out so I never used them. Zero adverse effects. I have a new set of monster fairings that will be going on the bike when it's done which will also not be using those reflective pads. I'm sure it helps the paint or something but i've never seen any heat related issues for the fairings

Link | Top | Bottom

rspauldi


Joined: 10/08/11

Posts: 81

RE: Engine Build + RCC Ultimate Build Gallery
06/17/25 9:25 PM

Ah, great news.. Rook ur from the great white north wear temps are much cooler so the leg to ball junction temp may stay cooler. But then again as I age I’m turning into a fair weather pilot.
That mat is getting a 3 point shot into the trash. I have some questions but don’t want to high jack Lieutenant Dan’s thread.

Link | Top | Bottom

danmin


danmin's Gravatar

Location: Granbury, Texas

Joined: 03/19/25

Posts: 202

RE: Engine Build + RCC Ultimate Build Gallery
06/17/25 11:50 PM

Ask away. This thread is mostly just drunk check-ins and me complaining

Link | Top | Bottom

Rook


Rook's Gravatar

Joined: 03/28/09

Posts: 21267

RE: Engine Build + RCC Ultimate Build Gallery
06/19/25 6:12 AM


08 MIDNIGHT SAPPHIRE BLUE ZX-14 Now Deceased, will be resurected 2024 ZX-14R bran friggin NEW!

Link | Top | Bottom

rspauldi


Joined: 10/08/11

Posts: 81

RE: Engine Build + RCC Ultimate Build Gallery
06/19/25 7:06 AM

Got it….. Dan, good luck with your build. You guys take care

Link | Top | Bottom

danmin


danmin's Gravatar

Location: Granbury, Texas

Joined: 03/19/25

Posts: 202

RE: Engine Build + RCC Ultimate Build Gallery
06/19/25 9:10 PM

June 19th, 2025

Tried to install the fuel pump plate but broke the fitting. It seized up when tightening it (with lots of threads left on the bolt) and I loosened it and tightened it and did what I could before just trying to muscle through it. Snapped the fitting clean in half. Now I get to remove the leftover piece. I emailed Rob Bush about it. Gonna see if he'll send me a new one.

Also got the wiring 75% plugged together and routed. Screen comes on but Gear Indicator is blank, fuel tank level flashes full, KTRC and power mode also flash. Not sure why.

Bike will attempt to start if I hit the start button.

Waiting on email back from Richard if RCC regarding boost line routing and connections. The Stage 1 and Stage 2 Instructions don't explicitly say what is connected and where. Just shows a blurry picture that doesn't match the description.

Waiting on the Voodoo Quick Access Clutch cover to arrive. The stock cover and aftermarket extended cover don't fit over the 2-Stage lockup. That's the last step before putting oil in and getting fuel in the system.

I pressure tested the airbox and it leaks from two of the rear hole-plugs that Richard supplies. They are installed and torqued properly. I'm not sure what to do about them. I am thinking JB weld. I am open to suggestions.

It appears that @ 20 PSI entering I am losing 2 PSI. I am also leaking somewhere by the front of the engine but I haven't confirmed where at yet. I tried using soapy water but I think I need to rework the soap/water ratio.


Link | Top | Bottom

Fordtech58


Joined: 12/10/16

Posts: 152

RE: Engine Build + RCC Ultimate Build Gallery
06/20/25 6:34 AM

Hey Dan, I've got a few thoughts on your problems as presented. The fuel fitting that go into the new pump plate are a pipe thread which is a tapered thread. It gets larger from the start of the thread to the wrench head. It's not designed to be tightened to the hex portion which is why it has no washer or sealing surface. The fuel gauge flashing is because the sending unit for the gauge is part of the original pump. Schnitz sells a plug you can add that will have the gauge just read 1/2 and not trigger a low fuel warning. Your pressure testing the airbox is flawed where as even with the throttle fully closed your forcing air into the engine. There's always some airflow past the throttle plates or they'd lock up in the bores. The leak you're hearing at the front of the engine is most likely what you're forcing into the engine coming into the exhaust header or out the crankcase breather. With the engine running when making boost and the throttles plates are wide open and the down stroke of the pistons are sucking air while being force fed your leaks will be inconsequential. Lastly get rid of as many of those scotch locks I can see in the last picture as they're okay for a quick emergency repair but totally useless for a good reliable connection.

Now if you're not totally offended by my "help" comments I'm hoping to come to the Texas Motorplex and race next Friday night and Saturday if you want to make the trip?

Link | Top | Bottom

Rook


Rook's Gravatar

Joined: 03/28/09

Posts: 21267

RE: Engine Build + RCC Ultimate Build Gallery
06/20/25 6:48 AM

I pressure tested the airbox and it leaks from two of the rear hole-plugs that Richard supplies. They are installed and torqued properly. I'm not sure what to do about them. I am thinking JB weld. I am open to suggestions.

I'm picturing these plugs to look something like a well nut. If so, I'd expect the leak to be coming past the threads. How can a rubber tire valve stem seal a hundred psi and the best thing we have to seal the air box can't hold 20 psi? If you're going with JB Weld, consider carving an aluminum plug and applying the JB Weld externally. If that works, you could clean away the JB Weld and actually weld them someday if the JB Weld doesn't last permanently.

I wouldn't be running 20 psi boost right away but I wonder how many of these problems I'd run into? I'm starting to think about just going with the Brock's CT Meg for a couple years. I can't see doing all this stuff right away on a brand new bike. LOL I haven't even done any maintenance to it yet. I haven't even cleaned the factory goo off the chain.


08 MIDNIGHT SAPPHIRE BLUE ZX-14 Now Deceased, will be resurected 2024 ZX-14R bran friggin NEW!

Link | Top | Bottom

danmin


danmin's Gravatar

Location: Granbury, Texas

Joined: 03/19/25

Posts: 202

RE: Engine Build + RCC Ultimate Build Gallery
06/20/25 8:49 AM

Those little snap on connectors are from the last owner. no idea what they were supposed to be for either. part of the fun of a used drag bike. I've done what I can to get rid of shady wiring and whatnot. I was under the impression it was a tapered situation for the fuel pump fittings, but I didn't see any mention of that on the plate's listing, and the other fitting went all the way in.

Those leaking rear "plugs" are 2 M8 bolts with rubber washers and a nut. You are supposed to tap two holes for the M8 threads and then install the bolt through it. I did so and added high pressure thread sealer, but it is leaking a little now. Thanks to the Stage 2 injectors- it's nearly impossible to access the nut for a little tightening or loosening and reinstalling. I'm gonna put a nice little dome of JB Weld over the bolt and see how it seals.

Rook, just part of the process. Gotta check seals and make sure I didn't leave a gaping hole in the airbox anywhere. A brocks exhaust and air filter won't scratch your speed and coolness itch like a turbo would. Maybe it would be worth saving up the dough to have a shop do your install. Running rate for a stage 1 install on a stock engine + head gasket and head studs is 10 grand. I am wishing I had done that. Just dropped it off and paid the fat bill at the end. But now I know that no corners were cut on this bike and I got to find a couple of sketchy things on this bike to repair in the process.


* Last updated by: danmin on 6/20/2025 @ 8:50 AM *

Link | Top | Bottom

Rook


Rook's Gravatar

Joined: 03/28/09

Posts: 21267

RE: Engine Build + RCC Ultimate Build Gallery
06/20/25 11:44 AM

A brocks exhaust and air filter won't scratch your speed and coolness itch like a turbo would.

I wouldn't give up on the turbo, I'd just spend the brand newness of the bike a lot closer to stock. ...do some major maintenance items like valve clearance adjustments ...do some engine related mods like manual CCT ...maybe in a couple years, I'd go all the way on the engine build like you did. Right now, tapping threads in a brand new bike is a bit more than I can stomach. We'll see Dan. It would be fun to experience the evolution of the bike in stages. I feel like buying the turbo and the pipe.

Maybe it would be worth saving up the dough to have a shop do your install. Running rate for a stage 1 install on a stock engine + head gasket and head studs is 10 grand. I am wishing I had done that. Just dropped it off and paid the fat bill at the end. But now I know that no corners were cut on this bike and I got to find a couple of sketchy things on this bike to repair in the process.

If the ten grand isn't enough, knowing it was done right (or at least you know what needs fixing) is even better. We'll see. Maybe I'll buy the turbo and just look at it for a couple years!


* Last updated by: Rook on 6/20/2025 @ 11:45 AM *


08 MIDNIGHT SAPPHIRE BLUE ZX-14 Now Deceased, will be resurected 2024 ZX-14R bran friggin NEW!

Link | Top | Bottom

danmin


danmin's Gravatar

Location: Granbury, Texas

Joined: 03/19/25

Posts: 202

RE: Engine Build + RCC Ultimate Build Gallery
06/20/25 11:56 AM

Fair enough. I cant stomach the idea of a brand new bike. I'd kick myself for any rock chips or scratches I would cause. And the feeling would repeat every time I'd see that imperfection. But maybe I'm just trying to justify myself for being a cheap a**.

Link | Top | Bottom

Rook


Rook's Gravatar

Joined: 03/28/09

Posts: 21267

RE: Engine Build + RCC Ultimate Build Gallery
06/20/25 2:37 PM

A little wear over time is all a part of making it your bike. You fix the things that get worn from use. That's the trepidation I have with really doing major mods on a new bike...nothing has any wear on it yet and here I am making changes that will be forever. I don't want to wait too long on that turbo though. Who knows when Richard will decide to get out of the business? I'm going to need some suggestions.


I don't think you're a cheapass! You've spent a lot of money so far...more than I could afford right away. If you can do it yourself, I think that's the best way to do it so really know what it is you have. ...ten grand for a stage one turbo install and you don't know what they might have taken shortcuts on or what they might have broken until one day you find out....no thanks. I'd need to have some real trust in that shop. At least if you have some misfortunes in your build, you know about them.


08 MIDNIGHT SAPPHIRE BLUE ZX-14 Now Deceased, will be resurected 2024 ZX-14R bran friggin NEW!

Link | Top | Bottom


Welcome to zx14ninjaform.com!
 
New Topic Reply
Next Page

Page: 1 2 3 4 5 6 7 8 9 10 11

Previous Page

New Post

Please login to post a response.