Move Close
Welcome to zx14ninjaform.com!

You are not logged in.
New Topic Reply
Next Page

Page: 1 2 3 4 5 6 7 8 9 10 11

Previous Page

Thread: Engine Build + RCC Ultimate Build Gallery

Created on: 04/16/25 08:54 PM

Replies: 273

Rook


Rook's Gravatar

Joined: 03/28/09

Posts: 21271

RE: Engine Build + RCC Ultimate Build Gallery
07/08/25 3:51 PM

Personally, I'd rather live in the sticks but when it comes to riding, I'll take the cops over the fucking deer. The metro Milwaukee area was a wonderful place to ride as long as you can avoid police. At this point in life, I'll pay whatever I need to go fast without worrying about animals or police.


08 MIDNIGHT SAPPHIRE BLUE ZX-14 Now Deceased, will be resurected 2024 ZX-14R bran friggin NEW!

Link | Top | Bottom

danmin


danmin's Gravatar

Location: Granbury, Texas

Joined: 03/19/25

Posts: 202

RE: Engine Build + RCC Ultimate Build Gallery
07/08/25 7:40 PM

Got the screws out and drowned each one in red loctite. Got them all back in. Just did one at a time until they were all finished. I had my friend with the longest and thinnest arms come over to reach into the airbox through the BOV hole. There were some metal shavings at the BOV built up for some reason. I think they are remnants from the intercooler unfortunately. it was ridiculously difficult with the injector rail installed. i tried to remove the injector rail but that was pretty difficult as well so i chose the lesser of two evils.


Is this the throttle valve plates? I hope that's all it is. Fuel rail or not, you better make sure those screws are secure

The airbox seal plates. Not really sure what they're called... Adding a picture of them for clarity.

I have much respect for you doing all this work in an extremely short amount of time. Just relax and go back over your work.

I appreciate that. It's certainly been a learning experience, to say the least. I hate not having my bike. And I hate having all this money sunk into it, and have nothing to show for it. Sounds too much like all my project cars that never get finished. I am determined to follow all the way through with this one.

Link | Top | Bottom

danmin


danmin's Gravatar

Location: Granbury, Texas

Joined: 03/19/25

Posts: 202

RE: Engine Build + RCC Ultimate Build Gallery
07/09/25 4:13 AM

July 9th, 2025

Off to the tuner.

Link | Top | Bottom

danmin


danmin's Gravatar

Location: Granbury, Texas

Joined: 03/19/25

Posts: 202

RE&#x3a&#x3b; Engine Build &#x2b&#x3b; RCC Ultimate Build Gallery
07/09/25 11:07 AM

Balancer bolt walked itself off and the rear balancer shaft halfway ejected itself out. Researching extent of damage, if any.

So far it's made 270 at the wheel on the base tune and 10lb spring. My Microtech was not reading the Tach Wire correctly. Fixed that. A coolant hose had a small crack at the end of it- fixed that. Boost controller didn't work correctly- removed it.


* Last updated by: danmin on 7/9/2025 @ 11:09 AM *

Link | Top | Bottom

Rook


Rook's Gravatar

Joined: 03/28/09

Posts: 21271

RE: Engine Build + RCC Ultimate Build Gallery
07/09/25 3:35 PM

The airbox seal plates. Not really sure what they're called... Adding a picture of them for clarity.

Oh, those things that used be the ducts. I remember early on, you saying those screws were difficult. That looks like a good part for a number of reasons, mostly because you have gasoline spraying right down them. That might be hard on the plastic stock ducts over time.

Boost controller didn't work correctly- removed it.

Is something other than the waste gate spring that controls boost?

So far it's made 270 at the wheel on the base tune and 10lb spring.

It sounds like bringing the bike to a tuner was a wise choice. ...not just for the tune but it seems like the tuner is helping a great deal to tie up any loose ends in the build and the kit install.


08 MIDNIGHT SAPPHIRE BLUE ZX-14 Now Deceased, will be resurected 2024 ZX-14R bran friggin NEW!

Link | Top | Bottom

Rook


Rook's Gravatar

Joined: 03/28/09

Posts: 21271

RE: Engine Build + RCC Ultimate Build Gallery
07/09/25 3:40 PM

That U-Haul motorcycle trailer is a great, low cost option for transporting the bike. I've used it a number of times.


08 MIDNIGHT SAPPHIRE BLUE ZX-14 Now Deceased, will be resurected 2024 ZX-14R bran friggin NEW!

Link | Top | Bottom

danmin


danmin's Gravatar

Location: Granbury, Texas

Joined: 03/19/25

Posts: 202

RE&#x3a&#x3b; Engine Build &#x2b&#x3b; RCC Ultimate Build Gallery
07/09/25 3:56 PM

Here is today's final dyno sheet. I stand to gain quite a lot more once I come back. Tuner estimates 320 at the wheel when the rest of the microtech is smoothened out. Then he's gonna get the Woolich suite working on my Stock ECU for full on and off boost refinement. $825 when it's said and done. Not including the trailer rental, gas, and feeding myself as well as my buddy. Tuner also suggested that capping off the wastegate top nipple will net me a PSI or three in addition to the spring.

I had a manual boost controller on the bike to increase the psi the wastegate would open at. It's a faulty unit. Going to get a refund and not use one at all. Using it caused the bike to make 25PSI at 8k RPM. Made 250 at the wheel when it did that, and the wheel was spinning. Throttle was cut as soon as the boost shot up. At almost 8k on the dot.

I met another forum member today. Or it was his nephew, Rook, do you recall any Gen 1 bikes all blue with blue flames on it? I think it's got an Orient Express kit in it. I didn't see the bike today. Maybe next time. It's been in a few Drag Racing Magazines.


* Last updated by: danmin on 7/9/2025 @ 8:38 PM *

Link | Top | Bottom

danmin


danmin's Gravatar

Location: Granbury, Texas

Joined: 03/19/25

Posts: 202

RE: Engine Build + RCC Ultimate Build Gallery
07/09/25 4:04 PM

75% of Dyno Day 1 was just heat cycling the bike and fixing little things. Remaining 25% was putting miles on the bike on the dyno. Next dyno day will be more productive.... Assuming my balancer didn't turn my crank into gravel.

Another complaint about RCC: I got to the shop today and the guy started asking me about the bike. He said he usually tunes with a Power Commander in addition to a Microtech. That the stock tune leaves things a little lean and "jerky" at cruising. I was disappointed to hear that. I think for future RCC customers they should be briefed on the due diligence needed to successfully run these kits. #1- Clean everything because there's metal shavings in the important pieces. #2- consult a tuner before purchasing any fuel system or controller. #3- You'll need to buy 17 different sized NPT taps

here is that blue bike:


* Last updated by: danmin on 7/9/2025 @ 7:36 PM *

Link | Top | Bottom

Rook


Rook's Gravatar

Joined: 03/28/09

Posts: 21271

RE: Engine Build + RCC Ultimate Build Gallery
07/09/25 4:54 PM

I had a manual boost controller on the bike to increase the psi the wastegate would open at.

Oh, ok...some device to adjust boost pressure manually on the spot. I remember talking to Ozrevhead about those.

Rook, do you recall any Gen 1 bikes all blue with blue fairings on it? ...here is that blue bike:

No, I would probably remember the screen name though. That Roman helmet insignia looks kind of familiar so maybe it was his avatar. ...but it's also reminiscent of the Monster Energy Drink skull I've seen many times.

Using it caused the bike to make 25PSI at 8k RPM. Made 250 at the wheel it did that. Throttle was cut as soon as the boost shot up. At almost 8k on the dot.

Your intuition was definitely on point when you decided you needed a tuner. Yep, sounds like there's plenty of things outside of building the engine and installing the turbo that need to ironed out.


08 MIDNIGHT SAPPHIRE BLUE ZX-14 Now Deceased, will be resurected 2024 ZX-14R bran friggin NEW!

Link | Top | Bottom

danmin


danmin's Gravatar

Location: Granbury, Texas

Joined: 03/19/25

Posts: 202

RE&#x3a&#x3b; Engine Build &#x2b&#x3b; RCC Ultimate Build Gallery
07/09/25 7:00 PM

I don't mean to ignore your reply. Just barely got the bike back home and started draining the oil and coolant. Getting ready to drop the engine... Not happy...

Here are two youtube shorts I uploaded of the bike on the dyno. I'll post some pictures and whatnot soon.

Video1
Video2

Full length pull
Longer Video


* Last updated by: danmin on 7/9/2025 @ 7:16 PM *

Link | Top | Bottom

danmin


danmin's Gravatar

Location: Granbury, Texas

Joined: 03/19/25

Posts: 202

RE: Engine Build + RCC Ultimate Build Gallery
07/09/25 9:41 PM

I've done some assessing. I think the best strategy is to drop the oil pan and check for any debris. I found some flakes in my drained oil. Not sure what from exactly. My guess is remnants from the clutch basket getting destroyed in addition to piston rings getting worn in and the initial bearing coating getting worn off. If no severe chunks- remove the fuel injector harness entirely. Remove water neck on rear right side of engine. That will open a huge channel behind the engine to try remove crankcase vent cover. If I can remove that cover, I can stick a camera into the cover hole and inspect damage to or around rear balancer. If there are chunks in the pan- probably the best idea is to drop the engine after removing all engine covers and inspecting what I can.

Link | Top | Bottom

Rook


Rook's Gravatar

Joined: 03/28/09

Posts: 21271

RE: Engine Build + RCC Ultimate Build Gallery
07/10/25 1:24 PM

Cool videos.

Fingers crossed for minimal to no engine damage. The metal flakes are probably built up over the short time you've been operating the engine. That's probably not from the balancer shaft since the engine must have only run a few seconds with that loose.


08 MIDNIGHT SAPPHIRE BLUE ZX-14 Now Deceased, will be resurected 2024 ZX-14R bran friggin NEW!

Link | Top | Bottom

danmin


danmin's Gravatar

Location: Granbury, Texas

Joined: 03/19/25

Posts: 202

RE: Engine Build + RCC Ultimate Build Gallery
07/10/25 1:57 PM

Rook: Your intuition was definitely on point when you decided you needed a tuner. Yep, sounds like there's plenty of things outside of building the engine and installing the turbo that need to ironed out.

Haha yeah. Mostly stuff that needed threadlocker. MicroTech Tach signal issue is from either lack of information from RCC instructions or me missing the detail about a yellow light flickering when tach signal is read correctly, in addition to the blinking red light for power to the unit. Coolant leak was just something I never got to see until the engine got really hot during the first handful of heat cycles. I talked to some turbo guys and nobody mentioned how severe vibrations can get. I don't know why the turbo would be adding much more vibration to anything, but they all said they have to add threadlocker on anything with threads.

Rook: Fingers crossed for minimal to no engine damage. The metal flakes are probably built up over the short time you've been operating the engine. That's probably not from the balancer shaft since the engine must have only run a few seconds with that loose.

I guess we'll see how it looks tonight. The oil pressure was so high that when the balancer shaft ejected itself it took out some metal from the case. I'll send a photo soon. sounds much worse than it is. That metal that was removed wasn't integral to the case's structure or anything. I am still trying to get the video of the moment. The video I saw was pretty neat to watch. Like a ghost put a ratchet on the bolt, unscrewed it, then the balancer flew out sideways and shot oil all over everything.


* Last updated by: danmin on 7/10/2025 @ 1:58 PM *

Link | Top | Bottom

danmin


danmin's Gravatar

Location: Granbury, Texas

Joined: 03/19/25

Posts: 202

RE: Engine Build + RCC Ultimate Build Gallery
07/10/25 3:33 PM

Oil pan had a lot of glitter and grit. I am going to chalk it up to break in and the "Liqui Moly Long-Life Grease + MoS2" I bought and lubed up the transmission, cam chain, and valvetrain parts with. It looks like silver toothepaste full of glitter. I never really used the transmission more than to roll a couple feet. Then I changed it, and the oil was completely silver with that Liqui Moly stuff. This time around- a lot less silver, but still pretty silver-y. There were slivers of metal just like what was shown when my clutch basket was mutilated by the connecting rod nut. Maybe some of those stuck to the grease that still hadn't been flung off of the transmission yet.

Dyno Day was the first time the transmission had been used really. And boy was it used... Warm ups and Heat Cycles were in lower gears. They sounded like pulls to about 6-8K RPM. All the real pulls were done in 5th gear, with my gearing, thats a redline of 205 MPH. Safe to assume there were a lot of quickly spinning things inside the case. I'm going to try and get a peak under the rear balancer cover tonight or tomorrow when my buddy comes over to help out.

I looked underneath the engine with the oil pan off and everything still looked pretty. Nothing is confirmed until I see the balancer area. That rear balancer is kinda in it's own little world. Pretty secluded from the rest of the case internals. zero chunks in the pan make me confident...


* Last updated by: danmin on 7/10/2025 @ 3:34 PM *

Link | Top | Bottom

danmin


danmin's Gravatar

Location: Granbury, Texas

Joined: 03/19/25

Posts: 202

RE: Engine Build + RCC Ultimate Build Gallery
07/10/25 7:50 PM

July 10th, 2025

-Removed oil pan and associated rubber pieces
-Removed oil pickup (Ordered replacement)
-Removed injector harness (Ordered replacement)
-Removed thermostat and housing (located at rear right side of engine head)
-Removed fuel lines
-Removed coolant tank
-Removed left side frame brace
-Removed rear balancer cover / crankcase vapor vent
-Removed balance case bearing ridge from misaligned rear balancer spinning at 10k RPM (Dremel with sanding ball tip slowly removing material)
-Recreated clearance for the rear balancer shaft by hammering it into the holes it's supposed to be in after using dremel to clean it up as much as possible, then removing shaft and cleaning any debris, cleaning, lubricating, repeating
-Reinstalled rear balancer after deep clean and rubber gasket instillation
-Removed crankcase vapor vent choke point with dremel
-Deep cleaned oil pan of any metal and moly grease


Tomorrow's plan:
-Loctite & Proseal on any bolt I can access, torquing it to spec, drawing on bolt head with paint marker. Until no bolts remain
-Double check balancer position on crank
-Reinstall rear balancer cover
-Raise suspension an inch
-Bleed clutch of any air bubbles
-Solder Microtech to Tach wire
-Install new injector harness
-Reinstall thermostat housing
-Reinstall fuel lines
-Reinstall frame brace and route electrics
-Wash everything with foam cannon and pressure washer

Saturday:
-Install new oil pickup
-Install oil pan
-Oil change + new filter
-Try starting
-Maybe check air intake stack tiny bolts with camera to make sure none loosened

I'll post some pictures of how it all looks

Link | Top | Bottom

danmin


danmin's Gravatar

Location: Granbury, Texas

Joined: 03/19/25

Posts: 202

RE: Engine Build + RCC Ultimate Build Gallery
07/10/25 9:11 PM

Rear Balancer exposed:


Link | Top | Bottom

danmin


danmin's Gravatar

Location: Granbury, Texas

Joined: 03/19/25

Posts: 202

RE: Engine Build + RCC Ultimate Build Gallery
07/10/25 9:22 PM

I forgot to snap a picture of the oil pan before. Just imagine buying a container of glitter and mixing it in oil, then smearing it on everything. with a couple built up spots in all the nooks of the pan.

Cleaned oil pan:

Tried to snap a picture of the condition of the case where the rear balancer washers meet the case. Not a pretty sight. Could be from the balancer shaft ejection, maybe just from about 17k miles, maybe from the 2 minutes or so it ran without oil. I'm thinking the last

I'll see about snapping some more pictures of the rear balancer shaft hole "porting" I did tomorrow. I'd also suggest the crankcase vent porting be done. I once again don't have a "before" picture, but it's got a decent sized lip where the pressed 90 degree tube meets the balancer cover plate. Also worth making the gasket quite a bit larger. My cometic and stock one was small versus the true diameter of the vent. Every little bit matters.

Link | Top | Bottom

danmin


danmin's Gravatar

Location: Granbury, Texas

Joined: 03/19/25

Posts: 202

RE: Engine Build + RCC Ultimate Build Gallery
07/11/25 9:56 PM

July 11th, 2025

Ended up getting busy with work and ate too much food to cross everything out. Not to mention I broke a coolant pipe.. My buddy had one at his shop about an hour and a half away. Decided since be was already there I'd head out and grab it for hopefully a reasonable price. I got a couple things done to it still. I ended up working like 11 hours today which put the biggest damper on stuff.

Finished Stuff:
-Loctite & Proseal on any bolt I can access, torquing it to spec, drawing on bolt head with paint marker. Until no bolts remain
-Double check balancer position on crank
-Reinstall rear balancer
-Install new injector harness
-Reinstall thermostat housing (this is what broke)
-Reinstall fuel lines
-Reinstall frame brace and route electrics

Found my rear balancer was 90-120 degrees out of alignment. that falls on me 100% for not triple checking that. I'm thinking I had it aligned and the removed the crank and didn't install it the same way, then aligned the front balancer believing the rear was aligned.
Fixed now.
I'm thinking this also contributed to some of the vibrations experienced. I think it's a good thing all this happened, otherwise that wouldn't have ever been addressed. Setting the balancers is one of those simple things that can be overlooked. it's basically- "look for marking on balancer. look for marking on crank gear. put them together. done."

I'm going to get a shipment of a bunch of Castrol Actevo 10W-40 oil. I've used it before and it was good. Oil analysis says it's nothing special but I can get it for less than Rotella T6 on Amazon. 3 1-gallon jugs for $60. Versus Amsoil is about $90 for 4 quarts + 1 quart shipped.

Link | Top | Bottom

danmin


danmin's Gravatar

Location: Granbury, Texas

Joined: 03/19/25

Posts: 202

RE: Engine Build + RCC Ultimate Build Gallery
07/11/25 10:04 PM

Rear balancer shaft seat. Not pretty around it. That's the starvation damage I mentioned. Inside of the hole has a distinct line that isn't reflective. It's where i took a dremel and made that part as flat as possible after it was "oval-ed" or whatever the official term is. balancer fits good.


This is the coolant piece that broke.

Link | Top | Bottom

danmin


danmin's Gravatar

Location: Granbury, Texas

Joined: 03/19/25

Posts: 202

RE: Engine Build + RCC Ultimate Build Gallery
07/11/25 10:28 PM

Video of the Balancer shaft coming out. Wish it was in better quality.

https://youtube.com/shorts/cJiBcIr47Xs?si=LS0ZdWWyfN52KyWC


* Last updated by: danmin on 7/12/2025 @ 1:48 AM *

Link | Top | Bottom

Rook


Rook's Gravatar

Joined: 03/28/09

Posts: 21271

RE: Engine Build + RCC Ultimate Build Gallery
07/12/25 10:33 AM

Rear Balancer exposed:

OK...so that's where that little sucker is. That's one part I wanted to delete on my gen1. They make a dummy you put in in it's place. Saves a little weight, picks up a little hp. If I recall, I was told I would need to tear the engine down to get at it but looks like NOT from your video.

-Double check balancer position on crank

So we have balancer lobes on the crank and then also that rear balancer shaft to lower vibes more, is that how it is?

-Reinstall thermostat housing (this is what broke)

After I crashed my gen1 I noticed there was a coolant leak and it seemed to be coming from the area of the thermostat. The crankcase cover had a hole in it so the bike hasn't run since but there was a drip from the thermostat area for months as the bike sat. Pretty hard for anything to poke in there and break the thermostat housing, I think it's more probable that it's a very fragile part. What would your rear balancer popping out have to do with the thermostat housing breaking. Nothing. If I ever get that old Gen1 engine to run again, I'm more optimistic it's just a replacement of the thermostat that will be required. That's what I thought it was ever since I detected the leak. Thanks, Dan.


-Reinstall frame brace and route electrics

I left that LH frame rail off my Gen1. Might brace the air box/frame arch over the engine but I have a hunch it's mainly a place to fasten the clutch line and main wiring harness. I think there might have been a fairing fastener there as well. I put in an aftermarket line for the clutch and a P-clip for the main wiring harness. Never had any indication of a problem from lack of frame strength. I also deleted the tail frame braces which are of the same material as the LH side frame brace. If you don't carry weight on the tail, you don't need those. Makes the bike look cooler too. The big, wide side frame rails support the riders weight. Thought about lightening holing those too. ...not on the brand new bike though, not for a while. With the turbo, I might leave the LH frame rail in place. ...but the turbo weighs a bit less than your stock exhaust so probably it's just fine to leave the rail off the bike. You do what you want though, weight loss matters a whole lot less when you go turbo, you want structural strength now.


I'm going to get a shipment of a bunch of Castrol Actevo 10W-40 oil. I've used it before and it was good. Oil analysis says it's nothing special but I can get it for less than Rotella T6 on Amazon. 3 1-gallon jugs for $60. Versus Amsoil is about $90 for 4 quarts + 1 quart shipped.

Just my opinion but changing the oil more often has benefits that using super high quality oil for the duration lacks. I've used Rotella and changed every 2500 miles. No way I'd be changing Amsoil that often.


This is the coolant piece that broke.

Yup, that's her.


Video of the Balancer shaft coming out. Wish it was in better quality.
https://youtube.com/shorts/cJiBcIr47Xs?si=LS0ZdWWyfN52KyWC

That's good enough quality. LOL Holy shit, just flew out of the side! I see it in both the full view and the closeup.

Yeah, I think it was a good thing that happened on the dyno. You have to find everything that could shake loose and lock it down. There should be some literary source that already tells you that. Looks like you're the one writing it. It's assumed the mechanic has enough knowledge to not require every single detail but the avocational mechanic needs all of this so once again, I thank you Dan.


08 MIDNIGHT SAPPHIRE BLUE ZX-14 Now Deceased, will be resurected 2024 ZX-14R bran friggin NEW!

Link | Top | Bottom

danmin


danmin's Gravatar

Location: Granbury, Texas

Joined: 03/19/25

Posts: 202

RE&#x3a&#x3b; Engine Build &#x2b&#x3b; RCC Ultimate Build Gallery
07/12/25 11:37 AM

Rook: So we have balancer lobes on the crank and then also that rear balancer shaft to lower vibes more, is that how it is?

Right. Counterweights on the crankshaft to balance it. And balancers driven off of the crankshaft to dampen secondary harmonics of an inline-4.

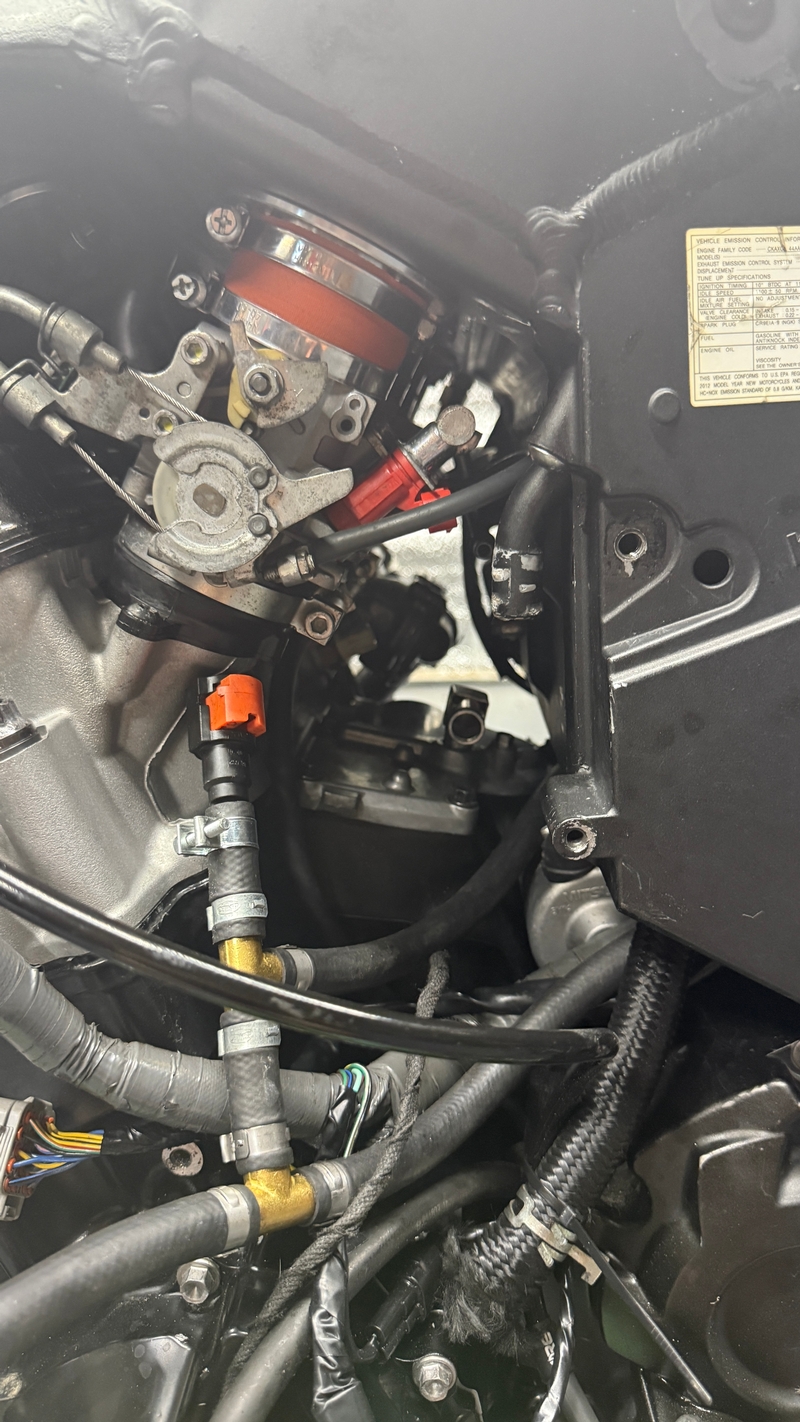
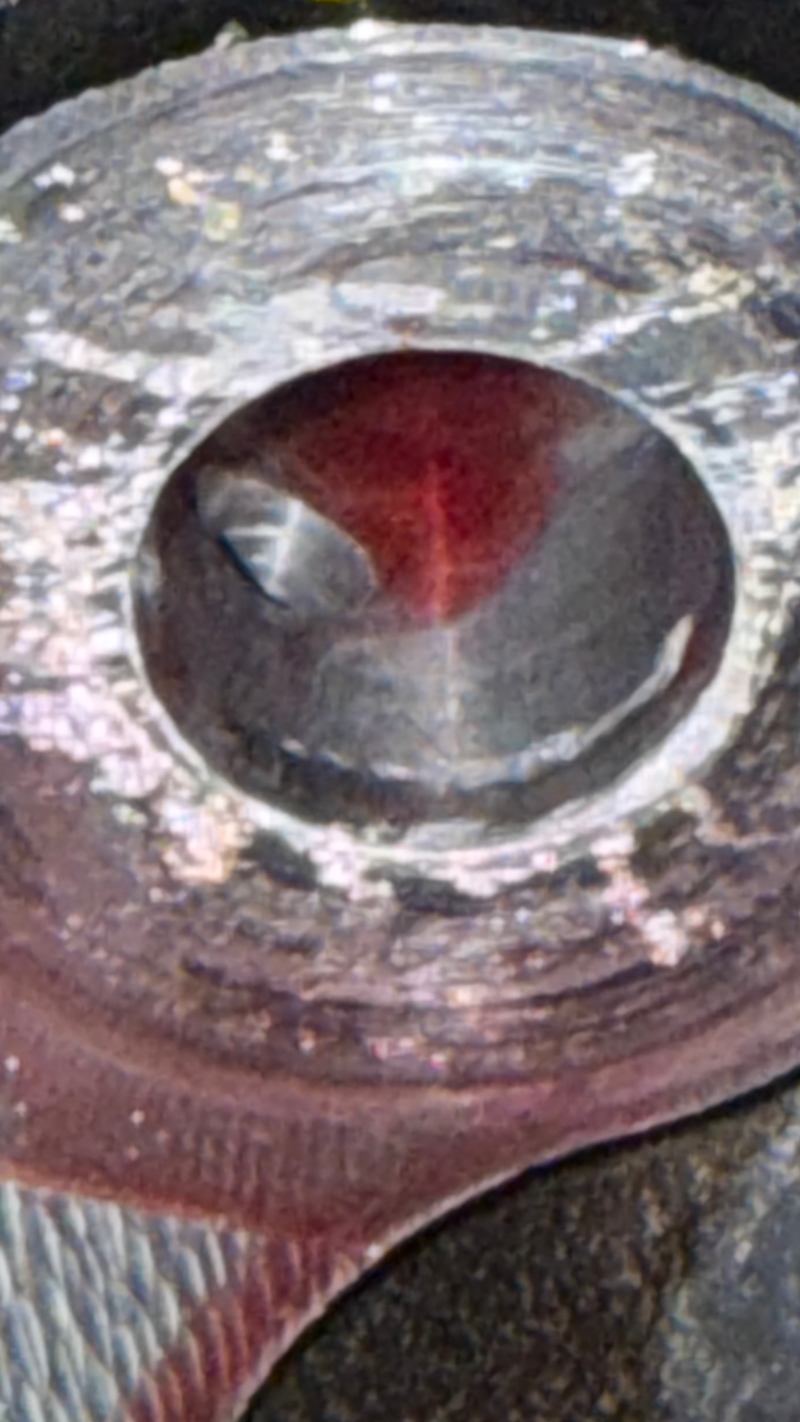
Rook: would your rear balancer popping out have to do with the thermostat housing breaking

No, thats from the thermostat being misaligned inside of the housing before I tried to tighten it down. Causing it to crack. It took a couple tries but the thermostat eventually went into the little groove it needs to be in and the housing went together perfectly.

Rook: If I ever get that old Gen1 engine to run again, I'm more optimistic it's just a replacement of the thermostat that will be required. That's what I thought it was ever since I detected the leak.

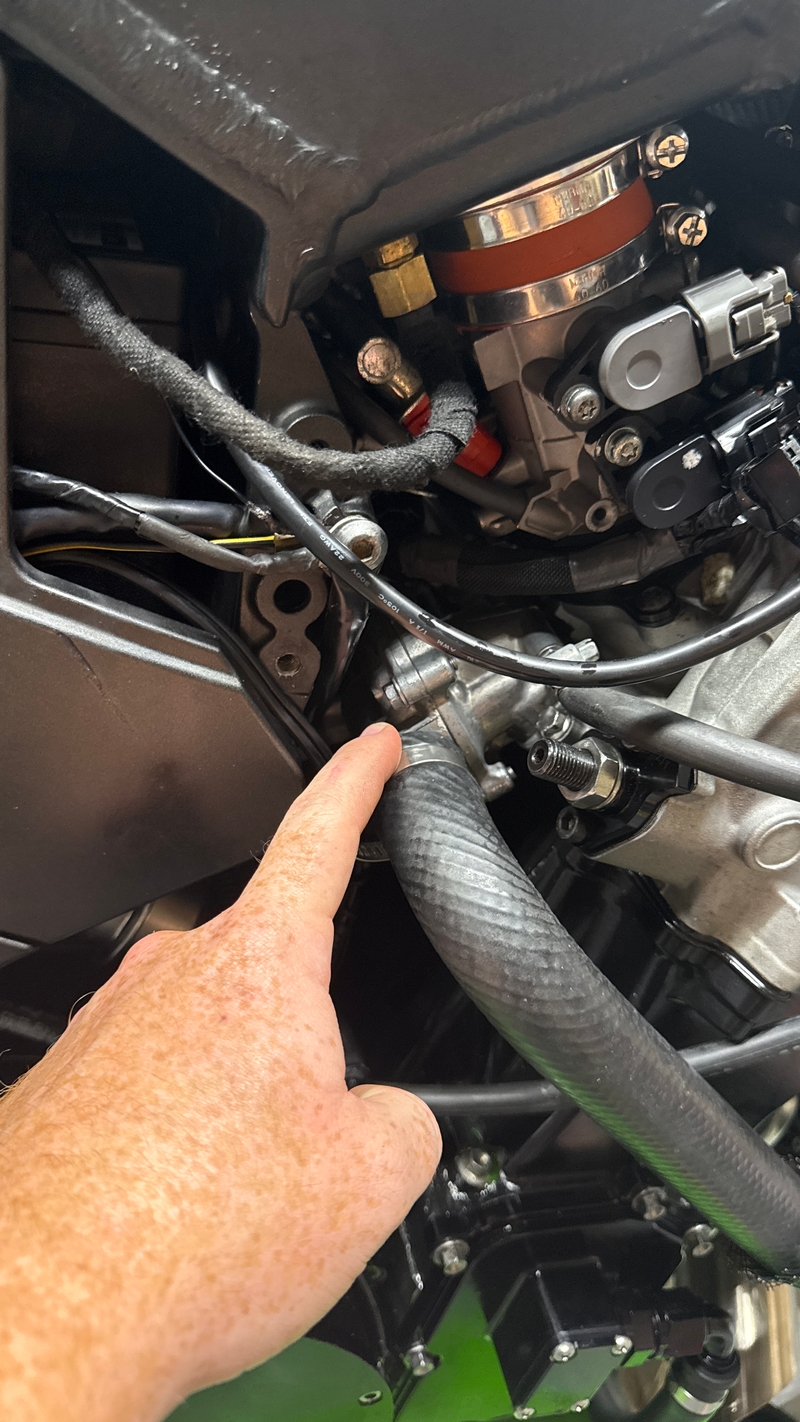
My buddy has a high compression built Gen 1 motor that made 240 (I think) on e85. Engine is good. Just needs a buyer.... Not sure if that is the cause of your leak or not. If anything couldve hit it- I bet thats where its leaking from. there are also two small hoses that run through it. the one that you cant see might be splitting at the end.


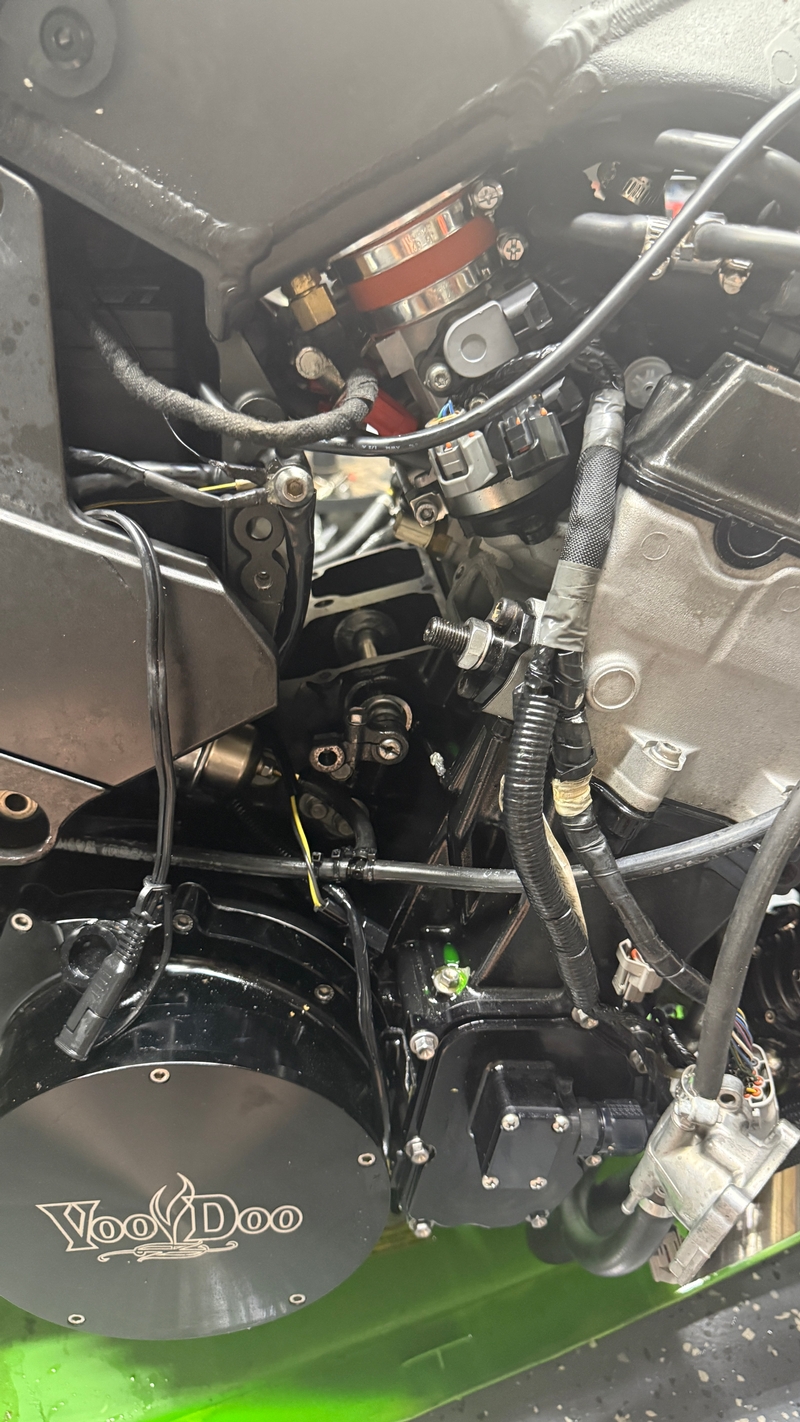
Rook: I left that LH frame rail off my Gen1. Might brace the air box/frame arch over the engine but I have a hunch it's mainly a place to fasten the clutch line and main wiring harness.

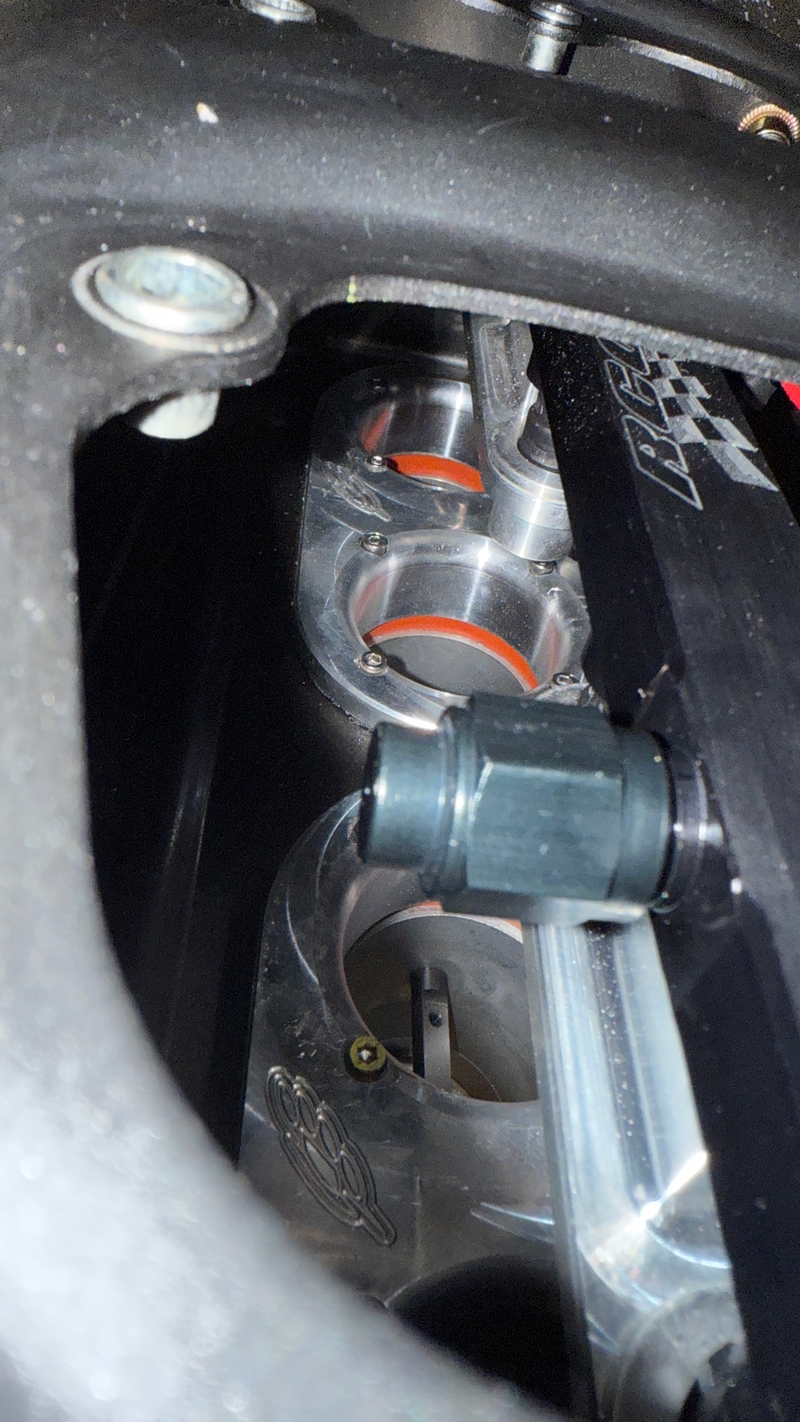
Yeah I dont thing it really adds much, but I'll take what I can get. I have my wiring harness routed sorta weird due to the intercooler being in the way of where the harness used to go. if the intercooler was on the other side it might not be an issue, oh well. I've got the CoreMoto clutch line as well. I am just using the bar to keep any wiring harnesses or lines from getting in the way of the throttle on the side of the throttle bodies. My stock clutch cable would rub on it and cause it to lock up or just give me a lot of resistance. not anymore.


Rook: Just my opinion but changing the oil more often has benefits that using super high quality oil for the duration lacks. I've used Rotella and changed every 2500 miles. No way I'd be changing Amsoil that often.

I believe Amsoil is the best oil on the market, next to Maxima oils. But I dont see myself buying it anytime soon. I do an oil change maybe 1 a month or every 3 weeks. At least when I was riding a lot. The nicer oils didnt seem to change much performance-wise. When I used Rotella on my Z1000 it made shifts feel terrible. But when I used this stuff it was better. The zx14r was a Rotella bike for the 8-10k I put on it. I do changes every 3k as well. Sometimes sooner if I was really really ragging on it. I shelled out $75 for some Maxima oil and it was nice, but I dont really think It added a lot from the rider's perspective. Additionally I always change the oil filter. Maybe twice ever have I reused a filter. That part never made sense to me. The filter is gonna have some nasty crap in it. Yeah you can keep using it since its not clogged, but what if it does get clogged or you rip the media. boom. engine full of crap. cheap insurance for an extra couple bucks a change.

This Castrol Stuff is good. The Actevo has all the same ingredients as their flagship Power 1 or whatever its called minus a few PPM of calcium or something. Rotella never did me wrong. I've just been hearing mixed reviews about foaming at high RPM, plus this was cheaper. I run Rotella T6 in my Audi Diesel which is about to pass 200k miles. That thing regularly sees about 40 PSI of boost and it still runs like a champ. Oil from that always comes out full of soot, but never any flakes ever. But it also has a redline of 4600 RPM.

Rook: That's good enough quality. LOL Holy shit, just flew out of the side! I see it in both the full view and the closeup.

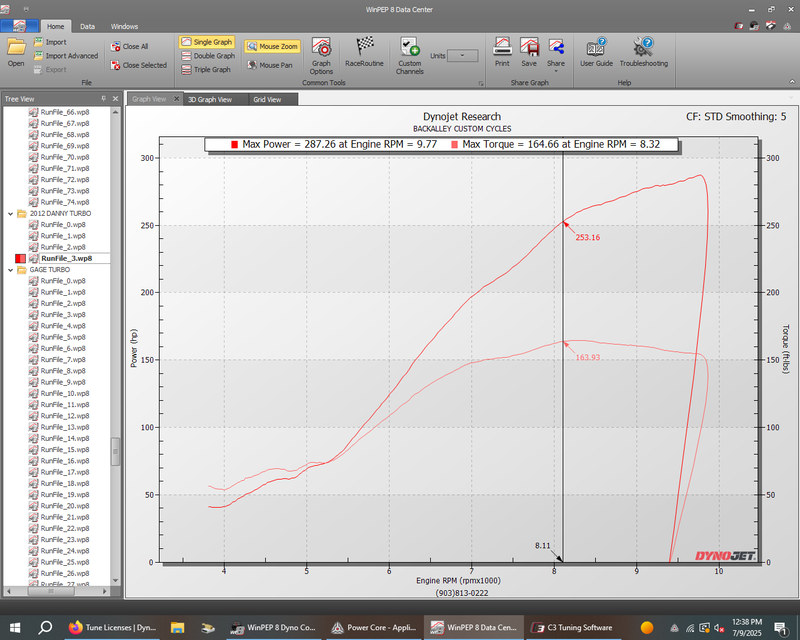
Yeah that sucker really flew out of there. I wish I could post it in the quality I saw the video in the first time. I think sending it around and uploading it reduced the quality. It was a steady unwinding of the bolt as RPMs went up. It never got faster or slower. One of the other dyno videos I posted is in good enough wuality you can sorta see the bolt unwinding. I am thinking I mightve missed those bolts when I got out the torque wrench, or the torque value I set them at was wrong. They are 18 ft/lbs which is pretty tight, especially now that they have a thick coating of ProSeal. Who knows. If it starts up good tonight. I'll book the next dyno session.


Some notes are that the bike has got some bad gas I think. I pulled all the plugs and they are all equally ashy. Sign of burning a fluid or bad fuel. And since the exhaust is pointing right in front of everyone, I am thinking we wouldve noticed any kind of smoke exiting it and paused everything. No weird smells either. So bad gas. I filled up at a Conoco station. I will go to a Shell next and get their famous V-Power fuel. See if that resolves the ashy plugs.

I also got a stock fuel pump to try and re-drill for the turbo. The fuel gauge doesnt like the resistor. It just always says full and ignores the fuel level sensor reading. The old setup with the ugly soldering would read correctly for 90 seconds then flash empty, which is livable, but not ideal. Going to try and redo RCC's instructions of the fuel pump modification sometime soon. After dyno day and all other issues are worked out. A fuel gauge isnt a big deal right now.


* Last updated by: danmin on 7/12/2025 @ 11:41 AM *

Link | Top | Bottom

danmin


danmin's Gravatar

Location: Granbury, Texas

Joined: 03/19/25

Posts: 202

RE: Engine Build + RCC Ultimate Build Gallery
07/12/25 2:18 PM

July 12th, 2025

Bike starts right up. Feels much smoother now. That rear balancer was definitely causing some vibrations. I might do a little adjusting to the front balancer now to see if the lash on that will improve the remaining vibrations. Feels about stock. Not perfect at idle, has a little lope to it and usual vibrations. Nothing crazy. Should be good on the dyno after a lap around town to make sure nothing ejects again.


Done so far today:
-Remade boost lines since I am no longer using boost controller.
-Capped wastegate head nipple since its not being used anymore (will result in slightly more boost)
-Getting ready to mount new boost controller (old one broke when I made 26 PSI since it only goes 0-20 PSI)
-Installed replacement thermostat housing half
-Added some coolant to bike
-Added 5 Quarts of oil to bike (Castrol Actevo)
-Got the best Fram filter I could get from Walmart (K&N coming from Amazon soon, then I am ordering NAPA Gold Filters for all future oil changes)


To Do:
-Install new boost gauge (maybe this time with a light installed in it)
-Raise bike suspension one hole in the rear and maybe an inch in the front
-Bleed clutch of any air bubbles
-Solder Microtech to Tach wire
-Identify why KTRC and Power Mode lights are flashing again....
-Install GoldPlug.com oil drain plug (once received in mail)


* Last updated by: danmin on 7/12/2025 @ 2:19 PM *

Link | Top | Bottom

danmin


danmin's Gravatar

Location: Granbury, Texas

Joined: 03/19/25

Posts: 202

RE: Engine Build + RCC Ultimate Build Gallery
07/12/25 5:35 PM

Finished the following:
-Install new boost gauge
-Bleed clutch of any air bubbles (MC had a lot of bubbles in it. There was a high spot in the line that was collecting air bubbles that never made it through the MC as well)
-Identify why KTRC and Power Mode lights are flashing again (MAP Sensor was not plugged in)
-Installed new throttle cables
-Installed new Domino grips
-Installed new throttle tube thing.

To Do:
-Raise bike suspension one hole in the rear and maybe an inch in the front
-Solder Microtech to Tach wire
-Install GoldPlug.com oil drain plug (once received in mail)

Handles feel much better than the big fat aluminum handles I used to have. It ran smoother and revved a little faster. Maybe placebo. Maybe the tune. Maybe the Balancer being correctly set. Maybe the oil. Maybe magic. Tuner was willing to get me in this upcoming week, and still are..... BUT I have a leaking rear balancer seal. Which can be expected. since it was pretty tore up and the internal spring that is apart of the seal had been blown out during the ejection. I was just hoping for the seal to hold up. Its not even a leak that could be RTV'd until after dyno day. Its a pretty decent amount of oil pouring out. Ordered 2 seals. We'll have a race and see which one makes it here first. Ideally before Tuesday, Wednesday, Thursday. Since those are the only days that the tuner works...


* Last updated by: danmin on 7/12/2025 @ 6:35 PM *

Link | Top | Bottom

danmin


danmin's Gravatar

Location: Granbury, Texas

Joined: 03/19/25

Posts: 202

RE: Engine Build + RCC Ultimate Build Gallery
07/12/25 6:31 PM

Ordered the following:

EBay: Kawasaki SEAL - OIL 92049-2204
PartZilla: 92049-2204 SEAL-OIL (Kawasaki) $2.75
Amazon: uxcell Oil Seal 12mm Inner Dia 22mm OD 7mm Thick Fluorine Rubber Double Lip Seals 2Pcs

Amazon Part is identical to Kawi part but is Viton rubber which is the same thing my upgraded valve seals are. Higher grade rubber that can handle heat. Also the 2-pack is $8 and has 2 day shipping. OEM part is Nitrile rubber ( I believe) and has a long wait on shipping. I guess we'll see if it fits and seals. I'd prefer Viton to Nitrile.

Official seal dimensions are 12x22x7. 12mm I.D. 22mm O.D. 7mm depth

Kawasaki Part:

Amazon Part:

Link | Top | Bottom


Welcome to zx14ninjaform.com!
 
New Topic Reply
Next Page

Page: 1 2 3 4 5 6 7 8 9 10 11

Previous Page

New Post

Please login to post a response.